Do you plan to move your blog from WordPress.com to a self-hosted website that you can get from WordPress.org?
For many users, this is a good choice.
Did you know that WordPress.com and WordPress.org are, in fact, two different platforms? Do you want to know which option is the better choice for your needs?
Let’s look at this and learn how to migrate or move your website from WordPress.com to WordPress.org.
Contents
Why should you consider migrating from WordPress.com to WordPress.org?
Are you struggling to move your blog from WordPress.com to WordPress.org, and are you wondering how to do it, right?
As you are reading this article, it means you’ve realized some of the WordPress.com limitations. Maybe you cannot install specific plugins, cannot run ads on your site, or have other issues.
What will help you now is to migrate from WordPress.com and switch to a powerful self-hosted version of WordPress.
Why should you move your free subdomain site (blog) to a self-hosted version? Before moving into details, let’s understand the key differences between both platforms. Let’s compare WordPress.org and WordPress.com first.
WordPress.com vs. WordPress.org
Definition
- WordPress.com is a hosting service that provides you with a preinstalled WordPress version limited in its features.
- WordPress.org provides the WordPress source code based version that you can install on your server or a web hosting plan.
** In the next paragraphs, we say WordPress.org whenever we mean to self-hosted websites and say WordPress.com when we mean to sites hosted by WordPress.com.*
WordPress.com Features & Limitations
The significant features and limitations of WordPress.com are
- With WordPress.com, you can’t upload custom themes and can not customize an existing theme. You are bound to a selection of themes.
- You can’t upload custom plugins on this platform. You can choose from a limited number of available plugins only.
- You have some extra built-in features that you need to install and create on WordPress.org by yourself.
- You are not allowed to publish ads on WordPress.com.
- You can’t install SEO plugins on WordPress.com, so you can’t maximize your SEO potential by using third-party tools.
- You are limited when you use a shopping system like WooCommerce, as you can not customize all aspects of WordPress.com.
WordPress.org Features & Limitations
WordPress.org provides full theme support. You can customize your theme settings and upload free or premium plugins. You can customize plugins on the self-hosted WordPress.org site.
You install this WordPress version with your chosen hosting provider, who usually also provides your domain name. However, it is also possible for another service provider to provide the domain. You are free in that decision. Sometimes it’s cheaper to have your domain hosted somewhere else, but hosting space and domain usually come in one plan to you.
For that domain name and hosting service, you usually pay a yearly or monthly fee to the hosting provider.
Some significant advantages are:
- You can make some revenue by placing ads on the WordPress.org website using a service like Google AdSense. You are the only person responsible for a self-hosted site, and you can do whatever you want on it as long as it does not violate any laws.
- You can install third-party SEO tools and plugins on WordPress.org to rank higher in Google.
- You can install and customize an online store like WooCommerce.
Requirements to Move Your Blog from WordPress.com to WordPress.org
As said above, to build a site on WordPress.org, you’ll need a WordPress hosting account and a domain name. If your WordPress.com site already has a custom domain name, you need to get a web hosting plan from a hosting provider.
Besides the hosting account, you will need login details of the WordPress.com account to move all of your posts, pages, media, comments, and other files over to the WordPress.org site.
Follow our step by step guide to learn how to move your blog from WordPress.com to a self-hosted WordPress.org version without losing content.
Most of the hosting providers offer migration services, but if you want to do it on your own, follow our step by step complete guide below.
How to Move Your Blog from WordPress.com to WordPress.org
WordPress.com users don’t have any FTP or database access in the free version (WordPress.com). We can’t migrate our website through a plugin, as WordPress.com doesn’t allow us to upload plugins. What options do we have to move our free blog to a self-hosted website? We only have the option to export pages, posts, and categories from WordPress.com and then import the data files into a new website and then redirect from our old WordPress.com site to our new WordPress.org site.
Let’s dive into the details and see how to switch from WordPress.com to WordPress.org:
- Export WordPress.com content
- Import your content to a self-hosted WordPress site
- Check your new site for any errors.
- Redirect your WordPress.com blog to your WordPress.org site
Step 1: Export WordPress.com content
Before moving your existing content and media files to your new site, you need to export posts, pages, categories, etc., from WordPress.com.
First, log into your WordPress.com blog and click on the WP Admin section.
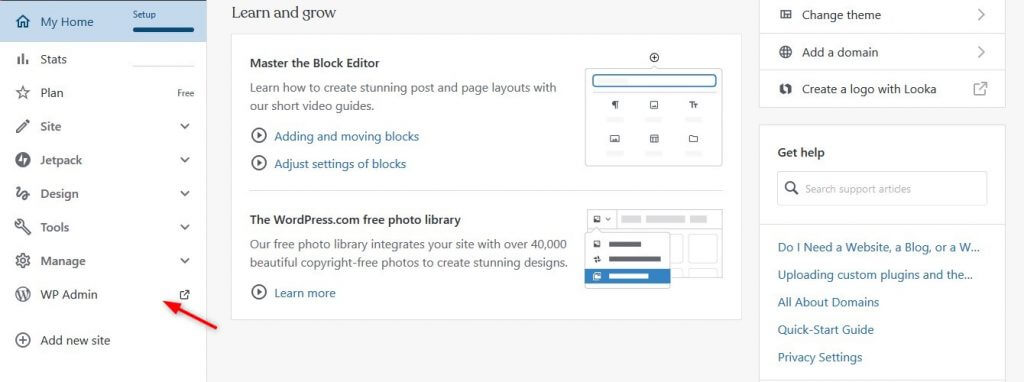
On the left, in the dashboard sidebar, click on Tools and select Export.
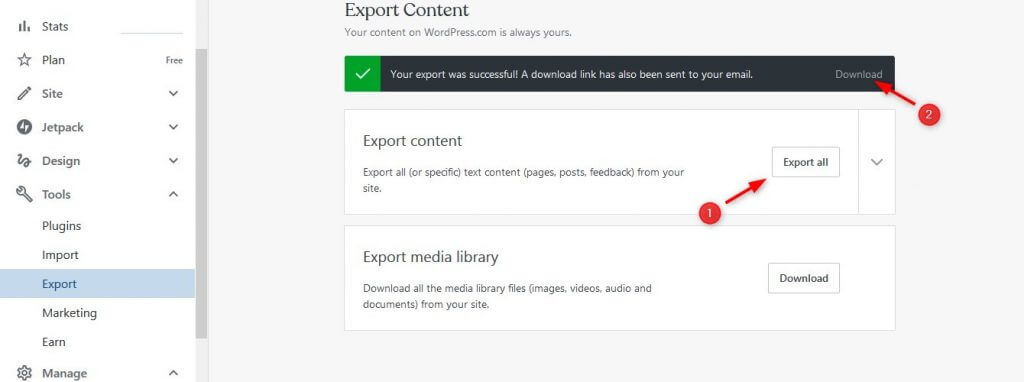
If you want to export all pages, posts, and categories, press the Export all button. Wait for some time, and you’ll see the message "Your export was successful!" and a download link that will contain a .zip file that includes all posts, pages, media files, navigation menus, and more. Remember the file location, as you’re going to use this file to import content in your new self-hosted site.
To import content to your new website, you have to unzip the downloaded file and import each .xml file separately.
Step 2: Import your content to the new WordPress site
To import data to your new website, you need to have WordPress installed on your new site to continue moving the blog. Most hosting providers come with an easy 1-click installation that allows you to install WordPress at a glance.
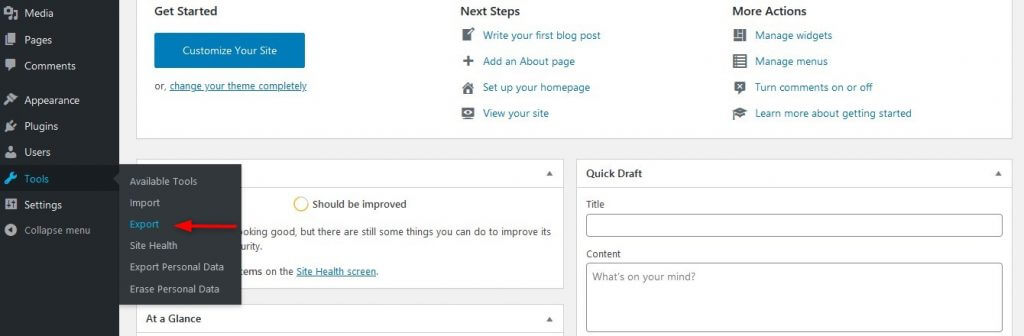
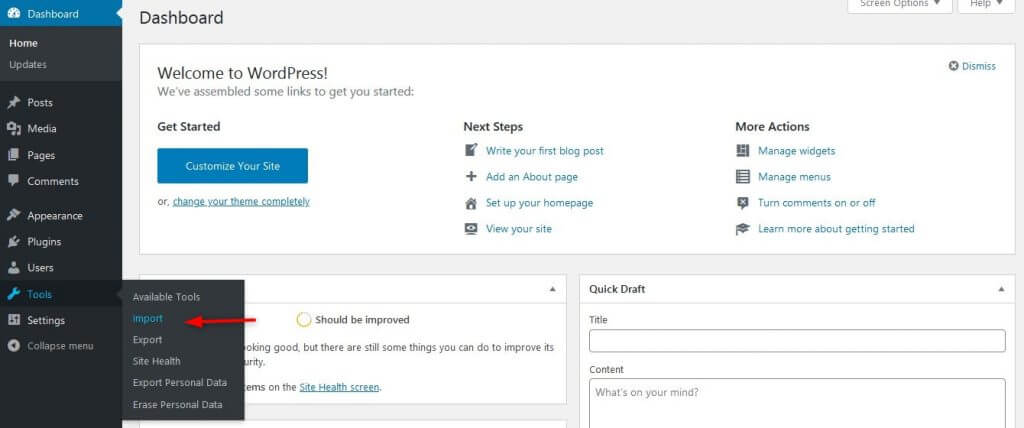
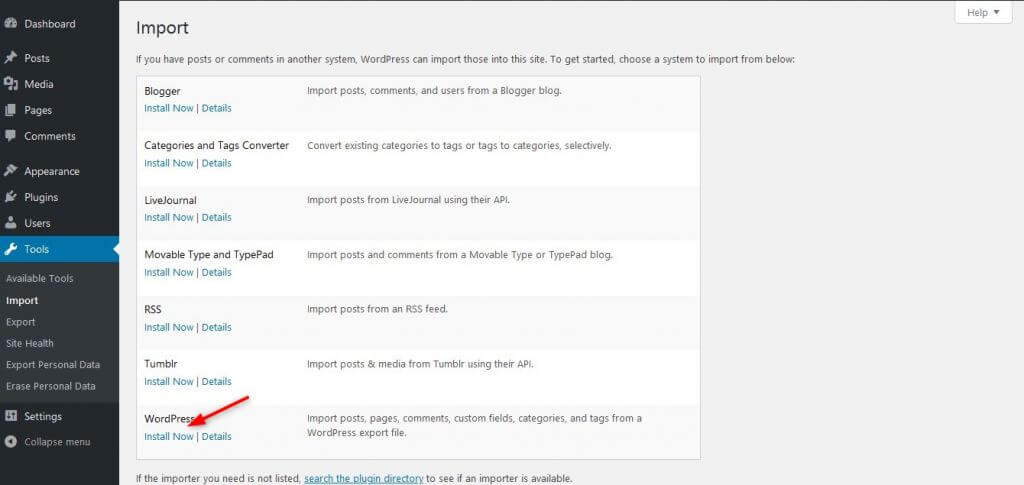
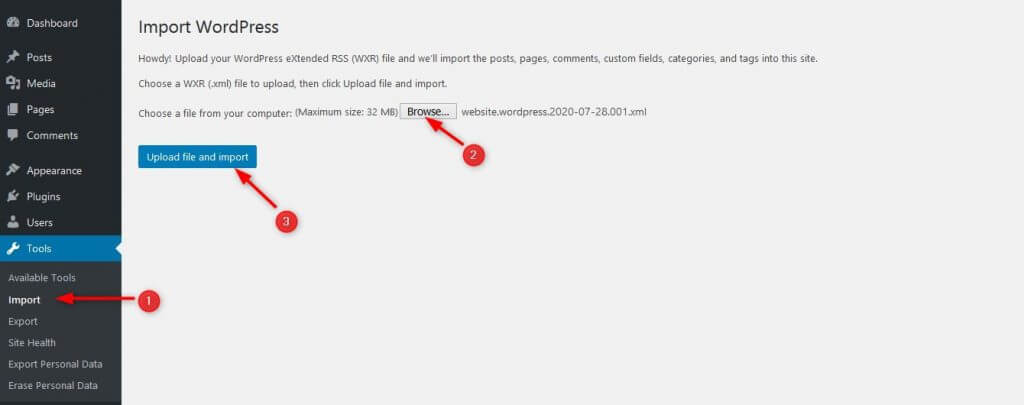
Log into the dashboard of your new WordPress site by going to example.com/wp-admin. Then head over to Tools again and click on Import.
A new page will appear where you’ll install the official import plugin for WordPress. Scroll to the bottom and click on the Install Now link.
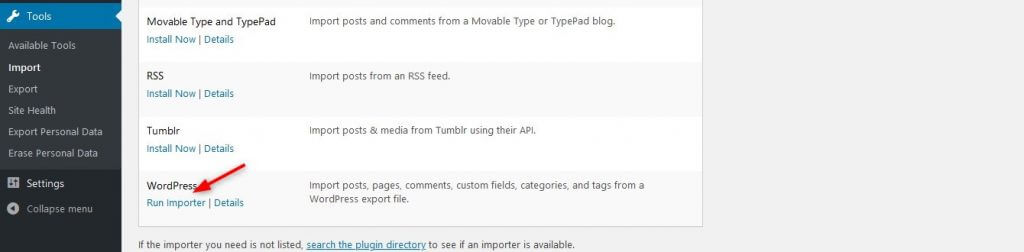
WordPress will start installing the plugin without requiring you to leave the page. After installing the plugin, the same link changes to Run Importer. Click on it to continue.
On the next page, you’ll be prompted to upload the file that you’ve already downloaded in Step 1. Click on Choose File and then select the .xml file. Then click on the Upload file and import button. WordPress will import your data (old posts & pages) from your local system in your new site.
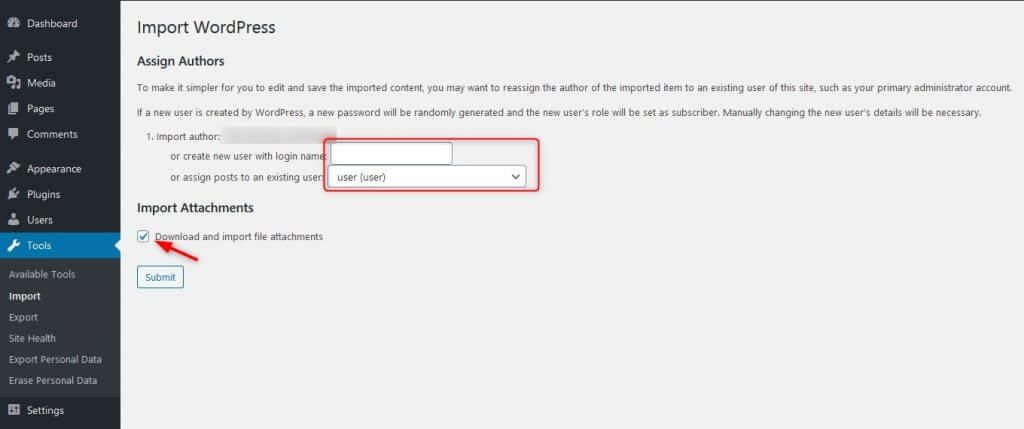
Next, you’ll see two options (Import author & Import attachments), as shown in the screenshot below. WordPress allows you to choose which author you want to assign free blog posts.
Either create a new user profile and assign all the imported posts to an original author or assign the posts to an existing author profile.
Don’t forget to check the box Download and import file attachments to keep your posts from breaking. This also helps with importing all media files from the WordPress.com site.
Click Submit, and WordPress will move everything from your old site. Importing data to a new website might take some time, depending on the size of your site. Once it’s done, you’ll see an "import succeeded" message.
Step 3: Check your new hosted site for any errors
Follow all the instructions to avoid any errors. The posts and pages will appear the same. However, it’s necessary to double-check your site to confirm that content and images have been imported successfully. To import your old photos, you can also use the free "Auto Upload Images" plugin.
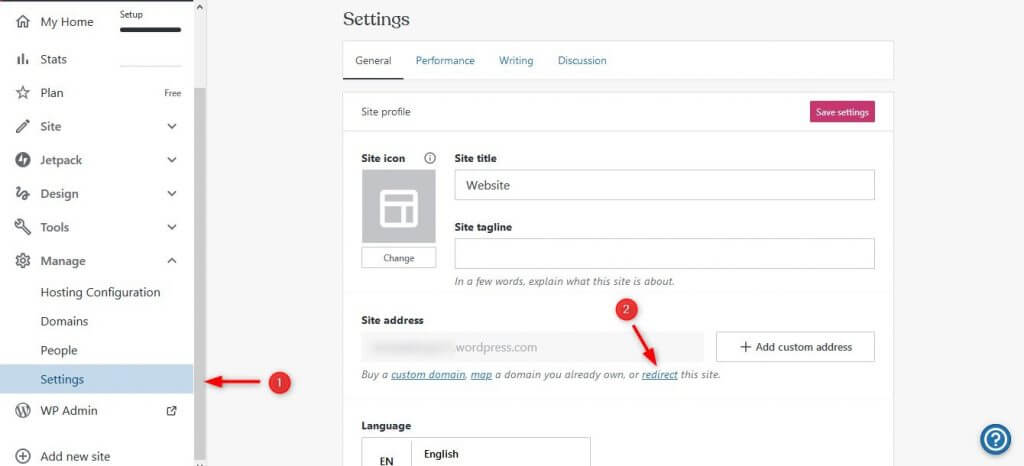
Step 4: Redirect the old WordPress.com site to the WordPress.org Site (or make Private)
Once you’re done importing your content, the next step is to redirect your WordPress.com site to your new self-hosted site. That is to ensure that you maintain your search engine rankings and that if any user clicks on your old site, it will send people to your new website.
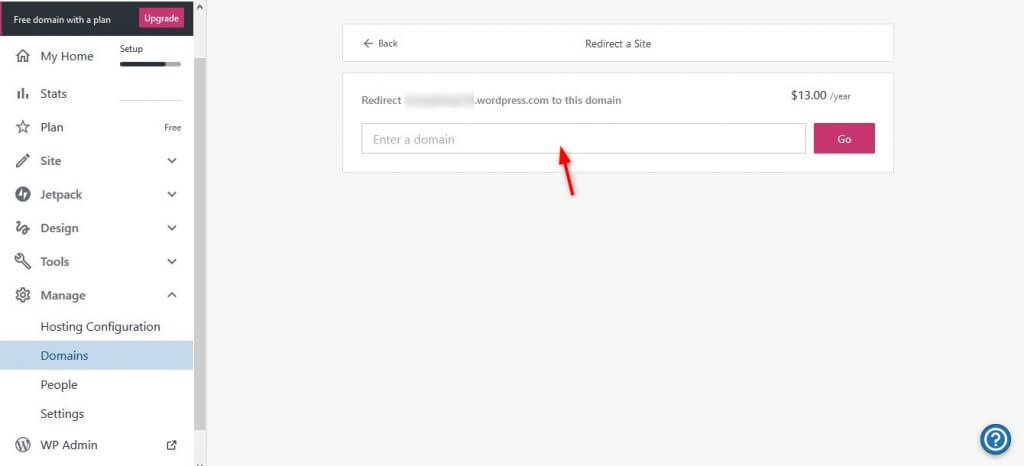
Go to the WordPress.com "Redirect a Site" page.
Enter your new domain name in the given box, click Go, and handle the payment. WordPress will charge a nominal fee for this service.
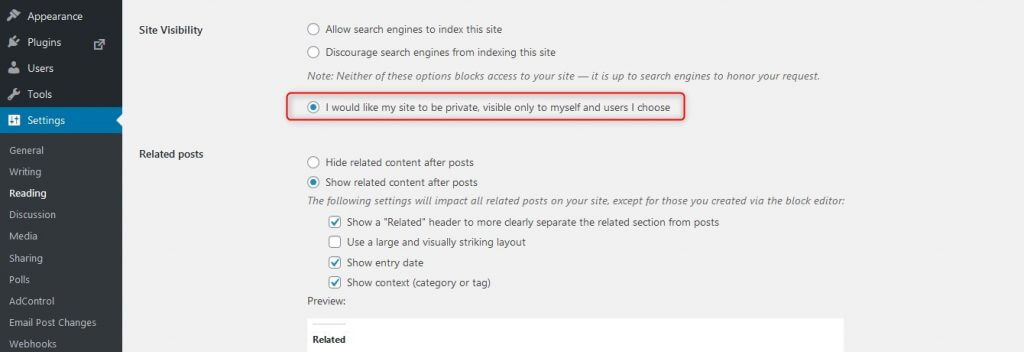
However, if you don’t want to spend this amount, it is recommended to set your old site as private to avoid similar content on two blogs or delete it entirely later.
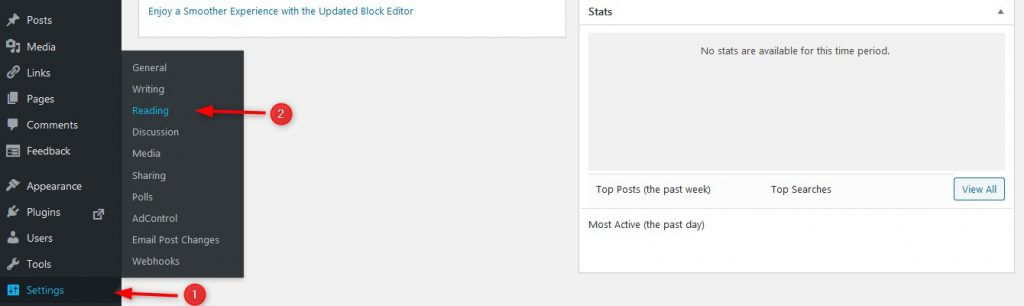
How to Make Your Old Site Private
- Go to the WP Admin for your WordPress.com site.
- Go to Settings, then to Reading, and check the box that says, "I would like my site to be private only to myself and users I choose."
Conclusion
Migrating your blog from WordPress.com to WordPress.org is often the right choice as WordPress.org gives you complete freedom to control all its features. The installation and customization of plugins and themes, as well as the endless possibilities of what you can do on your website.
If you are looking for step-by-step instructions on how to move your website to a new host, click here.
Subscribe to our YouTube Channel for more WordPress video tutorials and connect with us on Twitter and Facebook.