TL;DR: Download wp-staging-pro.zip from your purchase email (or from your account page), upload it via Plugins → Add New → Upload Plugin, click Activate, then paste your license key at WP Staging → License. The entire process takes under five minutes on a standard WordPress hosting account.
WP Staging Pro installs directly on your live production site. It runs alongside the free WP STAGING plugin — if the free version is not yet installed, WordPress will install it automatically when Pro activates. All staging sites previously created with the free version are preserved and immediately accessible after upgrading to Pro.
This guide walks through every step: confirming prerequisites, downloading the plugin ZIP, uploading and activating it, entering your license key, and keeping the plugin up to date. A troubleshooting section at the end covers the three most common activation failures seen in WP STAGING support tickets.
Contents
Prerequisites
Before starting, confirm these requirements are met on your production site:
| Requirement | Detail |
|---|---|
| WordPress version | 5.0 or later |
| PHP version | 7.4 or higher |
| User role | Site administrator with access to Plugins → Add New |
| License key | Visible in your purchase confirmation email and on your account page |
For the full list of WordPress server requirements, see wordpress.org/about/requirements. For WP Staging Pro version history and any minimum-version notes, see the WP Staging Pro changelog.
Upgrading from the free WP STAGING plugin: you do not need to uninstall the free version first. WP Staging Pro detects it and deactivates it automatically on activation. All earlier staging sites remain intact.
Step-by-Step Installation
Download the Plugin
After purchasing WP Staging Pro, you will receive a confirmation email with a direct download link for wp-staging-pro.zip.
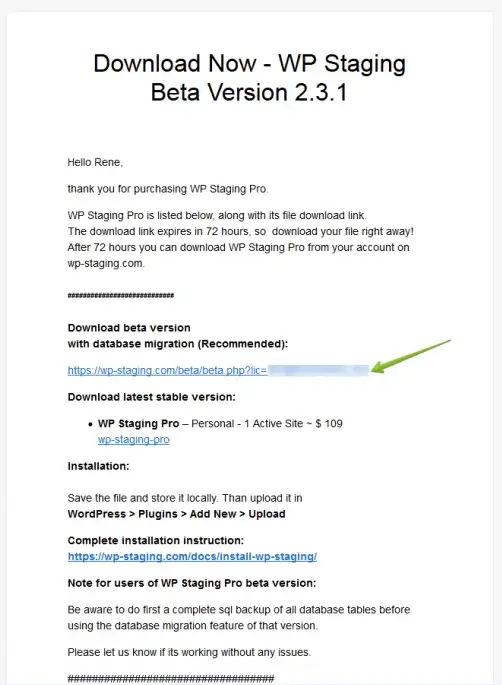
You can also download the latest release at any time from your WP STAGING account page. A full log of every release is available in the WP Staging Pro changelog.
Apple Safari Users: If you are using Safari, it’s trickier to get the raw zip file. The Apple Safari browser extracts zip files immediately after downloading them. Instead of downloading a zip file, it extracts it directly and only opens a folder labeled wp-staging-pro.
One way to fix that is to use Firefox or Google Chrome or to tell Apple Safari just to download the .zip file and leave it on you to decide what to do:
- Open Safari
- Click Preferences
- Under the General tab, uncheck the option Open “safe” files after downloading.
Save wp-staging-pro.zip to your computer. Do not open, extract, rename, or double-click the file before uploading. WordPress unpacks the raw .zip archive itself during the upload step — an already-extracted folder will not be accepted.
Upload and Activate the Plugin
- Log in to your WordPress admin panel and go to Plugins → Add New.
- Click the Upload Plugin button near the top of the page.
- Click Choose File (the button label varies by browser) and navigate to the
wp-staging-pro.zipfile you saved in the previous step.
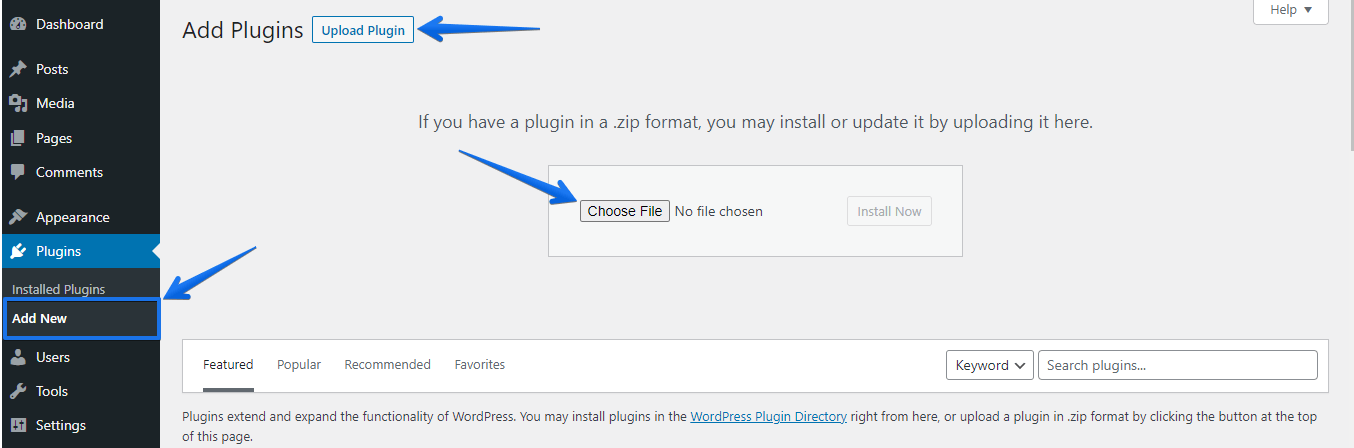
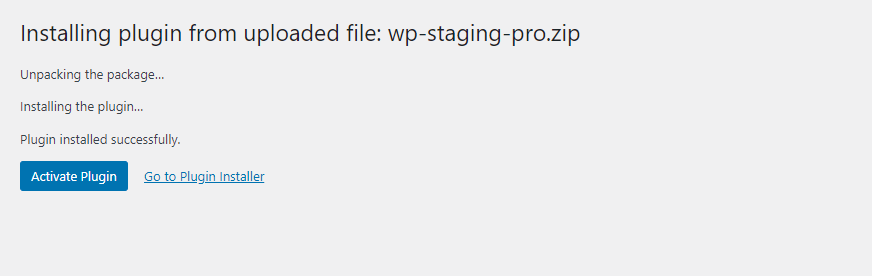
- Click Install Now. WordPress uploads and unpacks the archive.

- When the installation completes, click Activate Plugin.
Note: If the free WP STAGING plugin is currently active, it is deactivated automatically when Pro activates. All staging sites created by the free version are recognised immediately by WP Staging Pro without any manual migration step.
Activating Your License Key
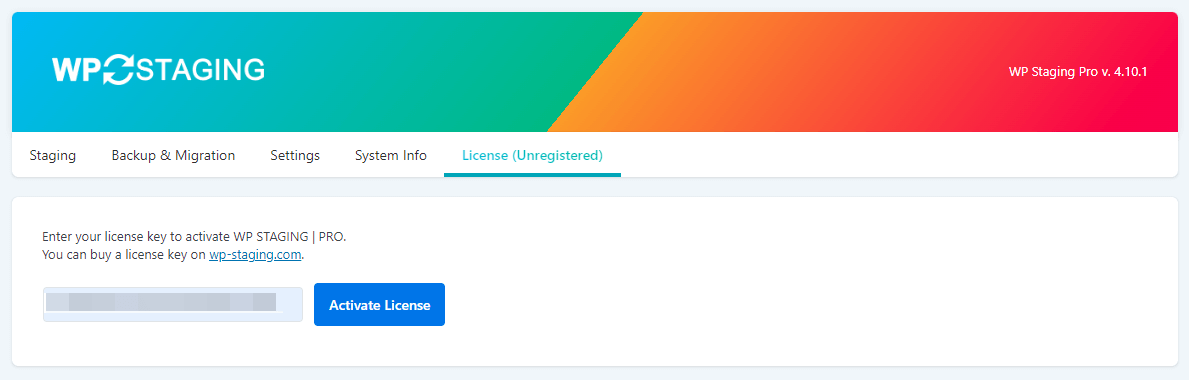
After the plugin activates, you must enter your license key to unlock all Pro features — including the push-changes-to-live workflow, backup exports, and access to automatic updates.
- In your WordPress admin, go to WP Staging → License.
- Locate the license key in your purchase confirmation email or on your WP STAGING account page.
- Paste the key into the license key field. Copy it directly from your account page to avoid hidden characters from email clients.
- Click Activate License and wait for the green confirmation message.
Please open a support ticketWe can also install the plugin for you.
To verify the plugin is fully active: after activation, go to WP Staging → Staging Sites. If the dashboard loads without a "license inactive" notice, the license is confirmed. Pro features — including push to live — will be available in the menu.
Your WP Staging Pro license is tied to a single domain. To move it to a new installation — for example after migrating to a different domain — deactivate the license on the old site first under WP Staging → License, then activate it on the new one.
Updating WP Staging Pro
Once your license is active, WP Staging Pro receives updates through the standard WordPress plugin update system. No manual ZIP re-upload is needed for routine version upgrades.
To check for and apply a pending update:
- In your WordPress admin, go to Dashboard → Updates.
- If a new WP Staging Pro version is available, it appears in the Plugins section of the updates screen.
- Check the box next to WP Staging Pro and click Update Plugins.
You can also enable automatic background updates for WP Staging Pro: in Plugins → Installed Plugins, locate WP Staging Pro in the list and click Enable auto-updates in the right-hand column. With this on, WordPress applies new releases in the background without requiring a manual check.
For auto-updates and manual update checks to work, two conditions must be met: the license key must be active and not expired, and the server must be able to reach wp-staging.com over HTTPS (port 443) to fetch the update manifest. If updates do not appear in the dashboard after activating the license, see the troubleshooting section below.
Troubleshooting Common Install Errors
From WP STAGING support tickets, the following are the three most common installation failures and how to resolve each one.
License Key Not Accepted
Symptom: After entering the license key and clicking Activate, the field resets or shows "License invalid" or "License key does not exist."
Common causes and fixes:
- Key already active on another domain. Each WP Staging Pro license activates on one production domain at a time. Log in to your account page, find the license, and click Deactivate next to the old domain. Then try activating again on the new site.
- Hidden characters from copy/paste. Email clients sometimes wrap long strings with invisible characters. Copy the key directly from your account page rather than from a forwarded email. Paste it into a plain-text editor first to strip any hidden formatting, then copy again and paste into the license field.
- Outbound HTTPS blocked by the server firewall. WP STAGING contacts its license server at
wp-staging.comto verify the key. If your host blocks outbound connections to external domains, the activation request fails silently with no error message. Contact your hosting provider and ask them to allow outbound port 443 towp-staging.com.
Plugin Auto-Update Fails After Activation
Symptom: The license activates successfully, but WP Staging Pro does not appear in the WordPress updates list, or clicking Update returns a download or connection error.
Common causes and fixes:
- License subscription expired. Update access is tied to an active support subscription. Check the expiry date in your account. Renewing the subscription restores update access immediately.
- Stale WordPress update cache. WordPress caches update metadata as a transient and only refreshes it periodically. Force a refresh by going to Dashboard → Updates and clicking Check Again, or delete the
update_pluginstransient directly using a plugin such as WP Crontrol. - Server SSL certificate issue. PHP’s cURL layer validates the
wp-staging.comcertificate when fetching the update manifest. An outdated root certificate bundle on the server causes the request to fail silently. Contact your hosting provider to confirm their server’s CA certificate store is up to date.
White Screen After Upload
Symptom: After uploading wp-staging-pro.zip, the WordPress admin shows a blank white page with no error message.
Common causes and fixes:
- PHP memory limit too low. Add the following line to
wp-config.php, above the line that reads/* That's all, stop editing! */:This raises the PHP memory limit available to WordPress to 256 MB. If the white screen persists after this change, check your server’sphp.ini— thememory_limitdirective there may overridewp-config.php. - Plugin conflict. Temporarily deactivate all other plugins, then activate WP Staging Pro. If it activates without errors, reactivate the remaining plugins one at a time to identify the conflicting one.
- Corrupted download. Re-download
wp-staging-pro.zipfrom your account page and repeat the upload. A partial or interrupted download produces an invalid archive that causes a PHP fatal error during extraction.