That is a lengthy general tutorial that shows how to move WordPress to a new server manually. Read this article instead if you want to automatically migrate your website using WP STAGING | PRO: How to move WordPress to another website or server.
WordPress website migration can be a daunting and stressful task, especially when you don’t know how to tackle it without complications. Some people might hire a professional to transfer their site to a new host—or look for a hosting provider that offers free migration services with their hosting package. However, if you’ve landed in this article, it means you’re looking for a step-by-step guide to migrate WordPress to a new server on your own without any fear of making a mistake and damaging your site(s).
Migrate WordPress Site to a New Server
Manual WordPress migration involves files transfer and databases and then editing the wp-config.php file. You can easily migrate WordPress files via the file manager or use an FTP client like FileZilla to download WordPress files and use the hosting control panel to transfer WordPress databases. In this article, you’ll learn how to migrate WordPress to a new server manually without any possible hurdles. If you can set up your WordPress website, you can migrate it without any help. Yes, it isn’t anything you shouldn’t be able to handle. Follow this step-by-step guide to migrate WordPress to a new server without the help of a plugin. This guide will help beginners and experienced WordPress users move their websites with no downtime in between.
Contents
- Migrate WordPress Site to a New Server
- How to Clone WordPress to a New Server – Step-by-Step Guide
- 1. Choose your New Host.
- 2. Create a Backup of Your WordPress Files.
- 3. Export the WordPress Database.
- 4. Create the WordPress Database on Your New Web Hosting.
- 5. Upload WordPress Files to New Web Host.
- 6. Edit the wp-config.php File with Your New Database Details.
- 7. Import the MySQL Database.
- 8. Update WordPress URL’s if You Move Your Website to a New Domain (Optional)
- Conclusion
- Related Articles
How to Clone WordPress to a New Server – Step-by-Step Guide
1. Choose your New Host.
Before we move forward, it’s essential to know why WordPress website migration is necessary. There may be different scenarios for WordPress users that force them to transfer their site(s). Maybe your site performance slows down due to massive traffic, or you want to switch to an affordable hosting plan or look for reliable support to resolve any issues. Whatever the reason might be, there is some risk involved in website migration, and if not handled properly, it might result in loss of data and sales. Choosing the right hosting provider is a big decision before a user goes into the website setup or migration process. Since you’re looking for better hardware, uptime, an affordable plan, and better customer support, it means you’re not satisfied with your current web host. You must purchase the new hosting plan before moving your site, as you’ll need login details from your new website to transfer your old site. Once you’re done choosing a web host, it’s time to create a backup of your website files.
2. Create a Backup of Your WordPress Files.
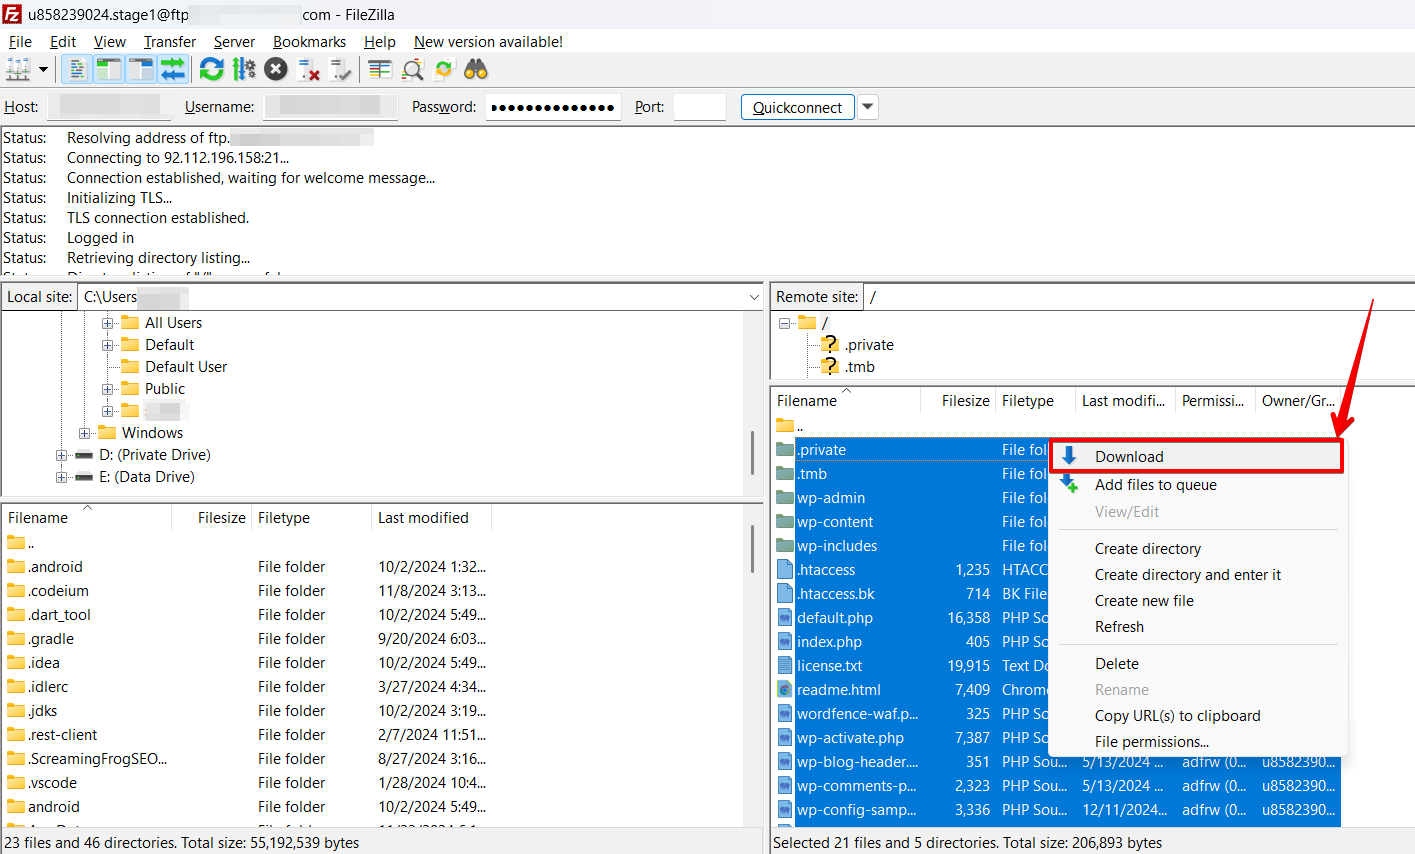
Before migrating the WordPress website, the first step is to create a complete backup of your website’s elements. That should be part of your website security and includes WordPress database backup, themes and plugins, media uploads (images/videos), and WordPress core files. So, how can you create a backup? You can create a manual backup of your WordPress files and their database; otherwise, use a third-party plugin to create a complete backup of your WordPress website. Manual backups require an (FTP) file transfer tool like FileZilla to access and download your website files. The first step is to download all WordPress files under your website’s directory to your computer. You’ll upload these files to your new hosting account later on.
- Connect FileZilla(FTP) to your old hosting server.
- Now open the public_html folder and select all the files inside it.
- Right-click, then select Download.
 In case if something goes wrong, you can restore your website files using that backup. This step may take some time, as it depends on your site’s type of media uploads; meanwhile, you can make a copy of your database.
3. Export the WordPress Database.
After downloading WordPress files, it’s time to create a backup of your MySQL database connected to your WordPress website. It is a straightforward process that only requires a few steps to complete.
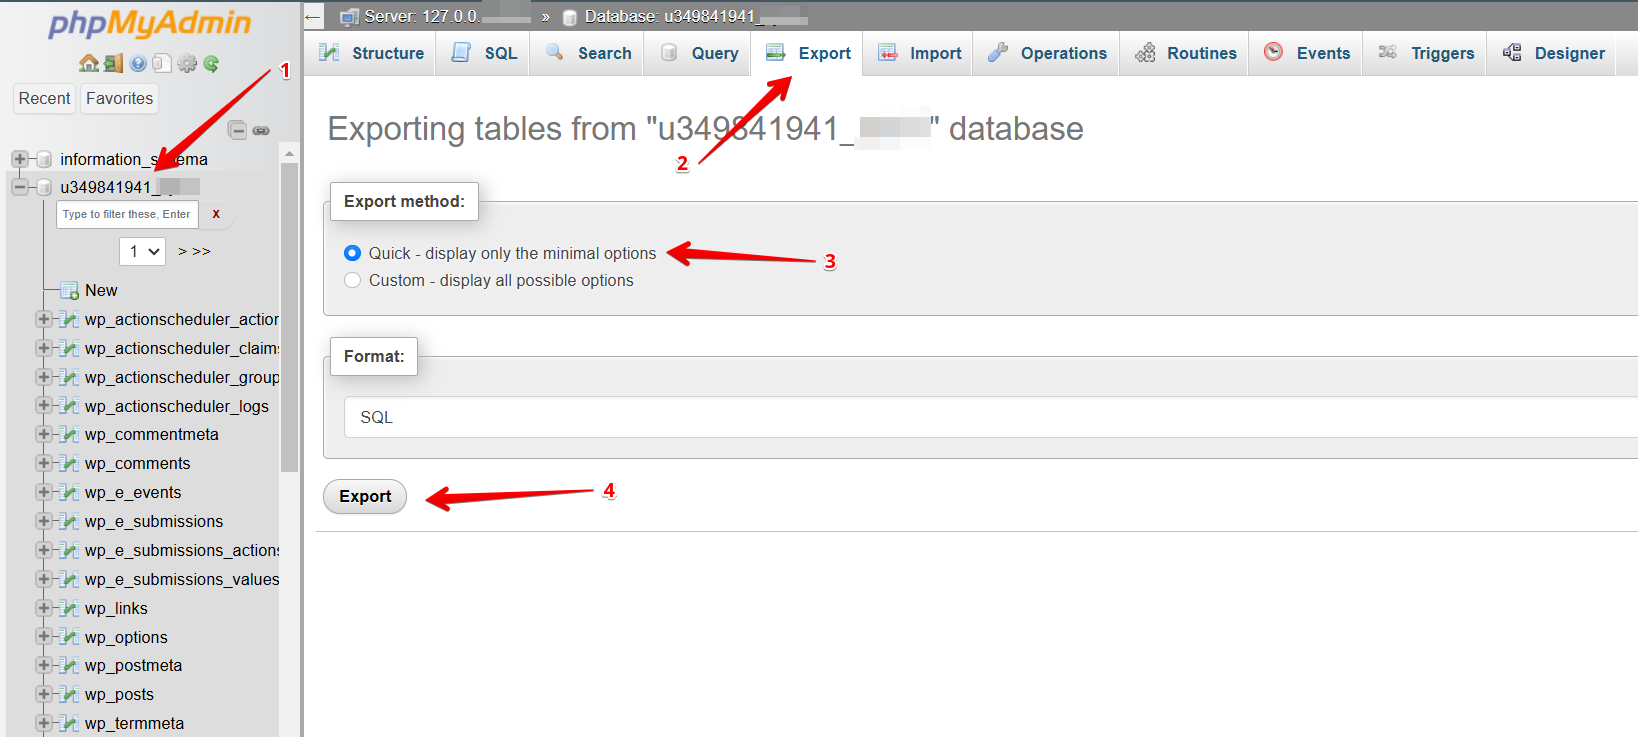
- To export the WordPress database, log in to cPanel to access the phpMyAdmin application/page.
- Select the database connected to your WordPress website on the left-hand sidebar and open the Export button on the navigation menu.
- Pick the Quick method and SQL as a format to export your entire database.
- Hit Go. Your database export will begin, and the file will be saved automatically to your local computer.
4. Create the WordPress Database on Your New Web Hosting.
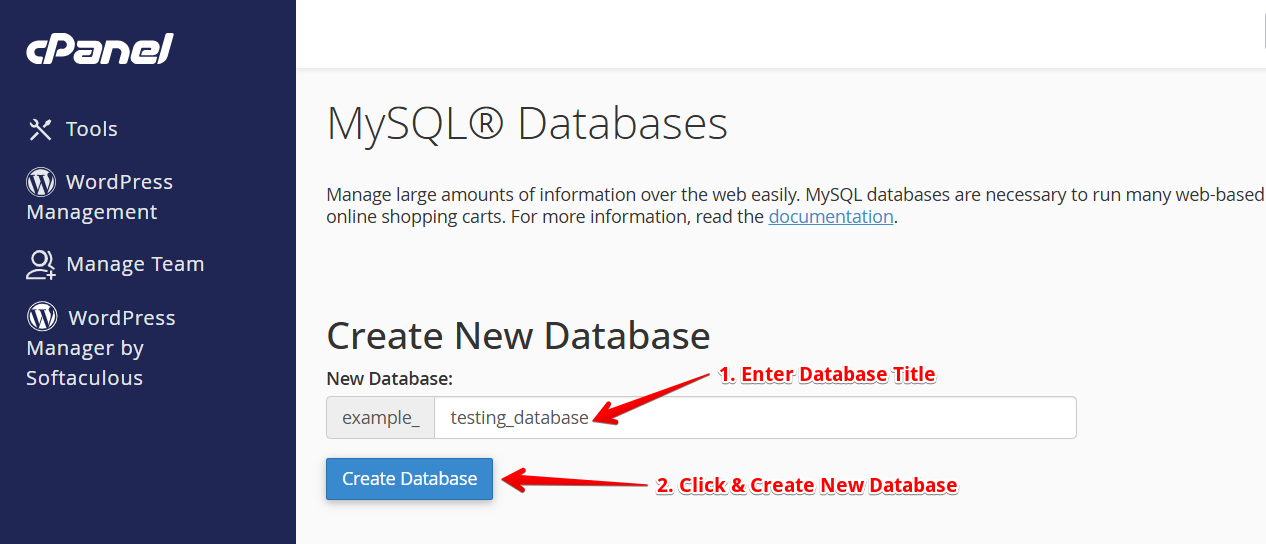
Before migrating the old website to the new host, we need to create a new web host database. To do this, log in to your new hosting cPanel with user credentials. For our step-by-step guide, we will employ the MySQL Databases application. However, if your web host doesn’t have that application running, you should ask for support to share their method of creating new databases. Follow the complete steps mentioned below to create a database on your new host server.
- Open MySQL Database and create a new WordPress database for your website with an appropriate name.
- Create a new MySQL user and set a secure password.
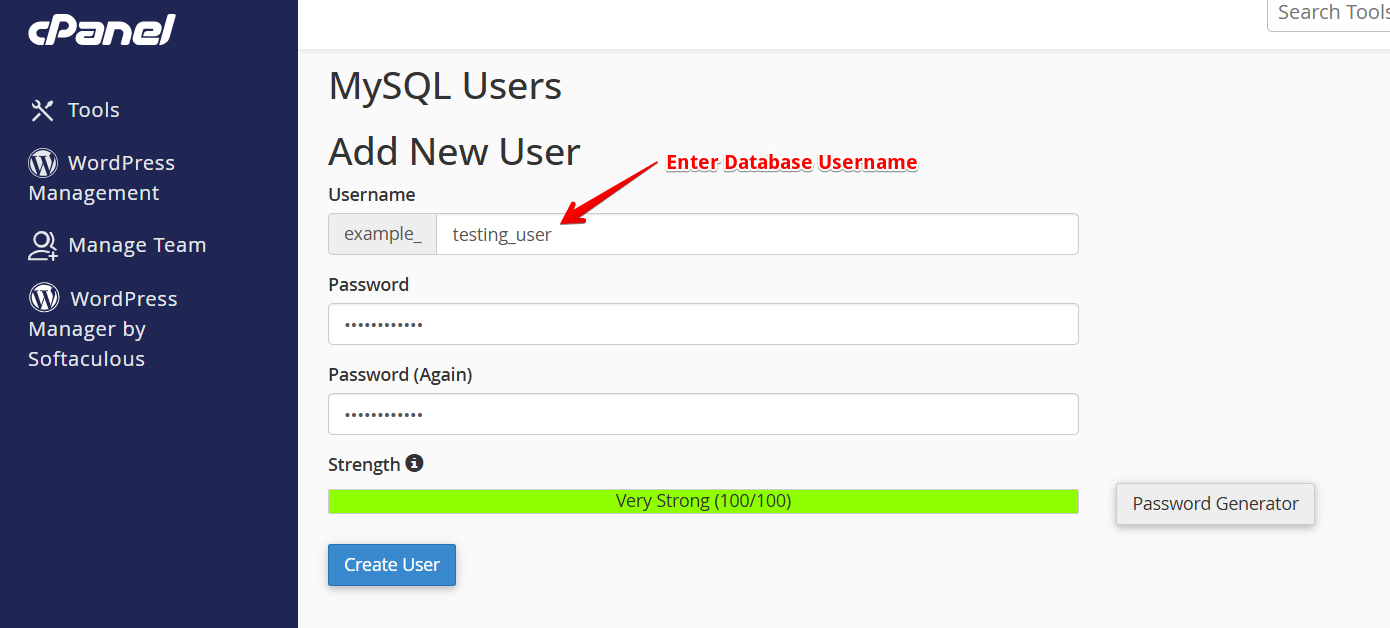
- Now, add this user account to the new database and grant All Privileges.
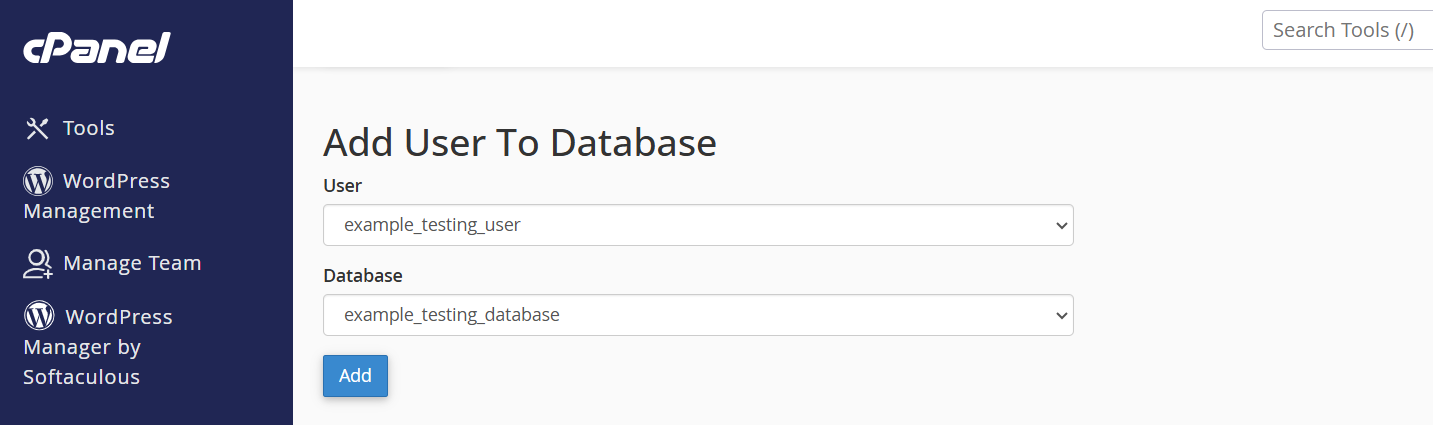
Save the database name, the new MySQL username, and its password in a file. You will need them soon.
5. Upload WordPress Files to New Web Host.
After importing the WordPress database, it’s time to upload the WordPress files to your new host that you’ve downloaded previously.
Use an FTP program like FileZilla to connect to your new hosting server. However, you’ll need a new set of credentials this time around. You’ll get them from your new web host. This time, locate the FTP Accounts button under Files.
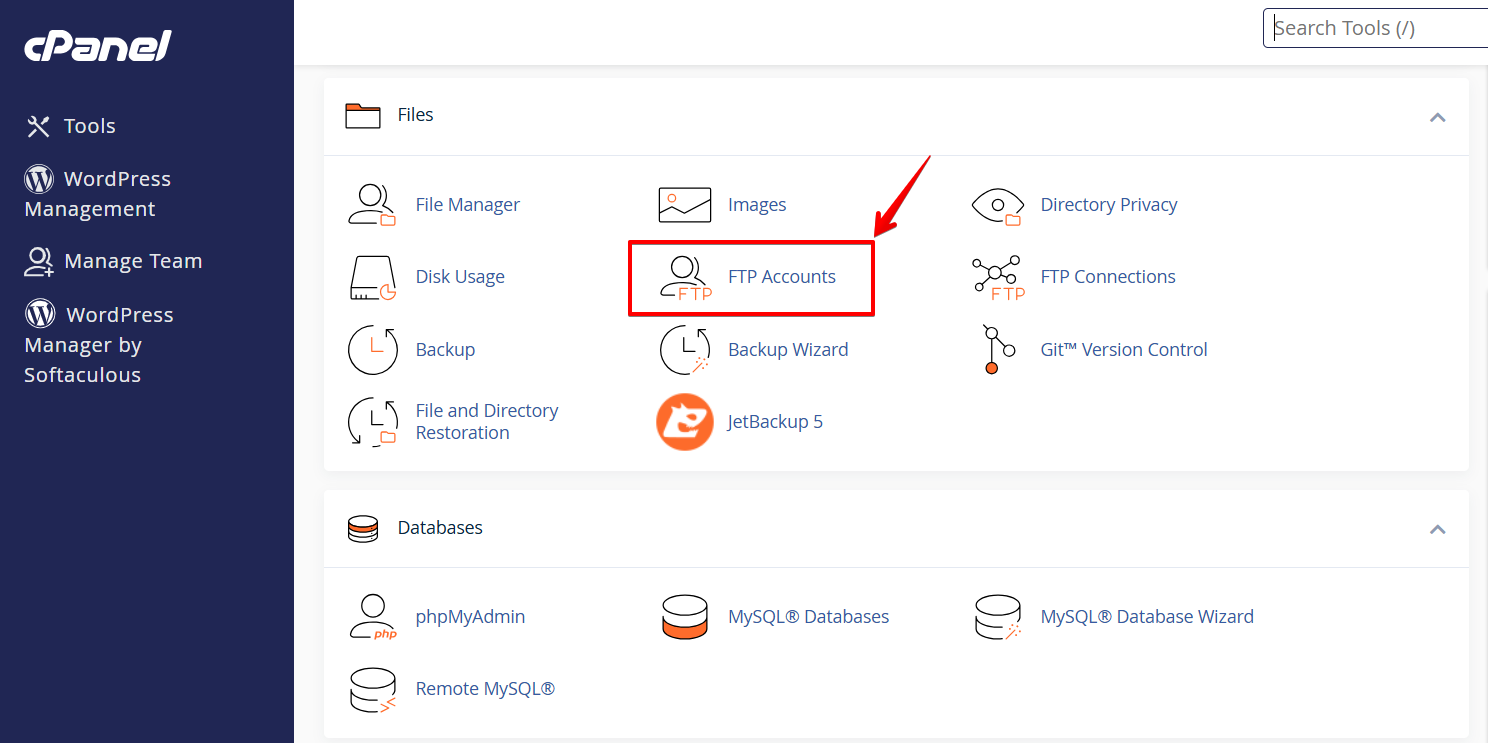 Inside, look for the fields that read FTP host and FTP username. Your password should be the same one as for your hosting account. Use login credentials, open FileZilla, and enter them into the empty fields at the screen’s top.
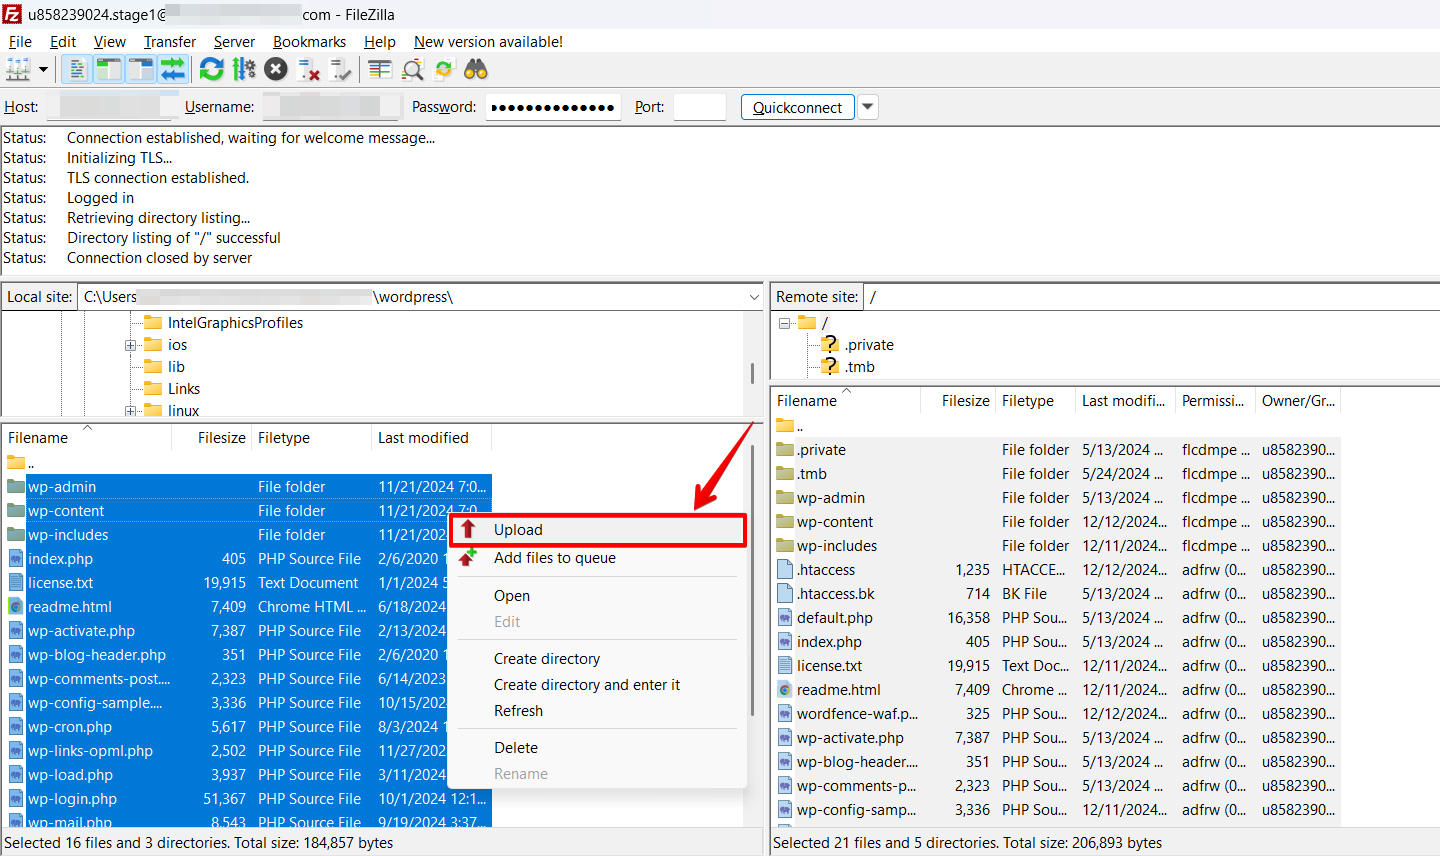
- Connect FTP, i.e., FileZilla, to your new hosting account and navigate to the public_html folder in the Remote Site column.
- Find the files you want to upload from the Local Site column, right-click on those files, and then select upload.
6. Edit the wp-config.php File with Your New Database Details.
Connect to your website to access the wp-config.php file using the FTP client. This file is placed in your WordPress website’s root folder with other folders, i.e., /wp-content/. The wp-config.php file is crucial for a WordPress site as it controls the access between WordPress and the website database, and a little mistake while configuring this file can make your site inaccessible. Please make a copy of the wp-config.php file and save it in another folder on the system. That step is necessary to ensure that if something goes wrong, we can quickly restore website data. Next, specify your new MySQL database’s login details by editing the wp-config.php file in your new hosting account.
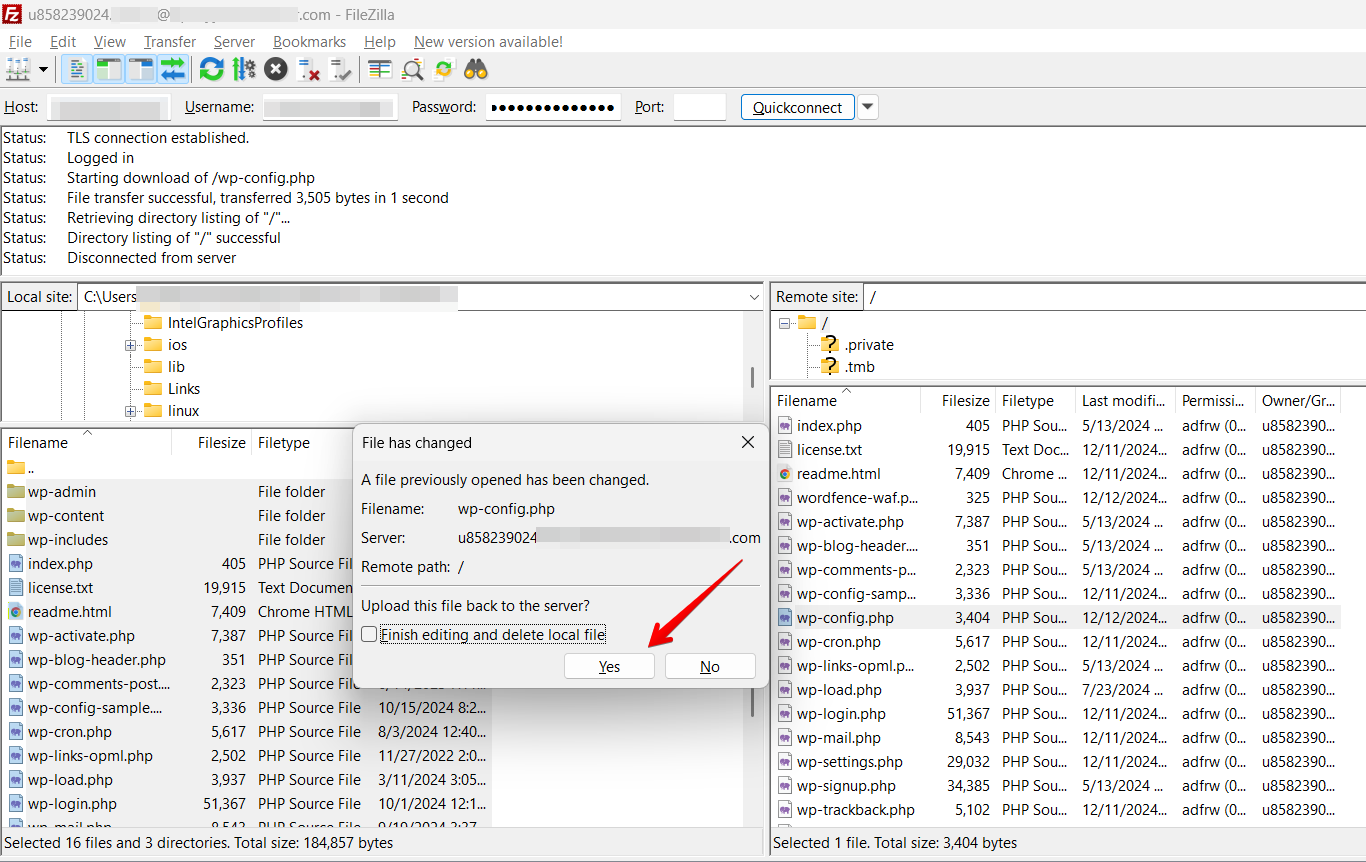
- Open the public_html folder again from FileZilla and search the wp-config.php file.
- Right-click and click on View/Edit.
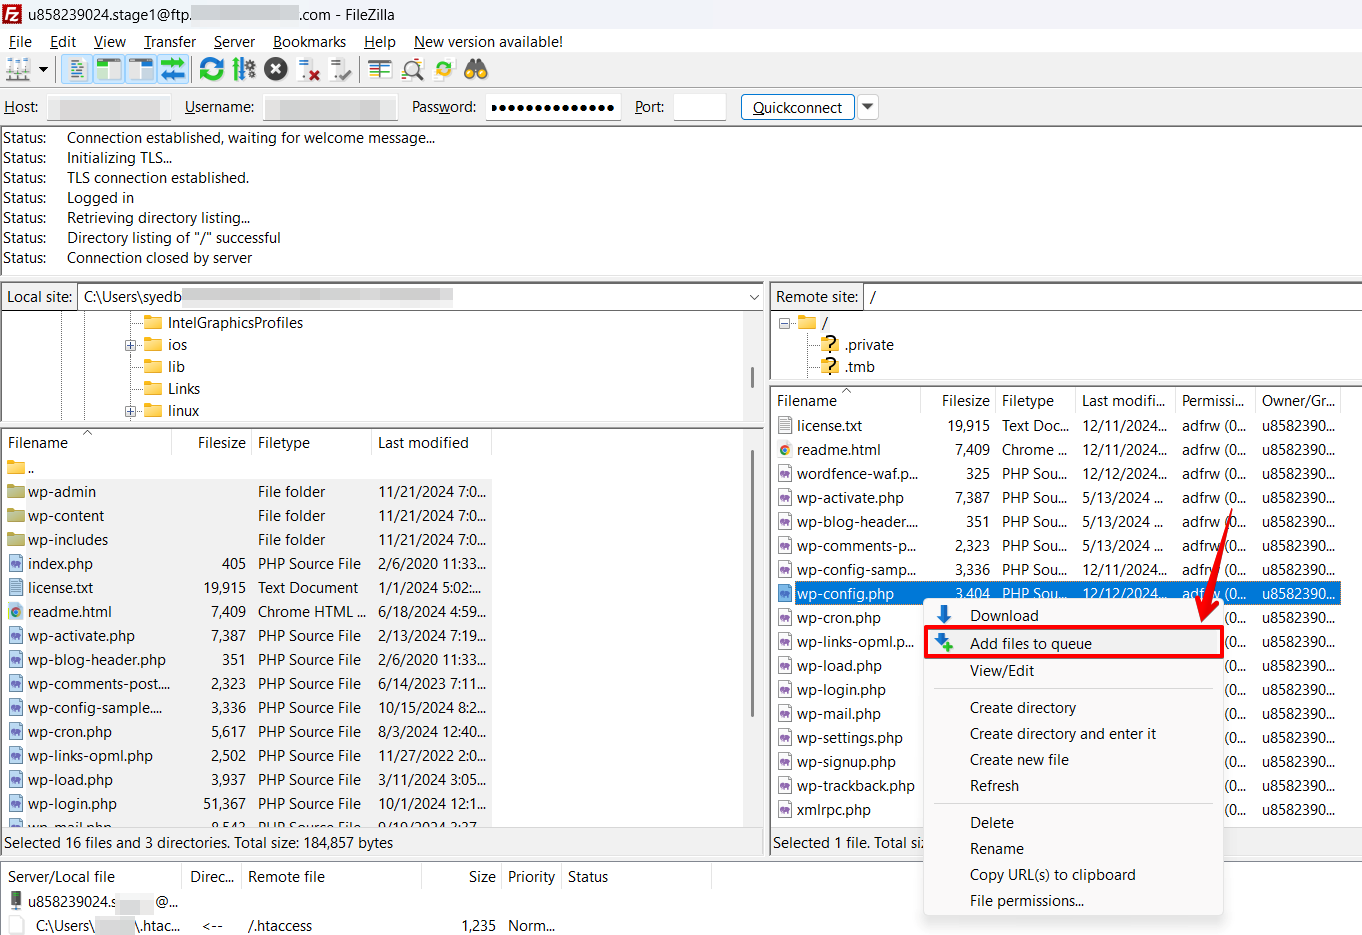
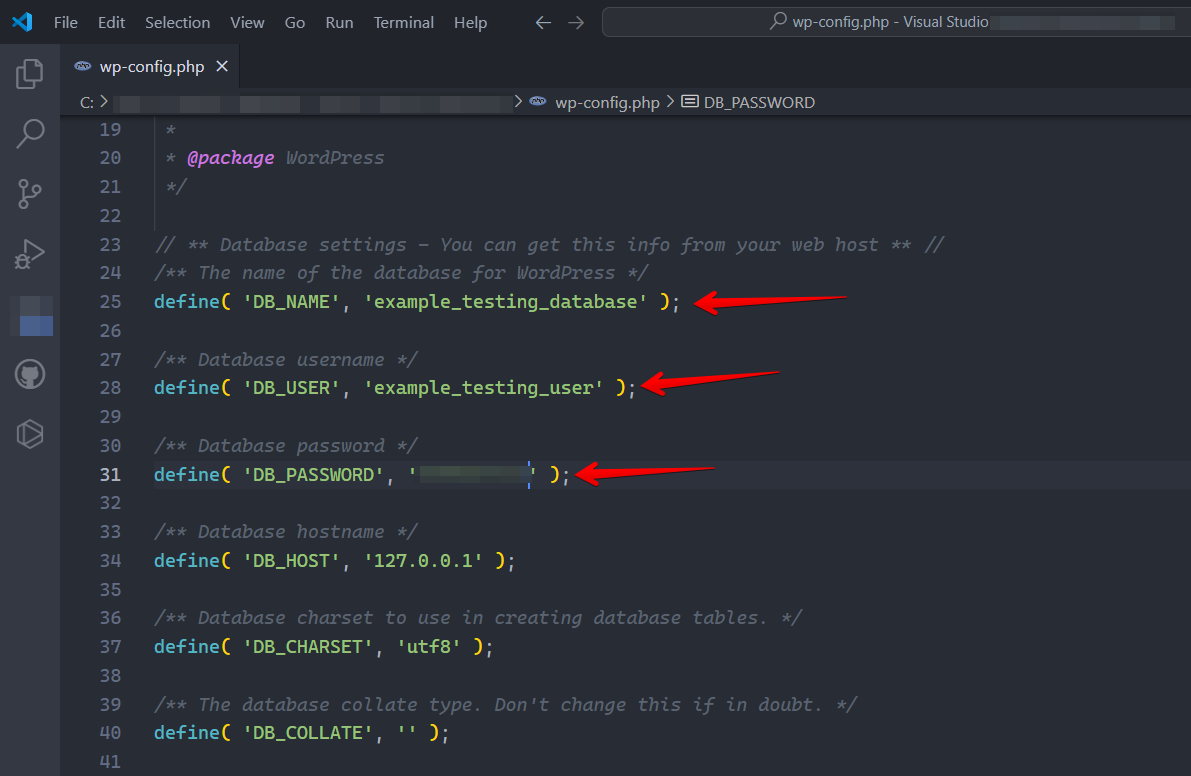
- Change the database name, username, password, and hostname values with your new database details:
- DB_NAME – database name.
- DB_USER – database username.
- DB_PASSWORD– user password.
- DB_HOST– database hostname (optional! This value is usually **localhost,**but may vary depending on your hosting platform).
- Click on Save Button, a popup window will appear. Now click on Yes.
7. Import the MySQL Database.
Once the upload has finished, don’t remove these files from your local computer, as they are still required until the final steps have been completed. After uploading WordPress files, we need to import the MySQL database:
- Open the control panel of your new web hosting account and navigate to MySQL Databases.
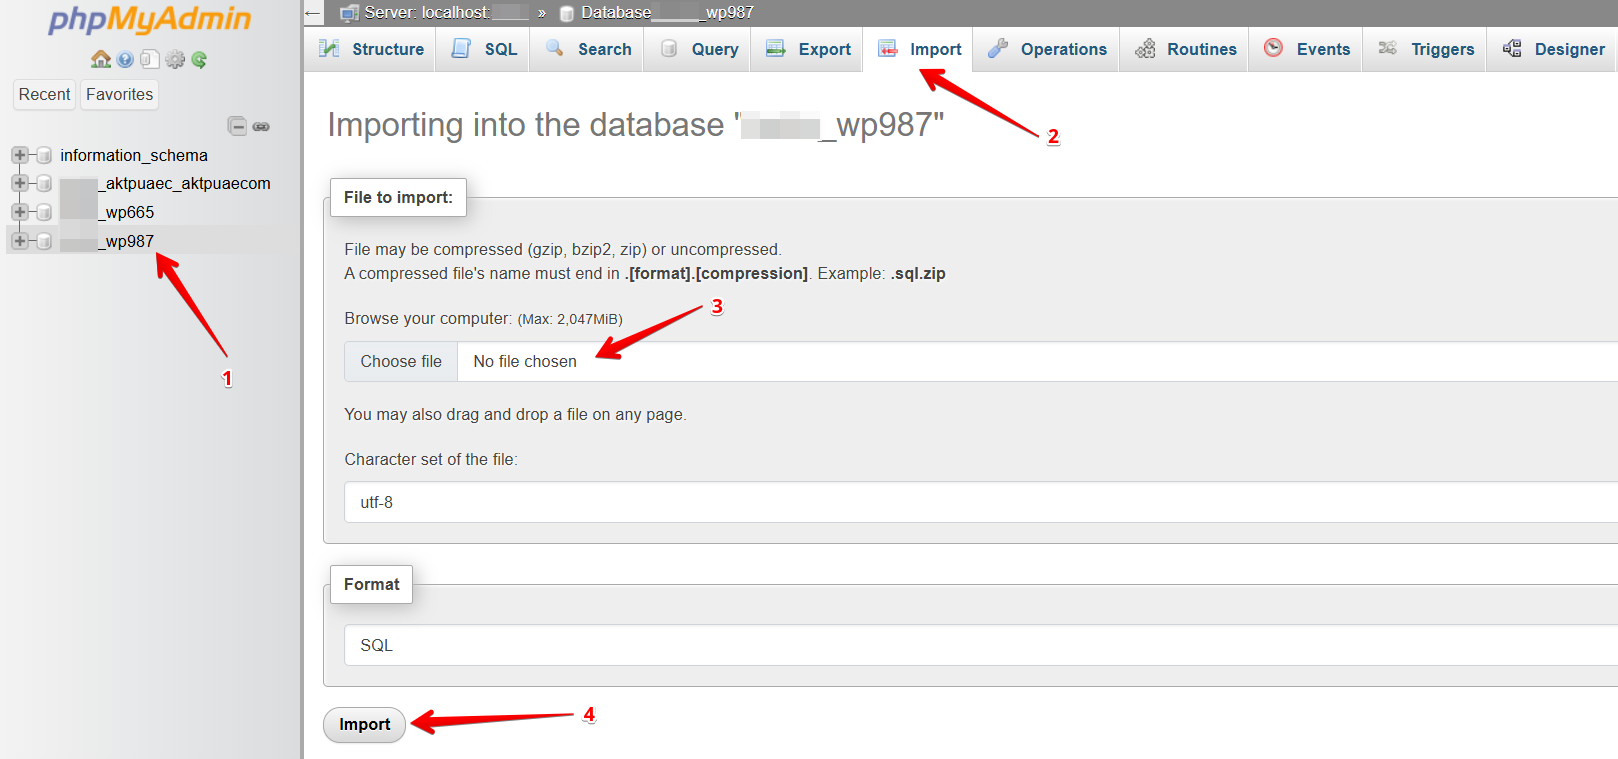
- Navigate to Databases -> phpMyAdmin and select the new database that you’ve already created in 4th
- Click on the Import tab at the top of the page.
- Select the Choose File button and import the downloaded MySQL database backup file you’ve saved previously on your local computer.
- Leave all the other settings as they are, and click on Go.
 It may take some time to import the database, as it depends on the size of your database. You’ll be notified when it has finished successfully.
8. Update WordPress URL’s if You Move Your Website to a New Domain (Optional)
Follow this step only if you are looking to move your old website to a different domain name. Before updating WordPress URLs, ensure that the new domain is functional and pointed to your new hosting platform. Follow the steps below to update domain URLs and replace old URLs with new URLs.
- Go to the phpMyAdmin application and select the wp_options table.
- Find the website URL and homeunder the column "option_name."
- Double-click the field under option_valueand change the old domain URL with the new one.

- Open your Dashboard, and then install the plugin "Better Search Replace" and activate it.
- Then navigate to tools and click onSearch & Replace. Fill out the fields with your old and new domain, and check to select all tables.
Search: //old-domain.com
Replace: //new-domain.com
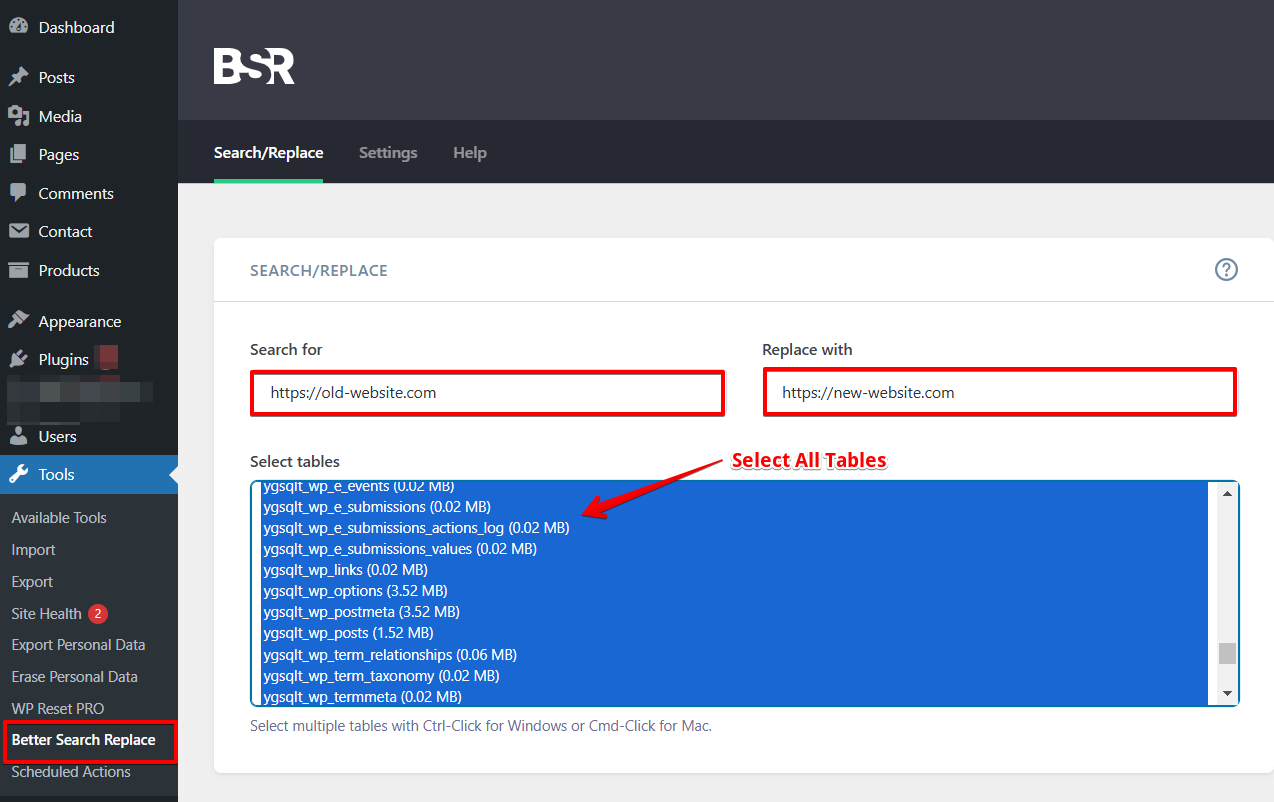
- Now click on "Do Search & Replace." Depending on the size of your database, the processing can take a while. When it’s done, log in again to your WordPress site, and you are done.
Conclusion
In short, migrating or moving your website to a new host is a complex process. In this article, we’ve shown you all the steps required on how you can migrate an old website to a new web host without using any plugin, just by using the free tools provided by your hosting provider. We hope that this complete step-by-step guide can help you migrate your WordPress site manually. Do you have any further questions about WordPress migration? Get in contact with us:
Subscribe to our YouTube Channel for more WordPress video tutorials and connect with us on Twitter and Facebook.
Related Articles
- How to back up a WordPress Website in Multiple Locations.
- How to Prevent Downtime on Your WordPress Website
- How to Repair & Optimize the WordPress Database
- How to Create and Modify WordPress Cron Jobs
- How to fix the “Sorry, You Are Not Allowed to Access This Page” Error in WordPress?