When you create a WordPress website using WP STAGING, there often comes a time when you want to migrate WordPress to your production website.
This step-by-step guide covers the manual free-version method — every step, in order, with nothing left out.
Please make sure you are tech savvy and know how to work with databases and files. Although this tutorial is easy to follow, it is much easier to push the staging site with the PRO version as it offers the “push changes” function with one click.
So, if you want to automatically copy your WordPress staging site with one click using WP STAGING | PRO, read this article instead.TL;DR: This guide walks through the manual method using the free WP STAGING plugin. It requires FTP access, a database administration tool (phpMyAdmin or Adminer), and direct editing of wp-config.php. If you want a one-click migration that handles database prefix changes automatically and leaves your staging site intact, use WP STAGING | PRO and its Push Wizard.
When to use this guide
Before starting, confirm which method fits your situation:
| Manual free-version (this guide) | WP STAGING | PRO Push Wizard | |
|---|---|---|
| Effort | High — FTP transfer, database search-and-replace, wp-config edit | Low — single button click |
| Risk of human error | High — one missed step can break the site | Low — automated |
| Supported site sizes | Any, though large sites may time out during FTP transfers | Any |
| DB prefix changes | Manual — you edit wp-config.php yourself | Automatic |
| After migration | Staging site unavailable; create a new one | Staging site remains intact |
If you want to see the Pro Push Wizard in action first, watch the video:
Read the instructions below carefully, and do not miss any of the mentioned steps, as it could make your website unavailable!
Before you begin
Requirements for this tutorial:
- One live site in production use, e.g., https://host.com
- A staging site previously created with WP STAGING or WP STAGING | PRO in a subfolder like https://host.com/staging
- Plugin WP STAGING activated on the live site
- Plugin Search And Replace activated on the live site
(Not needed with WP STAGING | PRO) - A backup plugin installed on the live site. WP STAGING already includes one of the most efficient and modern backup solutions — faster and with less CPU load than many other backup plugins.
Step 1 – Back up both sites
Back up both the production site and the staging site before making any changes.
At the file selection of your backup plugin, include the staging site subfolder. Also select all database tables beginning with the prefix wpstg_.
If you have a huge site with millions of database rows or want to prevent spikes of loading time while creating a backup, consider WP STAGING | PRO. It already includes one of the most sophisticated backup solutions.
Step 2 – Copy staging files to production
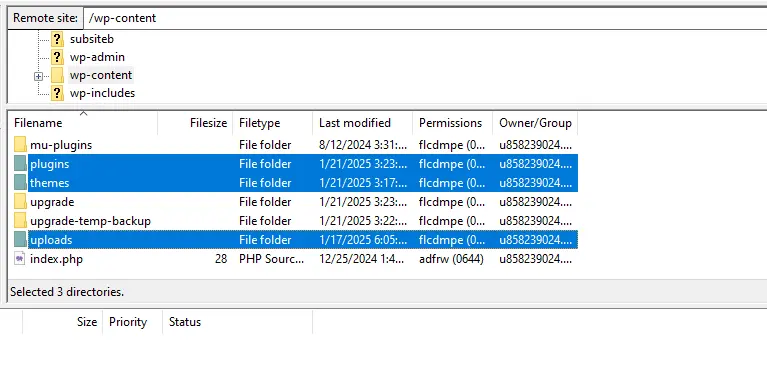
Use an FTP program like FileZilla to connect to your server. Copy the following folders from your staging site subfolder to the production root:
wp-content/uploadswp-content/pluginswp-content/themes
Step 3 – Migrate the database
You have three options for migrating the staging database to production:
- Option 1 — Very easy: Use WP STAGING | PRO to automatically clone the entire staging site to live with one button.
- Option 2 — Easy: Do a manual search-and-replace on the staging database tables and redirect WordPress to use those tables for production. The live site’s original database tables are not overwritten and can be restored at any time. Follow the steps below.
- Option 3 — Advanced: Use a dedicated DB migration plugin such as WP Migrate DB or any other tool that can migrate the staging database to live.
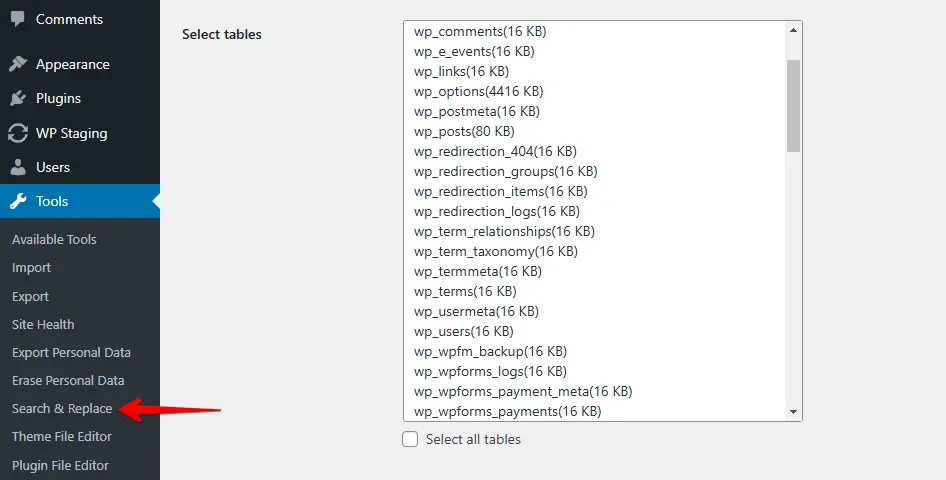
Search and replace staging URLs
This step updates all internal URLs in the staging database, replacing the staging subfolder path with the live domain.
Install the plugin Search And Replace if you haven’t already. Navigate to Tools > Search & Replace.
Assume your staging site is at http://yoursite.com/staging.
Enter the staging path in the Search for field:
//mysite.com/stagingEnter the live path in the Replace with field:
//mysite.comMake sure to work accurately. Enter exact strings!
– Do not enter any trailing slash after the URL!
– Do not add HTTP:// or https:// to the search string
Any misspelling will lead to a broken staging or even live site.
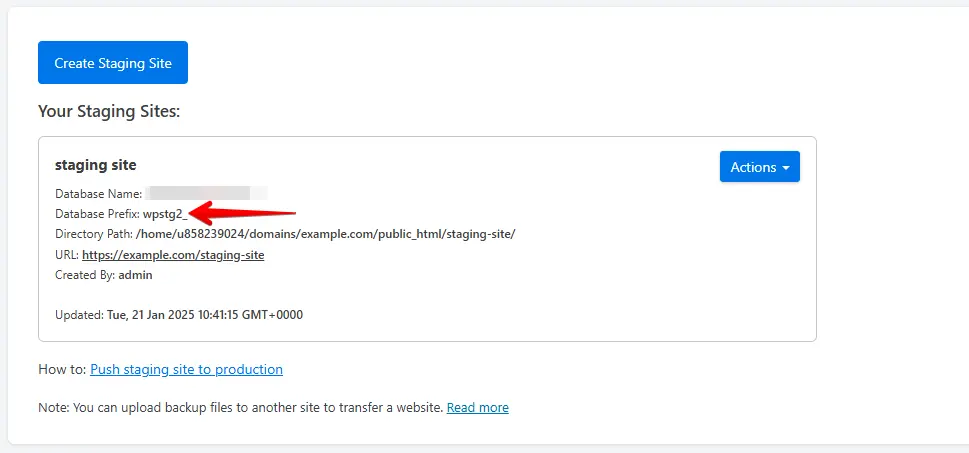
Select only the database tables that begin with the staging table prefix — usually wpstg[0]_. Check the correct prefix in the WP STAGING staging sites list:
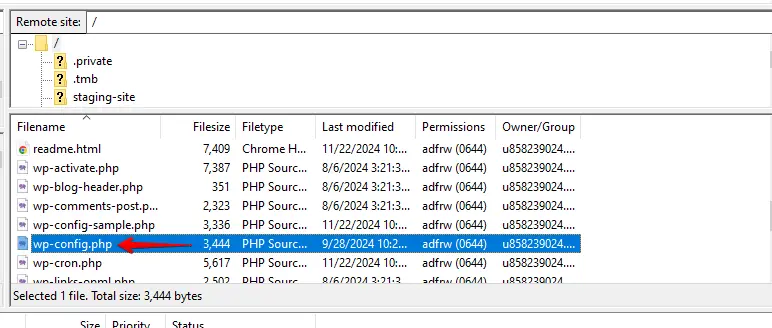
For older WP STAGING versions, find the prefix by opening the staging site’s wp-config.php via FTP:
path_to_wordpress/staging_name/wp-config.phpAll other tables belong to the live site or to other staging sites, which must not be altered in any way!
Run a dry run first to verify the settings without changing real data. If the dry run succeeds, deselect the dry-run option and run the replacement for real.
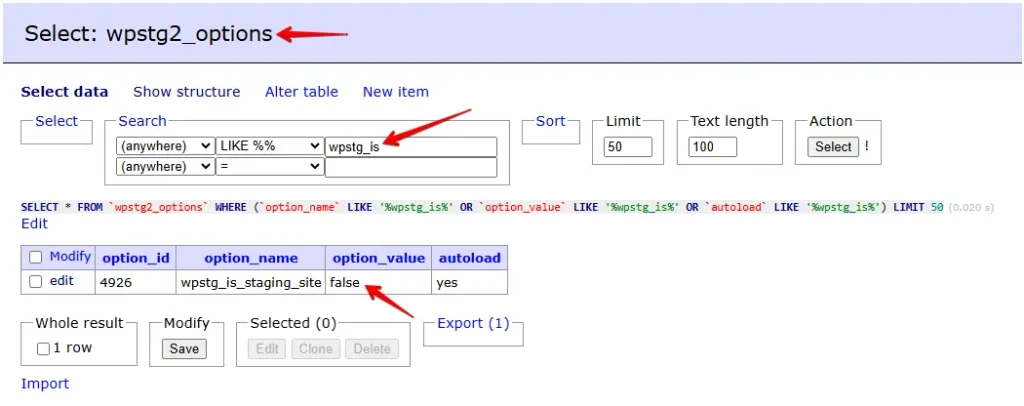
Remove the wpstg_is_staging_site flag
WP STAGING sets a wpstg_is_staging_site option in the database to identify staging environments and display the authentication screen. Leaving it in place after migration causes a blank admin dashboard.
Use a database administration tool such as phpMyAdmin or Adminer and search the staging database tables for:
wpstg_is_staging_siteDelete the row or set its value to false.
Update the table prefix in wp-config.php
The last step tells WordPress to use the staging database tables instead of the original production tables.
Log in to your live website via FTP. The config file is at /path/to/wordpress/wp-config.php. Use FileZilla or your preferred FTP client.
Right-click the file and select Edit. Update $table_prefix to match the staging table prefix, for example:
$table_prefix = 'wpstg1_';
Save the file. Open the live site — it now displays the content from the staging site.
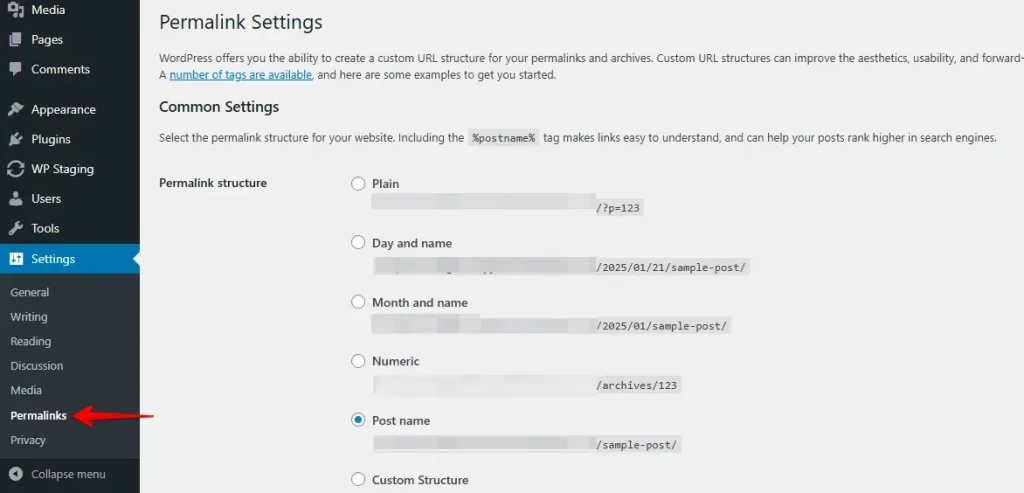
To re-enable pretty permalinks, go to Settings > Permalinks in the WordPress admin and click Save Changes.
Delete the old staging subfolder via FTP:
path/to/wordpress/staging-nameImportant: The production site now uses the staging database tables. Create a new staging site when you are ready — the old staging site can no longer be used.
In our experience helping WP STAGING users, the database prefix change in wp-config.php is the step most often missed. Double-check it before closing your FTP client.
Congratulations — you have successfully migrated your staging site to live.
The pro version covers our development expenses and comes with top-notch support!😊
Troubleshooting common issues
From support requests, three failure modes account for the majority of post-migration problems.
Staging database prefix not updated in wp-config.php
After migration, wp-config.php must reference the staging table prefix (for example wpstg1_), not the original wp_. If $table_prefix still points at wp_, WordPress loads the original live database instead of the migrated staging data, and the migration appears to have had no effect.
Fix: Re-open wp-config.php via FTP and confirm $table_prefix matches the prefix you selected in the Search and Replace step.
wpstg_is_staging_site not removed — blank dashboard
If the wpstg_is_staging_site row was not deleted, WordPress detects the site as a staging environment and shows a blank authentication screen instead of the admin dashboard.
Fix: Open phpMyAdmin or Adminer, search the staging-prefix options table (for example wpstg1_options) for wpstg_is_staging_site, and delete the row.
siteurl and home not updated — redirect loops or wrong domain
If the siteurl and home values in the options table still point to the staging subfolder after the search-and-replace step, WordPress redirects all requests back to the staging URL.
Fix: In phpMyAdmin or Adminer, open the wpstg1_options table (use your actual prefix), find the rows for siteurl and home, and confirm both values point to the production domain (e.g., https://yoursite.com) with no trailing slash and no subfolder path.
Related Articles
- How to Create a Backup of Your WordPress Database?
- Quickstart: How to Push a new Theme on Staging Site to Production Site