TL;DR: WP STAGING’s Push Wizard copies your staged changes — files, database tables, or both — to the live site. Back up the live site first (Step 1), choose what to push in Steps 2–3, then start the push. If the push fails, see the troubleshooting section below.
This article explains how to push a staging site to live and migrate modifications from a staging site to a production site with WP STAGING | PRO. If you haven’t set one up yet, see how to create a WordPress staging site before following this guide.
If you want to convert your staging site to the production site with the WP STAGING basic version, please read this article for an alternative migration method if the Push Wizard isn’t available.
What Do You Need to Push?
Before opening the Push Wizard, decide what to move to live. This determines which steps you need.
| Goal | Push database? | Push files? | Go to |
|---|---|---|---|
| Deploy new posts, menus, or plugin settings | Yes | Optional | Pushing Only Database Changes |
| Deploy a theme or plugin update | No | Yes | Pushing Only Files |
| Full site: files + database together | Yes | Yes | Pushing Your Full Staging Site to Live |
| Selective tables only (e.g., exclude WooCommerce orders) | Yes (selective) | Optional | Step 2: Select the Database Tables |
Video: Migrate your WordPress Staging Site to the Production Site
The video below shows how WP STAGING | PRO pushes data from the staging site to the production one.
WP STAGING | PRO can push all media files, themes, plugins, and database data from a WordPress staging website back to a production site.
Insights: To get a fundamental technical understanding of how WP STAGING moves your Staging Site to the Production site and to learn the differences between files and database data, read the articles below:
– How Does WP STAGING Handle WordPress Migration
– The WordPress database structure
Contents
- What Do You Need to Push?
- Video: Migrate your WordPress Staging Site to the Production Site
- Before You Push: Pre-flight Checklist
- Pushing Your Full Staging Site to Live
- Pushing Only Database Changes
- Pushing Only Files (Themes, Plugins, Media)
- What to Do If the Push Fails
- After the Push: Verification Checklist
- Related Articles
Before You Push: Pre-flight Checklist
Confirm all of the following before running the Push Wizard:
- The production site is live and accessible at its URL (e.g.,
https://example.com). - The staging site was created with WP STAGING and contains the changes you want to deploy.
- WP STAGING | PRO is installed and activated on the production site.
- WordPress core versions on staging and production are identical.
Always backup your production site before starting the push. A backup lets you restore production within minutes if anything goes wrong during the push.
Pushing Your Full Staging Site to Live
Use this path when you want to push both files and database tables in one operation.
Step 1: Backup the Production and Staging Site
Backup your production site before starting the push using WP STAGING | PRO’s built-in backup tool.
Go to WP STAGING > Backup & Migration > Create New Backup. Enter a name and click Start Backup. When the backup finishes, save a local copy via Actions > Download.
Step 2: Select the Database Tables
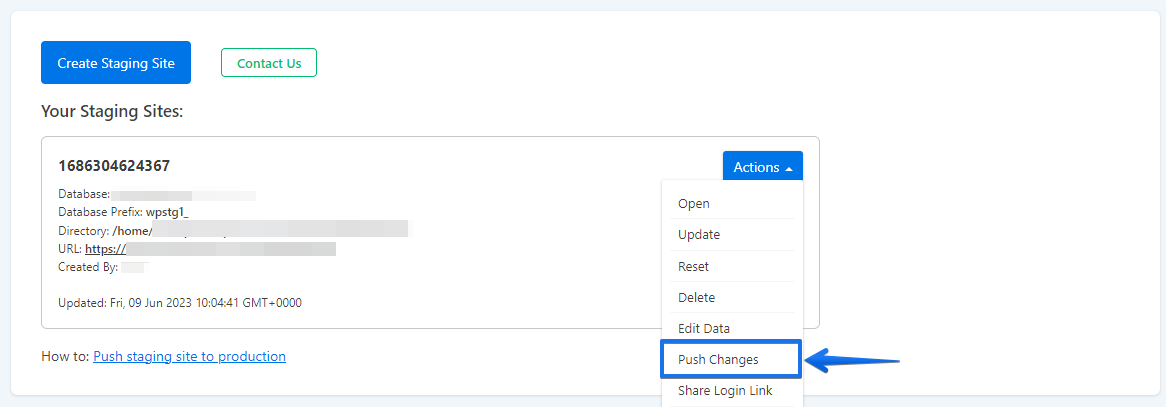
Go to your Production Site > WP STAGING > Start / STAGING.
If you have multiple staging sites, select the one you want to transfer and click the Push Changes button.
Click Database Tables and select all the tables you want to push from staging to production. Any selected table will completely overwrite its counterpart on the production site.
For understanding which database tables to include before pushing, the WordPress database structure reference lists every core table and what it stores.
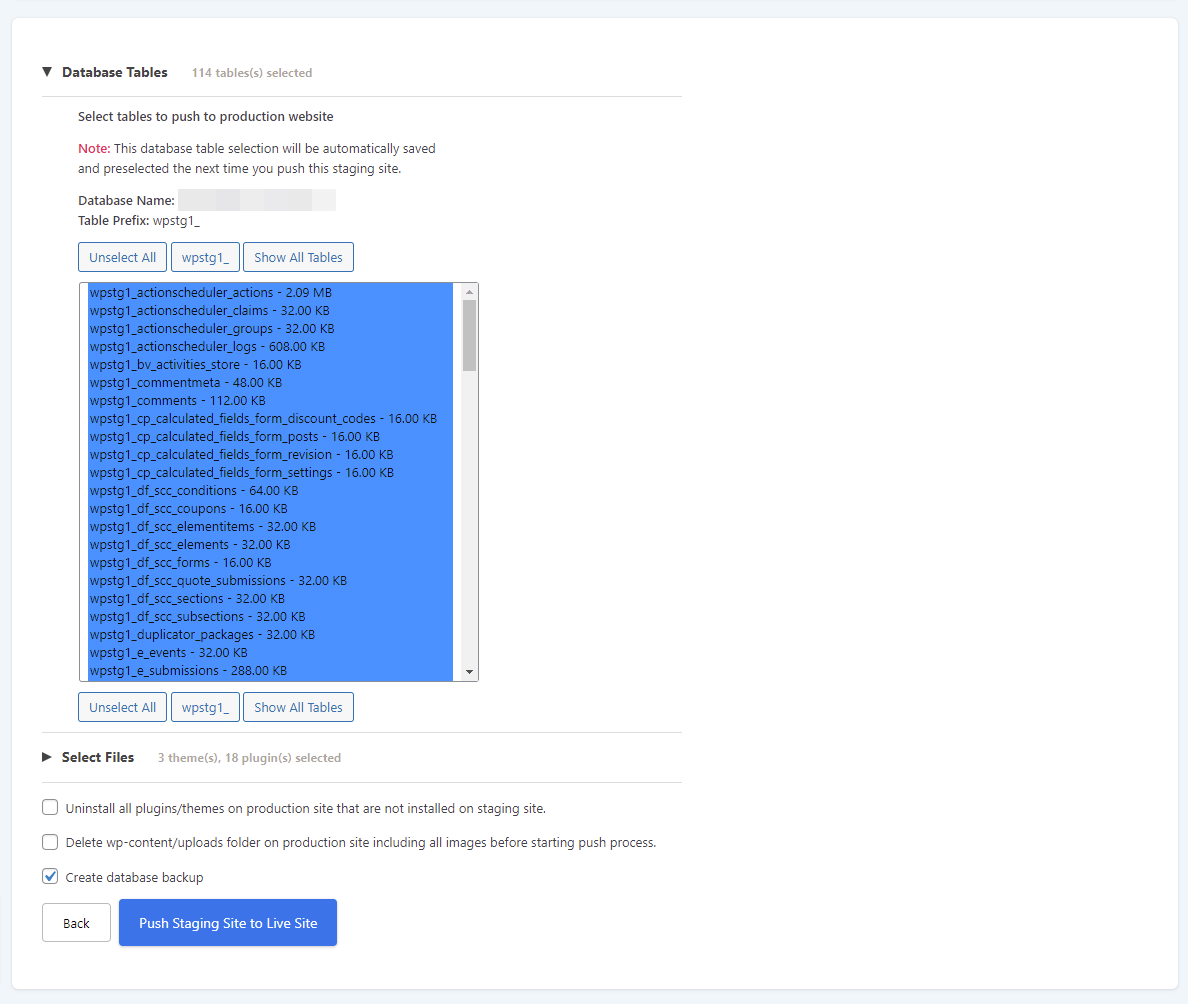
Deselect a specific table to exclude it from the push.
If you have a shop system like WooCommerce, you do not want to overwrite orders and customer data on the production site. In the links below, you will find a description of the WooCommerce database tables, which table you need to exclude not to overwrite any shopping transactional data on your production website, and how to export and import WooCommerce orders and user data to your staging site.
Note: If you are only pushing plugin or theme file updates, you do not need to push any database tables. However, if you changed settings, created posts, assigned menus, or installed new plugins on staging, those actions are recorded in the database and you must push the relevant tables.
Step 3: Select the Plugins, Themes, and Media Files
Click Select Files and choose all plugin, media, and theme folders you want to copy to production.
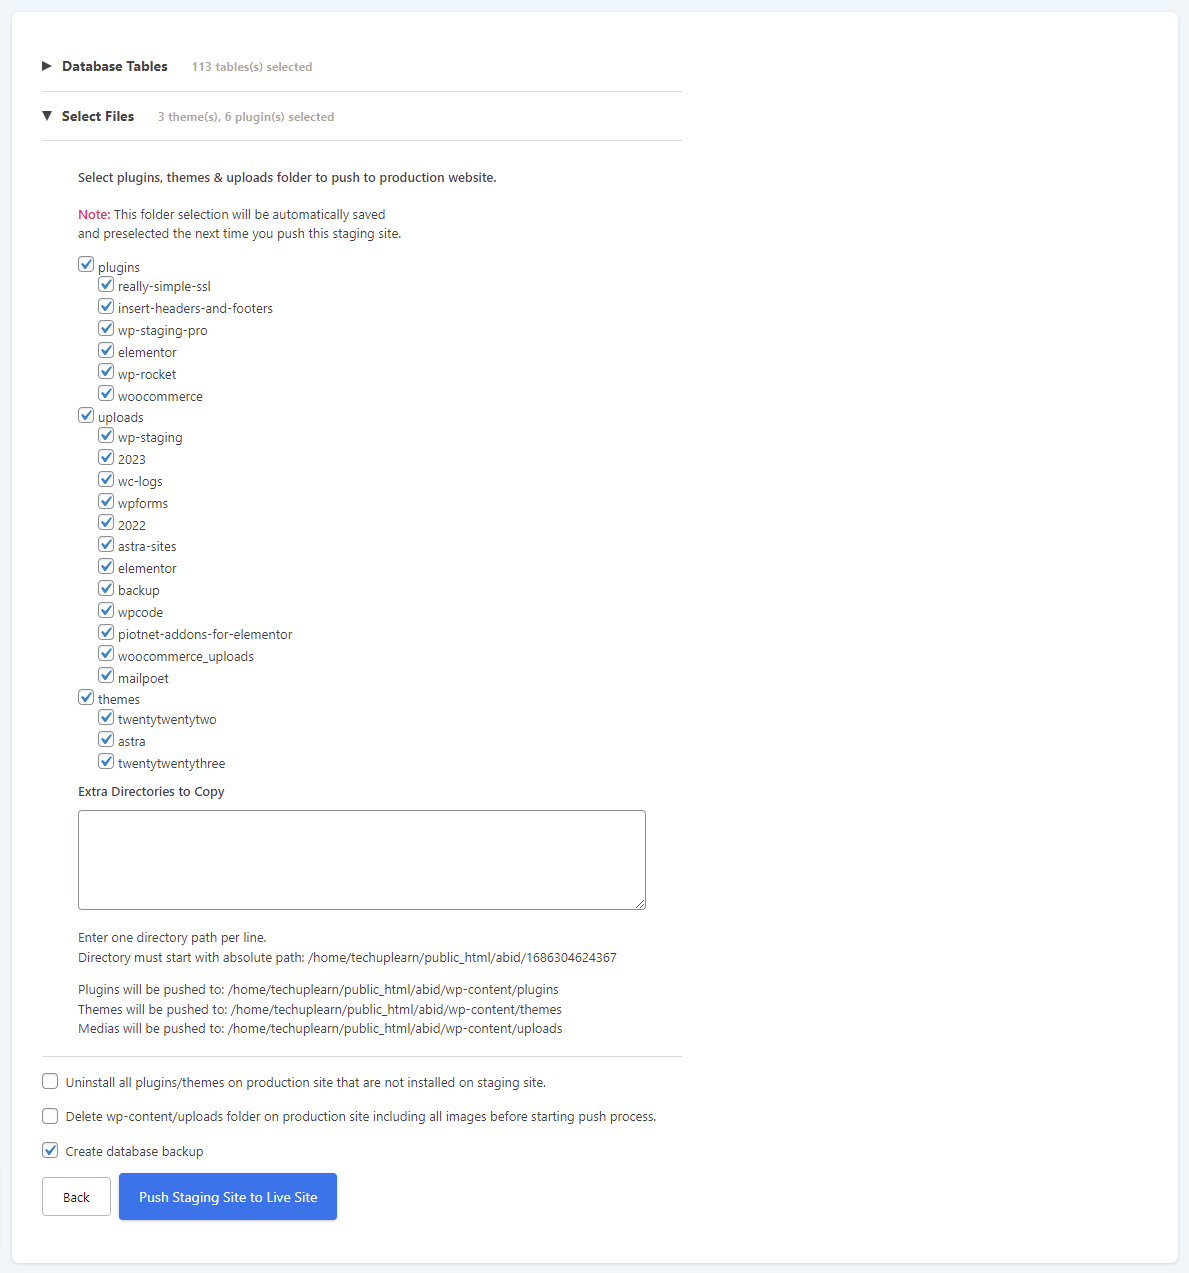
You can also specify additional folders by entering their full absolute paths in the text area.
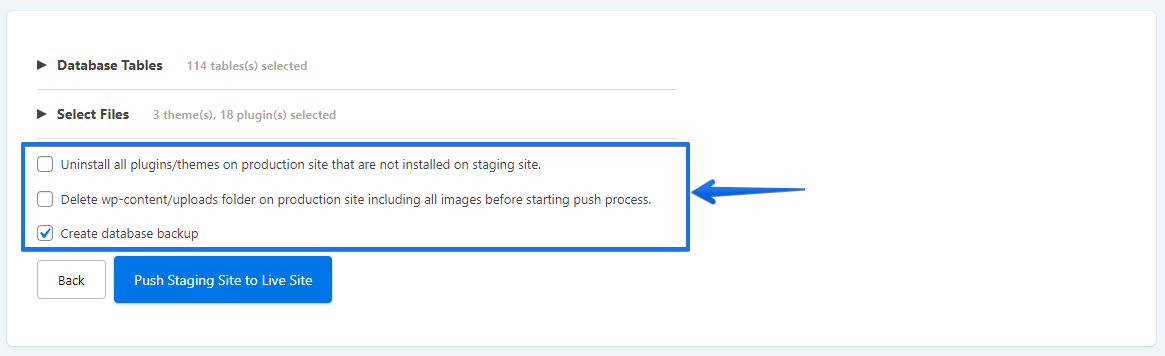
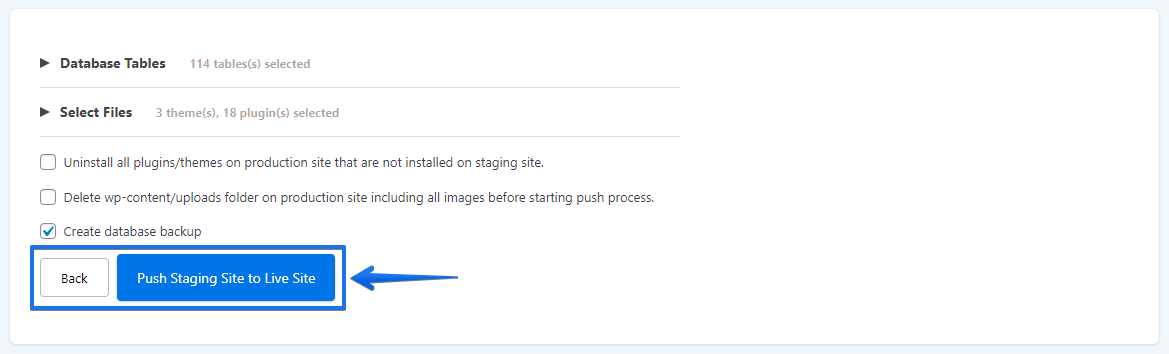
Step 4: Excluding Tables or Files from the Push
Two options control what gets removed from the production site during the push:
- Uninstall all plugins on the production site — removes plugins from production that no longer exist on staging.
- Delete the wp-content/uploads folder — clears production uploads before copying staging’s uploads folder.
If both options are disabled, nothing is deleted from production. A plugin removed on staging will be deactivated on production but will remain installed and can be reactivated manually.
Step 5: Start the Push Process
Click Push Staging Site to Live site to begin the push.
When the push completes, reload your website. All staged changes will be live on your production site.
Note: WordPress sometimes requires you to log in again after a full push. This happens when the staging database’s session data replaces the production session — it is normal behavior.
Pushing Only Database Changes
If your changes are limited to content, settings, or plugin configuration — and you haven’t changed any theme or plugin files — push only the database tables.
In the Push Wizard, open Database Tables and select only the tables that hold your changes. Leave all file folders deselected in Select Files. This is faster, reduces risk, and leaves production files untouched.
For understanding which database tables to include before pushing, the database structure reference lists every core WordPress table and what it stores.
WooCommerce users: Exclude WooCommerce order and customer tables when pushing a shop staging site. Pushing those tables would overwrite live transaction data. The WooCommerce callout in Step 2 lists the specific tables to skip.
Pushing Only Files (Themes, Plugins, Media)
If you updated or tested a theme or plugin on staging and confirmed it works, push only the changed files — no database push is needed.
In the Push Wizard, leave Database Tables fully deselected. In Select Files, choose only the folders that changed: for example, wp-content/themes/your-theme for a theme update, or wp-content/plugins/plugin-name for a single plugin.
After pushing, manually remove staging-only plugins after pushing to live if you installed any development-only tools on staging that should not run on production.
What to Do If the Push Fails
In our support queue, the most common reasons a push stalls or produces errors fall into four categories.
Push Stalls on Large Databases
If the push process hangs or times out while copying database tables, the most common cause is an undersized max_allowed_packet setting in MySQL. This limit controls the maximum size of a single database query; when a table row exceeds it — serialized option values and posts with embedded base64 images are the typical culprits — the push stops mid-operation.
Fix: raise max_allowed_packet in your MySQL configuration or ask your host to increase it. See also PHP configuration limits that can interrupt a push — directives such as memory_limit and max_input_vars can also cause timeouts when pushing large media libraries.
Mixed Content or Broken URLs After the Push
If the live site shows broken images or mixed-content warnings after the push, the staging domain is still present in some database rows. WP STAGING replaces URLs during the push, but serialized values in custom plugin tables can be missed.
Fix: run a database search-and-replace to swap the staging domain for the production domain. REST API errors that appear after pushing to live are frequently caused by the same URL mismatch; fixing the domain replacement resolves both problems.
Admin Cannot Log In After the Push
If you pushed the full database and cannot log in to the production admin, the staging user table replaced the production one and your original admin credentials no longer match.
Fix: reset the admin password directly in MySQL using your host’s database management tool (phpMyAdmin, for example). Alternatively, resolve any login issues on your staging site first, then push again.
White Screen or Fatal Error After the Push
A white screen immediately after the push usually means a plugin that worked on staging is incompatible with the production server environment — typically a PHP version difference or a server configuration mismatch.
Enable the WordPress debug log to identify the plugin: add define('WP_DEBUG', true); define('WP_DEBUG_LOG', true); to wp-config.php. The error log appears at wp-content/debug.log. Once you identify and fix the incompatible plugin, remove the debug constants.
After the Push: Verification Checklist
Run through these checks before treating the push as complete:
- [ ] Visit the production home page — confirm the new content or design is visible.
- [ ] Log in to the production admin — confirm credentials work.
- [ ] Check
https://your-domain.com/wp-json/— a JSON response confirms the REST API is healthy. - [ ] Open browser developer tools → Console — no mixed-content warnings.
- [ ] Test any forms, checkout flows, or critical functionality.
- [ ] Manually remove staging-only plugins after pushing to live that should not run on production.
- [ ] Request re-indexing in Google Search Console if significant content changed.
Related Articles
- Quickstart: How to Push a new Theme on Staging Site to Production Site
- Push a Staging Site to a Live Production Site
- Create a Dev > Staging Env. Create a Staging Site and Copy it to Another Staging Site before the Release
- Tips to Backup WordPress Production & Staging Website
- Moved Website to New Server – Can not Push Staging site