Did you lock yourself out of the WordPress admin dashboard?
That can happen due to changes in the database, an accident, or a technical issue that deleted your WordPress admin account.
Do you need a WordPress admin user restoration service? Buy WP Staging Pro and one of our developers will restore the WordPress admin user for you!
To get access again to your WordPress website, you can create and add a new WordPress admin account by applying one of these options:
- Add a piece of little code into a mu-plugin
- Add the admin user directly into the database by using a SQL query
- Create WordPress admin user on the MySQL command line
Option 1: Add a WordPress Administrator With a mu-plugin
Contents
Add this code into a new mu-plugin or add it into an existing one on top of it:
/*
Plugin Name: Add admin account
Description: This adds an admin account into database
Author: WP STAGING
Version: 1.0
Author URI: https://wp-staging.com
*/

add_action('wp_loaded', function() {
  if (isset($_GET['add-admin'])) {
    $inserted = wp_insert_user([
    'user_pass' => 'password',
    'user_login' => 'username',
    'user_email' => 'test@example.com',
    'role' => 'administrator'
  ]);
  var_dump($inserted);
exit;
  }
});Change the variables user_pass, user_login, and user_email to your desired values.
Open your website with the parameter https://example.com/?add-admin
Then you can log in with that new user account.
After that, remove the mu-plugin from your site for security reasons.
Option 2: Add a WordPress Admin User With a SQL Query
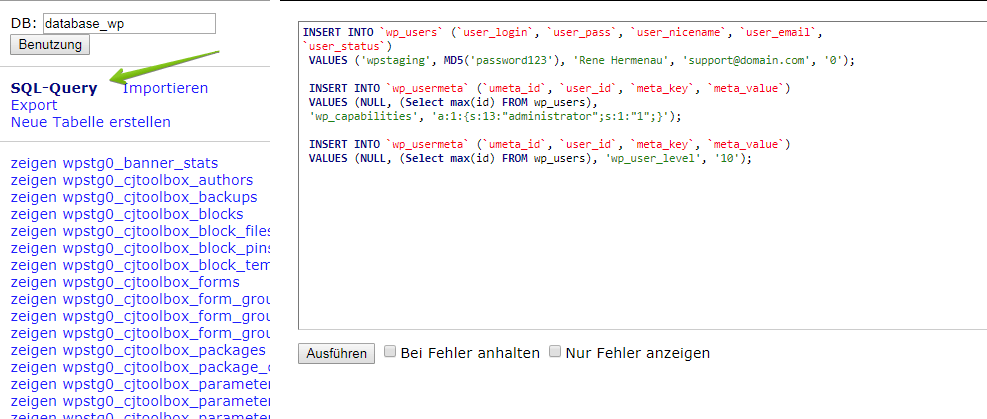
To do so, open your favorite database administration tool to look for the SQL-Query import function.
In that case, I use the popular adminer, a database administration tool with only one file you can upload via FTP to your website root folder. Another popular tool is PhpMyAdmin, installed on most website hosting servers.
Create WordPress Admin User SQL Query
Paste the code below into the SQL Query field of PhpMyAdmin or Adminer and change the name, username, mail, and password you like to use for the new user. (Bold strings).
Important: If you have another table prefix instead of wp_ you’ll need to modify the table prefix as well!
INSERT INTO `wp_users` (`user_login`, `user_pass`, `user_nicename`, `user_email`,
`user_status`)
VALUES ('wpstaging', MD5('password123'), 'Rene Hermenau', 'support@domain.com', '0');
INSERT INTO `wp_usermeta` (`umeta_id`, `user_id`, `meta_key`, `meta_value`)
VALUES (NULL, (Select max(id) FROM wp_users),'wp_capabilities', 'a:1:{s:13:"administrator";s:1:"1";}');INSERT INTO `wp_usermeta` (`umeta_id`, `user_id`, `meta_key`, `meta_value`) VALUES (NULL, (Select max(id) FROM wp_users), 'wp_user_level', '10');
If your website is not using the default WordPress prefix _wp also, change the prefix of the database tables wp_users, wp_usermeta, wp_capabilities and wp_user_level to the one your website is using.
So if your website is using the table prefix wpstg0_ the new table name for wp_capablities is wpstg0_capabilities.
After executing the function, you can re-access your WordPress dashboard with the new user credentials.
Option 3: Create WordPress User on the MySQL Command Line
Sometimes you may need to create a new WordPress admin user using the MySQL command line, especially when you do not have access to the WordPress dashboard. This article will guide you on how to create a WordPress admin user on the MySQL command line.
Step 1: Connect to the MySQL server
Before you can create a new user, you need to connect to the MySQL server. You can do this using the following command:
mysql -u <username> -pReplace <username> with the MySQL user you want to use to connect to the server. You will be prompted to enter the password for the user. After entering the password, press enter to connect to the MySQL server.
Step 2: Select the WordPress database
After connecting to the MySQL server, you need to select the WordPress database. You can do this using the following command:
USE <database_name>;Replace <database_name> with the name of your WordPress database. If you do not know the name of your WordPress database, you can find it in the wp-config.php file in your WordPress installation directory.
Step 3: Insert the new user details
To create a new WordPress admin user, you need to insert a new row into the wp_users table. You can do this using the following command:
INSERT INTO wp_users (user_login, user_pass, user_nicename, user_email, user_status)
VALUES ('<username>', MD5('<password>'), '<display_name>', '<email>', '0');Replace <username> with the username you want to use for the new admin user, <password> with the password you want to use for the new admin user, <display_name> with the display name you want to use for the new admin user, and <email> with the email address you want to use for the new admin user.
Note that the password needs to be encrypted using the MD5 function.
Step 4: Get the user ID
After inserting the new user details, you need to get the user ID. You can do this using the following command:
SELECT ID FROM wp_users WHERE user_login = '<username>';Replace <username> with the username you used for the new admin user. The command will return the user ID.
Step 5: Insert the user role
Finally, you need to insert the user role into the wp_usermeta table. You can do this using the following command:
INSERT INTO wp_usermeta (user_id, meta_key, meta_value)
VALUES (<user_id>, 'wp_capabilities', 'a:1:{s:13:"administrator";s:1:"1";}');Replace <user_id> with the user ID, you got in step 4.
Congratulations! You have created a new WordPress admin user on the MySQL command line. You can now log in to your WordPress dashboard using the username and password you created.
I hope this article helped you understand how to create a new admin user in your database manually. Please get in touch with us if you still have questions or if something is unclear.
