Plugin conflicts in WordPress are pretty standard. They can happen due to incompatible plugins, buggy updates, or extensions that haven’t been maintained. You’ll likely run into a plugin conflict on your site at some point, but there’s no need to worry.
You can quickly spot and fix the issue with time and the right approach. This guide will walk you through the process and share tips to prevent plugin conflicts in the future.
Contents
What Is a WordPress Plugin Conflict?
A WordPress plugin conflict occurs when one or more plugins interfere with each other, your website’s theme, or core WordPress files. These conflicts can arise from several reasons, such as:
- Outdated plugins that don’t match the latest WordPress version.
- Incompatible plugins that perform overlapping tasks.
- Poorly coded plugins cause unexpected errors.
- Resource conflicts occur when two plugins compete to control the same functionality.
When a conflict happens, your site might display several issues, like a blank white screen (the “white screen of death“), broken layouts, random error messages, or even slow and unstable performance.
To fix these conflicts, you can manually deactivate plugins individually to find the issue or use troubleshooting tools to detect the problem without affecting live visitors. We’ll explore both methods and offer tips to avoid plugin conflicts in the future.
Fixed WordPress Plugin Conflicts
Note: Before making any changes, it’s wise to back up your website. That ensures you can swiftly revert to the previous state if anything goes awry. WP Staging offers a simple solution for setting up automatic backups. For additional assistance, refer to the backup and restore guide.
Try a Different Browser
Trying a different browser can help determine if the Error in WordPress is browser-specific. This method effectively identifies issues related to browser configurations, extensions, or outdated versions that may not support the current web technologies used by your server or WordPress site.
Accessing your site from another browser lets you quickly ascertain whether the problem remains across different platforms, indicating a more widespread issue.
Clear Your Browser Cache
Clearing your browser cache can be helpful if you run into an error on your WordPress site.
This approach deals with problems that might come from old or incorrect data stored in your browser, which could be causing the error.
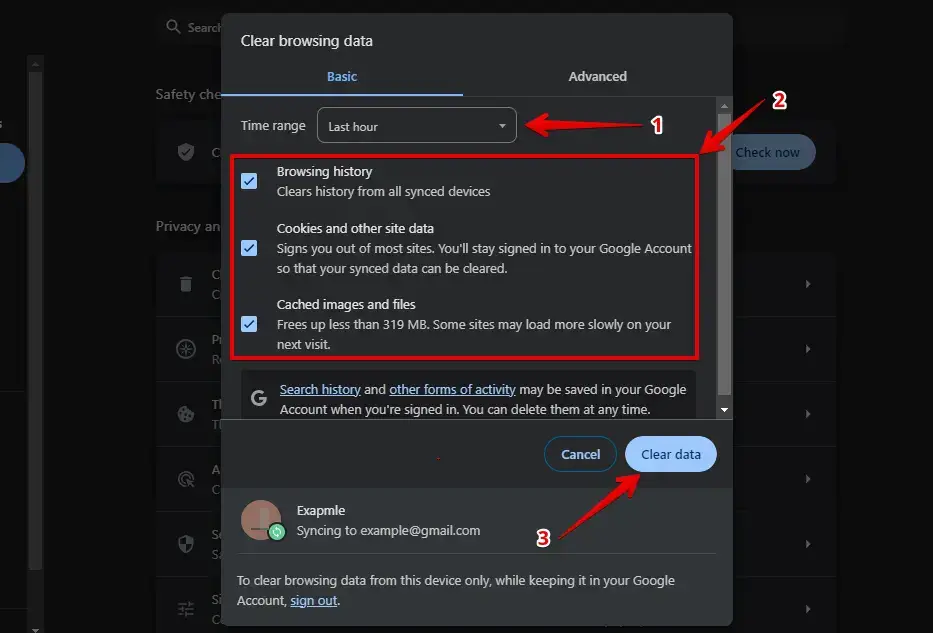
Google Chrome: Press Ctrl + Shift + Delete, choose your preferred time range, and click “Clear Data.”
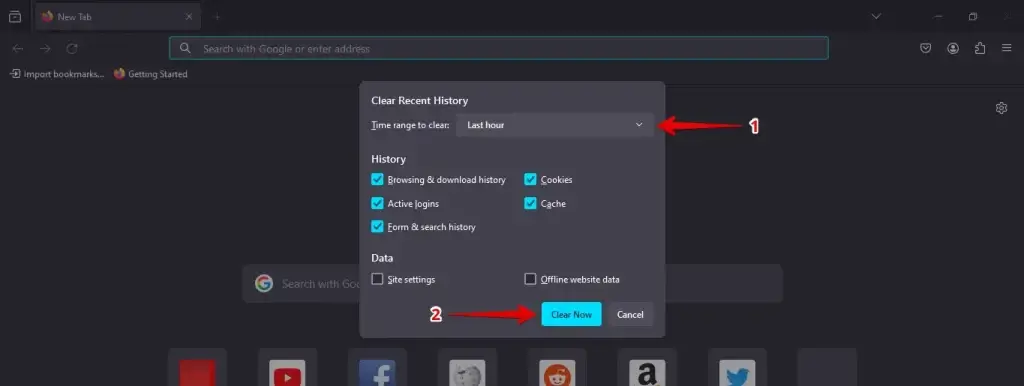
Mozilla Firefox: Press Ctrl + Shift + Delete, select the right time range, and click “Clear Now.”
After clearing the cache, close and reopen your browser to ensure all changes take effect. Then, return to your WordPress site and check if the error has been resolved.
Check for Stuck Updates
To resolve this issue manually, you can check for any stuck update processes.
- Log in to your WordPress admin dashboard.
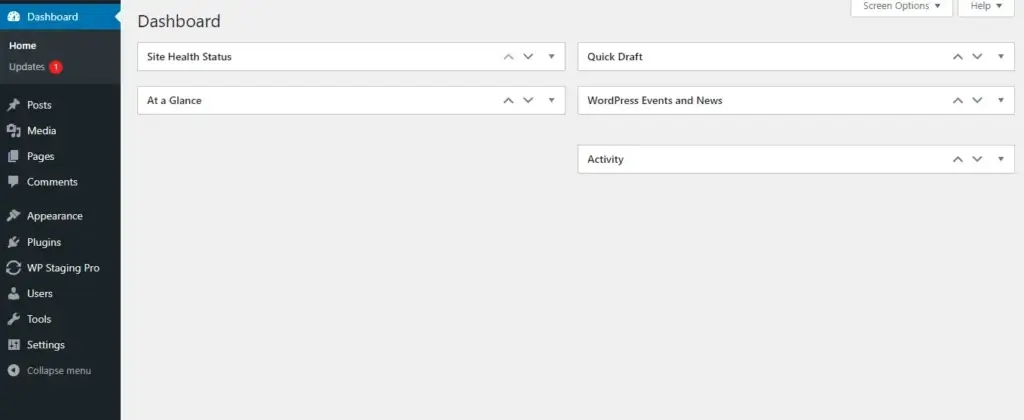
- Navigate to the “Updates” page.
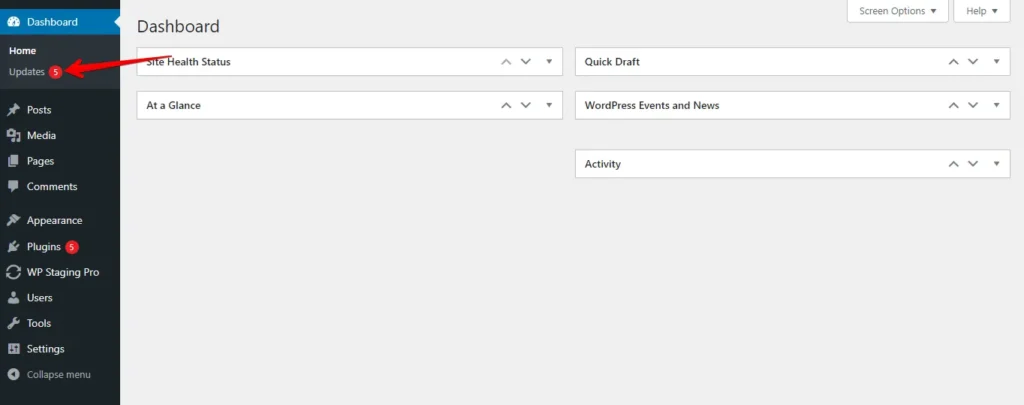
- You’ll find a list of updates for plugins, themes, and the WordPress core there. Identify any updates that seem stuck or have failed.
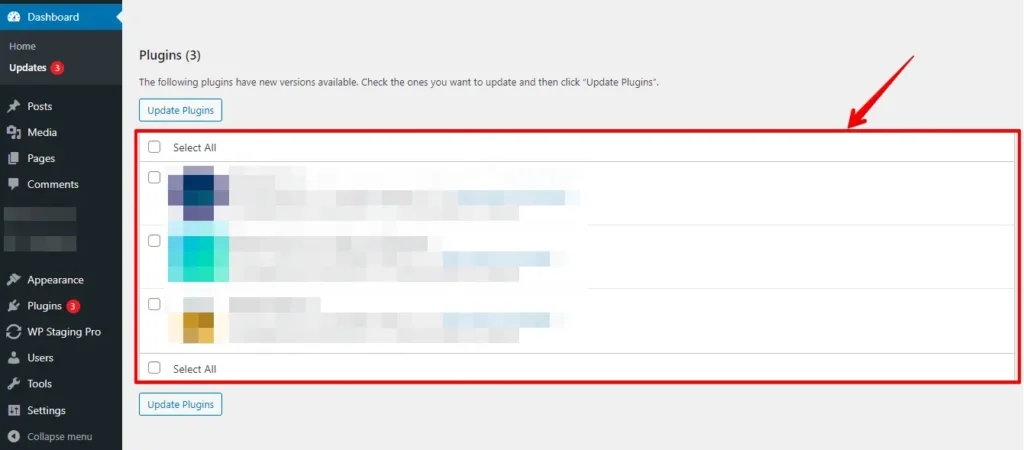
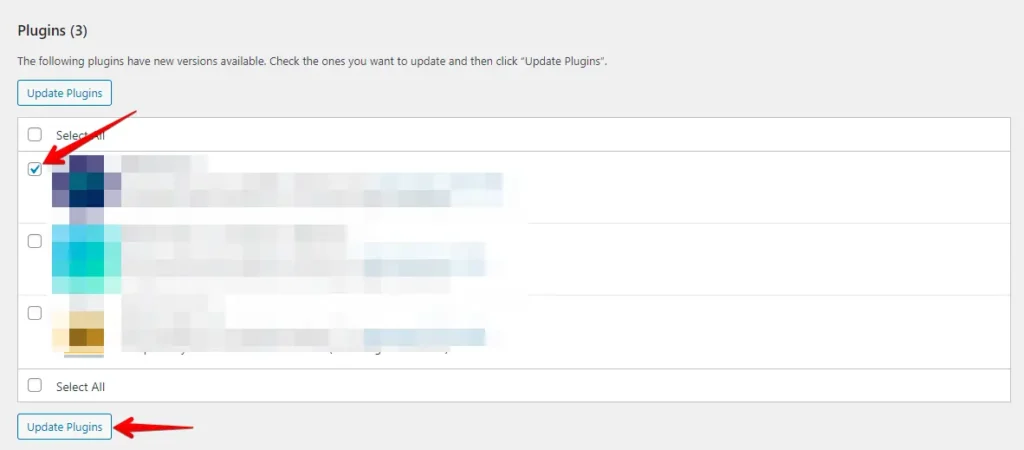
- To fix it, update the problematic item separately. Click on the stuck plugin, theme, or WordPress core update. WordPress will focus on updating only that item, often resolving the problem.
Deactivate All Plugins
Deactivating all plugins is a quick way to troubleshoot conflicts that might be causing the error. Here’s how to do it step by step:
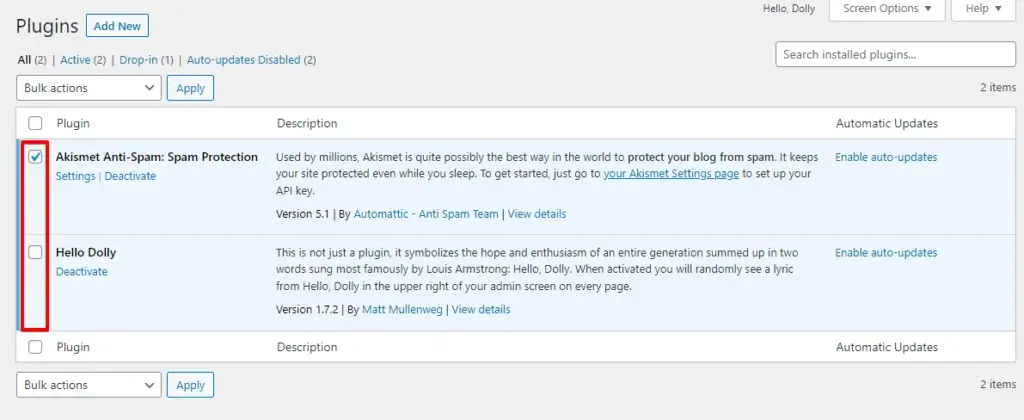
Log in to your site to access the WordPress admin dashboard. Go to “Plugins” in the sidebar, and click all the checkboxes next to the plugins.
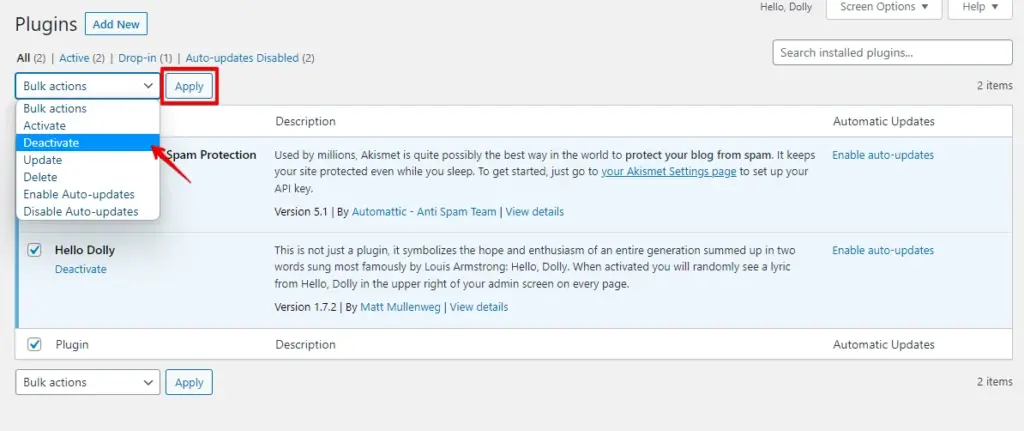
After selecting the plugins, go to the “Bulk Actions” dropdown at the top, choose “Deactivate,” and click the “Apply” button.
After deactivating all plugins, return to your site to check if the issue of plugins disappearing from the WordPress dashboard has been resolved. If the problem is gone, reactivate each plugin one by one to identify the one causing the issue.
Continue this process until you determine which specific plugin is responsible for the error.
Manually Identifying Plugin Conflicts Using Plugin
Manually testing for plugin conflicts can be time-consuming, but tools like Health Check & Troubleshooting make the process quicker and easier. Here’s a detailed method for both manual and automated approaches.
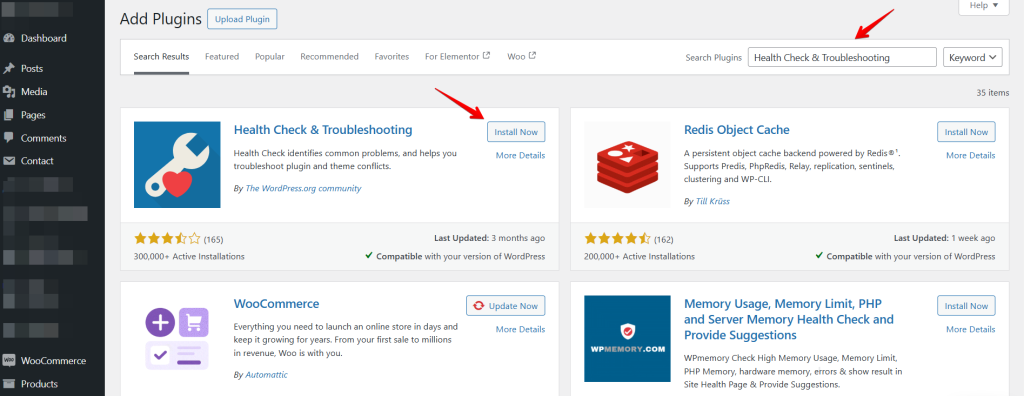
- Install and activate the Health Check & Troubleshooting plugin.
- Navigate to Tools > Site Health.
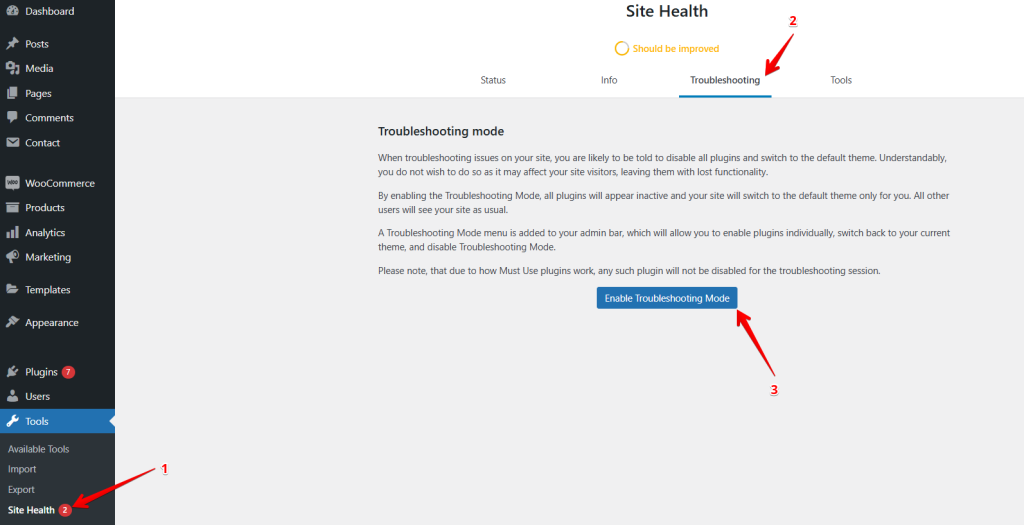
Thus, you can find the faulty plugin or theme on your WordPress site. Once the troubleshooting is done, click on Disable Troubleshooting Mode. Your site will return to its previous state.
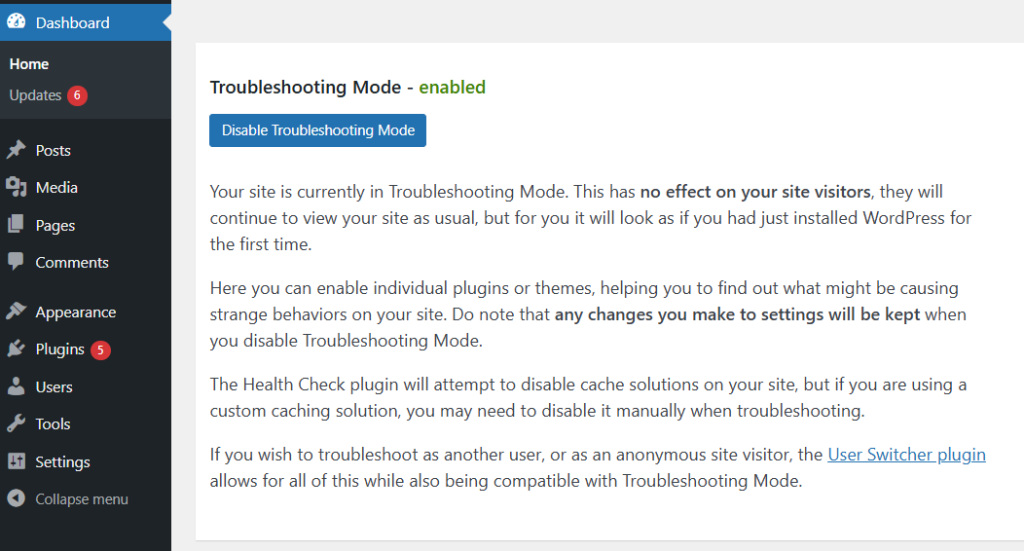
Don’t worry. This is only you who is seeing this happening. But your site is working fine on the visitors’ end. You may check it from incognito mode.
Another option is to activate and check the WordPress debug.log for errors. Read this extensive WordPress debugging guide!
Conclusion
Plugin conflicts can be frustrating, but they’re easy to solve with the proper steps. Disable plugins, check error logs, and use troubleshooting tools to find and fix issues quickly. Keeping plugins updated and following best practices can help prevent conflicts in the future.
Remember to always keep backups and regularly update your site and plugins to minimize these kinds of issues in the future.
Related Articles
- How to Fix the HTTP 501 Not Implemented Error in WordPress
- How to Fix the “Installation Failed: Could Not Create Directory.” Error in WordPress
- Featured Images don’t Show up in WordPress
- How to Fix “This Site Ahead Contains Harmful Programs”? (WordPress)
- How to Fix the 400 Bad Request Error on WordPress

