Learn how to save your entire website with WP Staging and how to back up and restore your WordPress website much faster than with any other backup plugin.
With WP Staging, you can create a backup of your entire WordPress website with one click and save it locally. You can also set up scheduled backup plans. So if your website breaks due to an updated plugin or an attack, you can restore it and bring it back to its previous working state.
TL;DR: WP STAGING backs up your WordPress files and database into a single encrypted archive. Restoration is a one-click process — no manual SQL import or FTP required.
Contents
If you’d rather watch a video than read it, look here. It explains all the steps of how to back up and restore WordPress:
Backup WordPress
Restore a WordPress backup
Before You Create a Backup
Before starting a backup, a few quick checks prevent the most common problems:
- Check available disk space. WP STAGING writes the backup archive to your server’s file system. A full-site backup requires roughly as much free space as the current size of your WordPress install. Check your hosting control panel or run
df -hon the server. - Deactivate aggressive caching plugins during the backup run. Some object-cache plugins hold database connections that can interfere with a full-database dump. Re-enable them once the backup completes.
- Enable maintenance mode if you’re backing up a busy e-commerce or membership site where mid-backup writes could produce an inconsistent snapshot.
- Confirm the backup destination. By default WP STAGING stores the
.wpstgarchive underwp-content/uploads/wp-staging/backups/. Make sure that directory is writable.
If you’re about to back up your live site before pushing changes from staging to production, run the backup first and confirm it completes before making any file or database changes.
For understanding what WP STAGING backs up at the database layer, the WordPress database structure guide explains each of the core tables. WordPress.org’s own backup documentation covers the fundamentals of what every WordPress backup should include.
Create a Backup of a WordPress Website
Backup Types
Before starting, choose which components to include. WP STAGING offers four backup scopes:
| Backup type | What it includes | When to use |
|---|---|---|
| Full site | Database + plugins + themes + media | Before any major update, migration, or deployment |
| Database only | All WordPress tables | Before a plugin update that only touches data, or a schema change |
| Files only | Plugins + themes + uploads (no database) | Before a theme customisation when data is unchanged |
| Scheduled backup | Full or partial, runs automatically | For automated daily or weekly protection |
For context on raw database exports without a plugin, the MySQL mysqldump documentation explains what a database-only export contains and how it differs from a plugin-managed backup.
Step-by-Step
If you have not done so, install the WP STAGING | PRO plugin first and read the article "How to install WP STAGING | PRO".
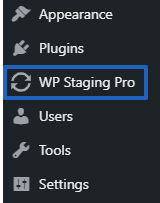
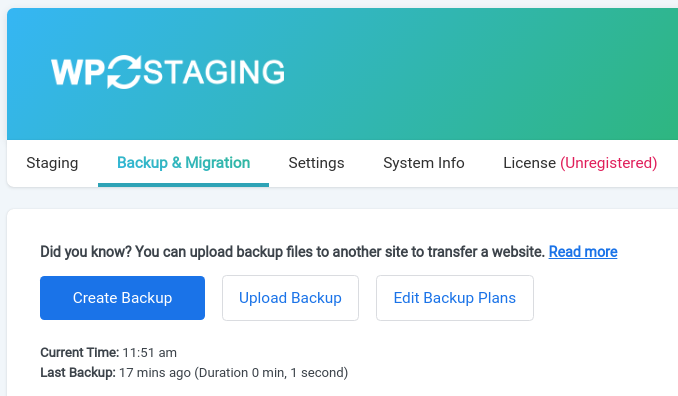
Go to WP Staging > Backup & Migration:
Click on "CREATE BACKUP."
In the opening modal, assign a name to identify the backup better and select if you want to back up the whole website or only plugins, themes, media files, or the database.
If you run a WordPress multisite website, you can specify if you want to back up all or only the current network website.
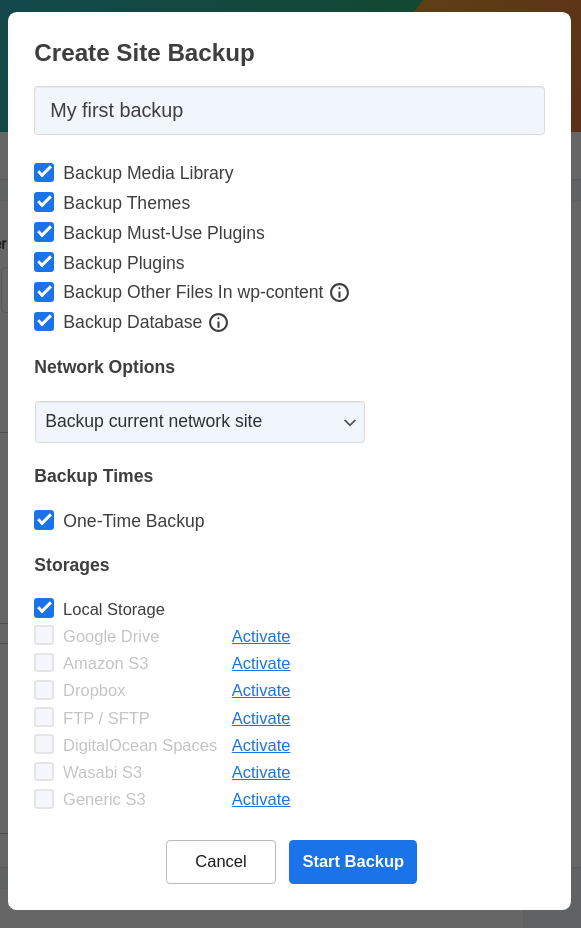
For instance, if you plan to update WooCommerce or any other plugin, you could name your backup "Backup before installing WooCommerce."
Then select the components of your website that WP STAGING | PRO should include in the backup. Leave all the boxes selected unless you want to include only a particular element.
Click on "Start Backup."
The time it takes to create a backup depends on the size of your website. In our testing with WP STAGING 4.x, sites under 500 MB back up in well under a minute — and WP STAGING is generally faster than other backup plugins for large sites.
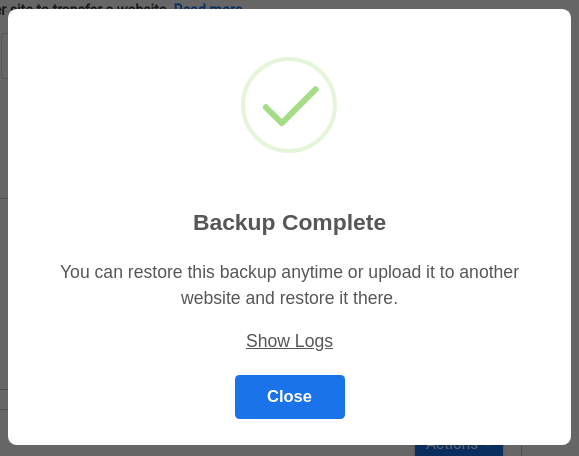
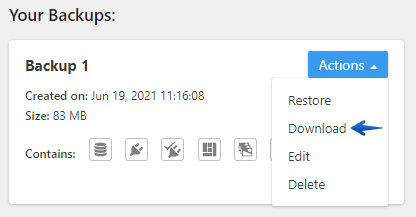
When the backup is ready, you will find it under "Your Backups." The icons indicate which components the backup includes.

Download the Backup File
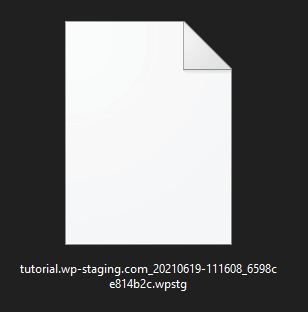
To download the backup, click Actions > Download. That will download a file with the extension ".wpstg."
Downloading the backup file to a local computer is strongly recommended. If an attacker compromises your server, they could delete the backup file stored there, leaving you without a restore point.
Restore the Backup on the Same or Another Server (Migration)
From WP STAGING support experience, the most common restore failure is a mismatched table prefix — if the backup was created on a site with a non-default prefix, check that wp-config.php on the destination uses the same prefix before starting the restore. See the full restore documentation for advanced options.
Restore to the Same Server
To restore the backup, select it from the existing list in WP Staging > Backup & Migration and click Actions > Restore. WP STAGING replaces the current site’s files and database with the backup contents.
Once the restore finishes, open your website and confirm it works as expected.
Restore to a New Host (Migration)
You can upload the backup file to any other existing WordPress website and use it to clone your website to another hosting provider and server. Make sure to back up before migrating on the destination site as well.
Go back to WP STAGING and click the "Upload Backup" button.
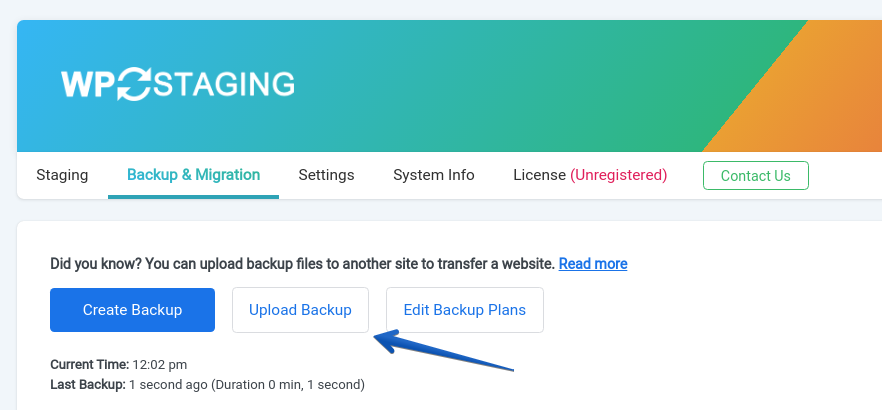
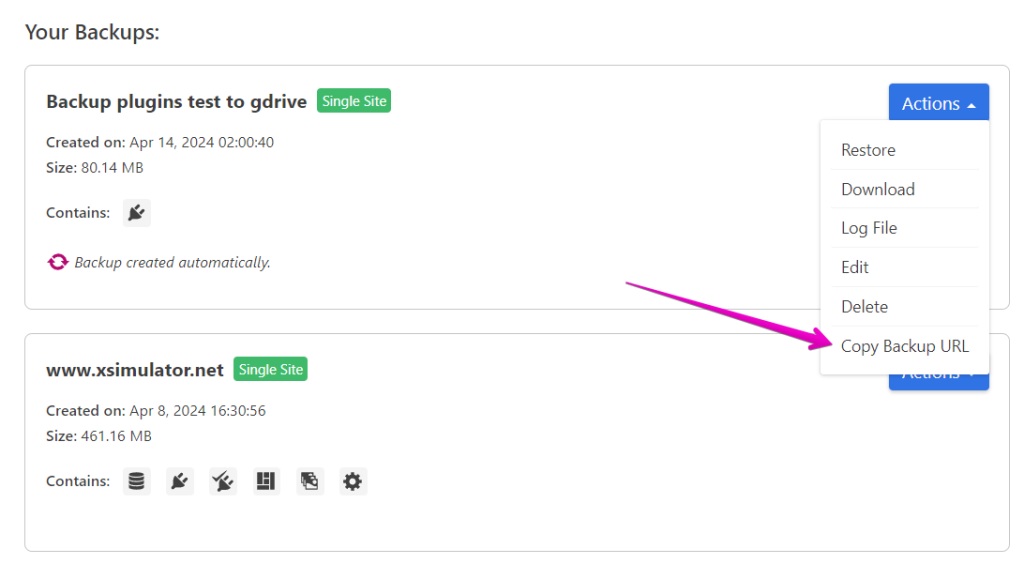
You can either upload the backup from your local computer or — faster — copy the backup URL from the source site. Copying the URL transfers the backup file directly between servers and is generally much quicker than a local upload.
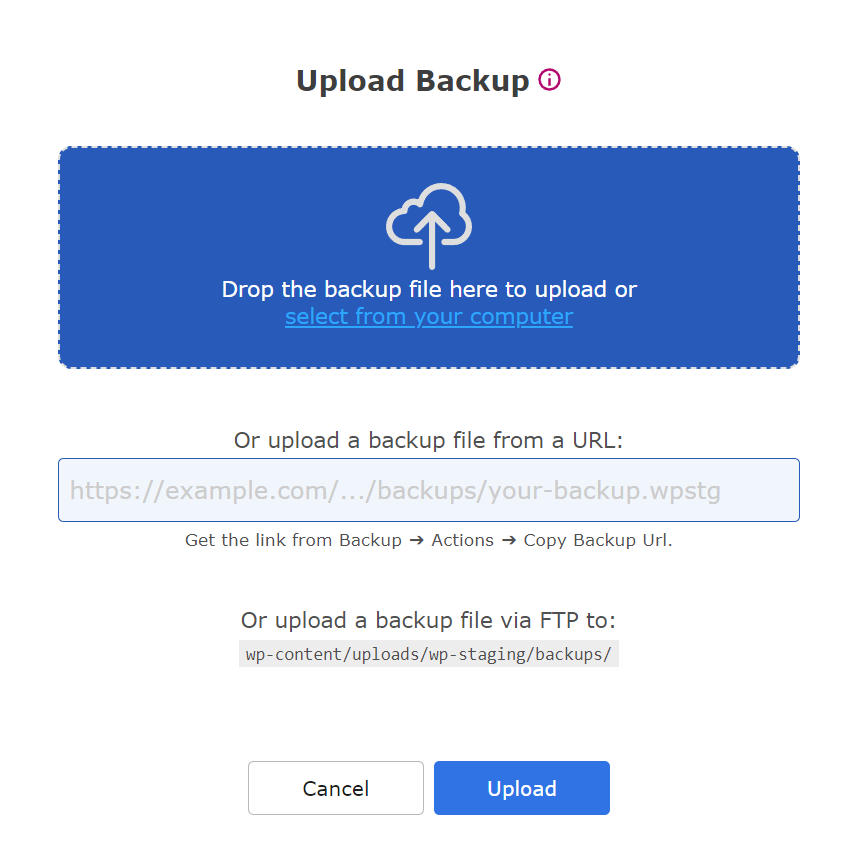
Optional — skip this step if you are uploading the backup from your local computer:
If you want to upload the backup by using its backup URL, go to your source website, WP Staging > Backup & Migration > Actions > Copy Backup URL:
Once the backup is uploaded, click on Actions and Restore.

You will see the "Finished" modal if the backup restore is successful.
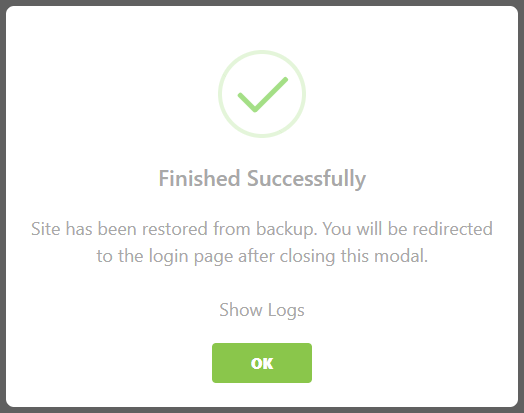
Open your website and test whether the website works as intended and is entirely functional.
You are done here! 🙂
For a related workflow, see creating a backup or staging clone — both approaches protect your site before making changes, but a staging clone keeps the copy live and editable while a backup is a point-in-time snapshot.
Restore from Command Line
For large backups or headless server environments, WP STAGING supports extracting backup archives on the command line on Linux, macOS, and Windows. This approach is useful when a PHP timeout prevents a browser-based restore for very large sites.
Restore a Multisite Backup to Another Multisite
Suppose you created a backup from a multisite network and want to restore it on another existing multisite, for example, to copy the multisite to another server. In that case, there are a few things to consider, depending on the multisite type you operate:
- Subdirectory-based network sites like mysite.com/site1, mysite.com/site2
- Subdomain-based network sites where every site has its own domain like sub.example.com, sub2.example.com, etc.
- Domain-based network sites can be set up on both types of installation.
WP STAGING can handle the following multisite setups out of the box:
Restoring subdirectory backup on subdirectory multisite
example.com will turn into destination.com
example.com/site1 will turn into destination.com/site1
example.com/site2 will turn into destination.com/site2
Restoring subdirectory backup on subdomain multisite
example.com will turn into destination.com
example.com/site1 will turn into site1.destination.com
example.com/site2 will turn into site2.destination.com
Restoring subdomain backup on subdirectory multisite
example.com will turn into destination.com
site1.example.com will turn into destination.com/site1
site2.example.com will turn into destination.com/site2
Restoring subdomain backup on subdomain multisite
example.com will turn into destination.com
site1.example.com will turn into site1.destination.com
site2.example.com will turn into site2.destination.com
Restoring domain-based backup on subdirectory multisite
example.com will turn into destination.com
site1.com will turn into destination.com/site1.com
site2.com will turn into destination.com/site2.com
To remove the Top-Level Domain ending, e.g. *.com (TLD), you can use this filter:
add_filter('wpstg.backup.restore.multisites.subsites', function($sites, $baseDomain, $basePath, $siteURL, $homeURL, $isSubdomainInstall) {

    $adjustedSites = [];

    foreach ($sites as $key => $site) {
        $site['adjustedPath']    = str_replace('.com', '', $site['adjustedPath']);
        $site['adjustedSiteUrl'] = $site['adjustedDomain'] . $site['adjustedPath'];
        $site['adjustedHomeUrl'] = $site['adjustedDomain'] . $site['adjustedPath'];

        $adjustedSites[] = $site;
    }

    return $adjustedSites;
}, 10, 6);Copy this filter in a mu-plugin and then start the backup restore process.
As a result:
example.com will turn into destination.com,
site1.com will turn into destination.com/site1
site2.com will turn into destination.com/site2
Restoring domain-based backup on subdomain multisite
example.com will turn into destination.com
site1.com will turn into site1.com.destination.com
site2.com will turn into site2.com.destination.com
To remove the Top-Level Domain ending, e.g., *.com (TLD), you can use the same filter as above:
add_filter('wpstg.backup.restore.multisites.subsites', function($sites, $baseDomain, $basePath, $siteURL, $homeURL, $isSubdomainInstall) {

    $adjustedSites = [];

    foreach ($sites as $key => $site) {
        $site['adjustedDomain']  = str_replace('.com.', '.', $site['adjustedDomain']);
        $site['adjustedSiteUrl'] = $site['adjustedDomain'] . $site['adjustedPath'];
        $site['adjustedHomeUrl'] = $site['adjustedDomain'] . $site['adjustedPath'];

        $adjustedSites[] = $site;
    }

    return $adjustedSites;
}, 10, 6);example.com will turn into destination.com
site1.com will turn into site1.destination.com
site2.com will turn into site2.destination.com
Replace destination hostname while restoring a multisite backup
Use the filter below to change the hostname of the destination multisite while restoring a multisite backup.
Example
www.example.com will turn into sandbox.example.com
add_filter('wpstg.backup.restore.multisites.subsites', function($sites, $baseDomain, $basePath, $siteURL, $homeURL, $isSubdomainInstall) {

    $adjustedSites = [];

    foreach ($sites as $key => $site) {
        $site['adjustedDomain']  = str_replace('www.', 'sandbox.', $site['domain']);
        $site['adjustedSiteUrl'] = $site['adjustedDomain'] . $site['adjustedPath'];
        $site['adjustedHomeUrl'] = $site['adjustedDomain'] . $site['adjustedPath'];

        $adjustedSites[] = $site;
    }

    return $adjustedSites;
}, 10, 6);That’s it. With WP STAGING | PRO, you have created a backup of your entire WordPress website and learned how you can restore it from a backup or migrate it to another system.
What to Do If the Restore Fails
Most restore failures have a straightforward root cause. Work through these checks before opening a support ticket.
White Screen After Restore
A white screen (HTTP 500) after a restore usually points to a PHP error or a missing plugin file. Enable WP_DEBUG_LOG in wp-config.php and check wp-content/debug.log, or review your server’s PHP error log. For a broader diagnostic workflow, see troubleshooting a failed restore .
Can’t Log In After Restore
If the wp-admin password is not accepted after a restore, the user table in the backup may carry different credentials than expected on the destination. See the dedicated guide: Can not log in after Restoring Backup .
Database Connection Error
"Error establishing a database connection" after a restore means the DB_HOST, DB_NAME, DB_USER, or DB_PASSWORD constants in wp-config.php on the destination don’t match the new server’s credentials. Update wp-config.php with the correct values for the new environment.
Permalink 404s After Restore
If pages return 404 errors after a successful restore, go to Settings > Permalinks and click Save Changes. This regenerates .htaccess with no content changes required.
.htaccess Not Restored
WP STAGING includes .htaccess in a full-site backup. If it was not restored (for example because a files-only or database-only backup type was used), regenerate it from Settings > Permalinks or copy a clean .htaccess from a reference WordPress install.
For broader recovery scenarios, including a completely inaccessible site, see restore a WordPress backup .
Related Articles
- How to Backup and Restore Your WordPress Website
- How to Create a WordPress Backup Manually: A Step-by-Step Guide
- The Ultimate Guide to Moving WordPress From a Subfolder To a Root Domain
- Can not log in after Restoring Backup
- Migrate Your WordPress Site to Another Host
- Increase database max_allowed_packet_size