If you manage a large or well-established website, there may be instances when you need to remove posts or pages. WordPress simplifies this process with a feature that allows you to swiftly delete items with just a click, moving them initially to a trash file where they can be permanently deleted later.
However, posts or pages sometimes don’t move to the trash as expected. This issue could arise from several causes, and identifying and resolving the underlying problem is critical to ensuring smooth content management.
Contents
What is an ‘Error Moving to Trash’ Error from WordPress
The “Error Moving to Trash” in WordPress is a notification when WordPress encounters issues while trying to delete posts or pages.
This problem can stem from various sources, such as caching issues, plugin conflicts, database errors, or incorrect file permissions.
Resolving it typically involves clearing caches, deactivating plugins to identify conflicts, repairing the WordPress database through tools like phpMyAdmin, and ensuring correct file permissions are set on your server.
Each step addresses a different potential root cause, helping restore the functionality to delete content as needed.
Step-by-Step Guide to Fix Error Moving to Trash
Note: Before making any changes, it’s wise to back up your website. That ensures you can swiftly revert to the previous state if anything goes awry. WP Staging offers a simple solution for setting up automatic backups. For additional assistance, refer to the backup and restore guide.
1. Reload the Page
Reloading the page can sometimes resolve the error of moving to the trash in WordPress, mainly if temporary server glitches or outdated cache data cause it.
By performing a simple reload or a hard refresh (using Ctrl + Shift + R Windows or Command + Shift + R on macOS), You can ensure that your browser fetches the latest data from the server.
This method is quick, easy, and often effective, making it a significant first step in troubleshooting before moving on to more complex solutions.
2. Try a Different Browser
Trying a different browser can help determine if the moving to the trash Error in WordPress is browser-specific. This method effectively identifies issues related to browser configurations, extensions, or outdated versions that may not support the current web technologies used by your server or WordPress site.
Accessing your site from another browser lets you quickly ascertain whether the problem remains across different platforms, indicating a more widespread issue.
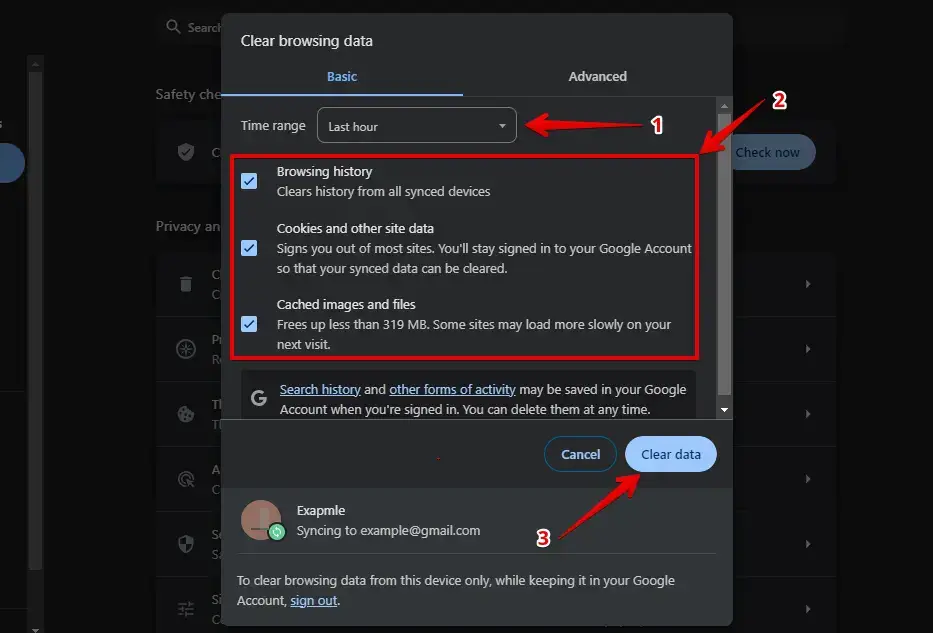
3. Clear Your Browser Cache
Clearing your browser cache can be helpful if you run into the moving to the trash Error on your WordPress site.
This approach deals with problems that might come from old or incorrect data stored in your browser, which could be causing the error.
Google Chrome: Press Ctrl + Shift + Delete, choose your preferred time range, and click “Clear Data.”
Mozilla Firefox: Press Ctrl + Shift + Delete, select the correct time range, and click “Clear Now.”
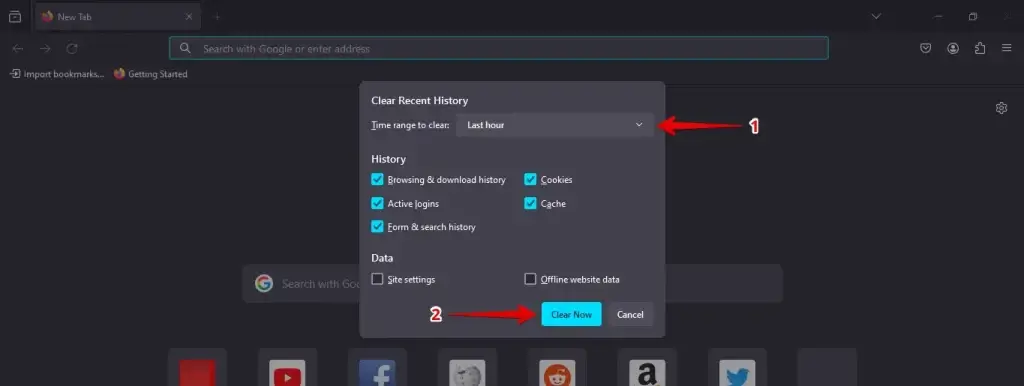
After clearing the cache, close and reopen your browser to ensure all changes take effect. Then, return to your WordPress site and check if the moving to the trash error has been resolved.
4. Deactivate Plugins
Deactivating plugins is a helpful way to troubleshoot the moving to the trash Error in WordPress. This error might be caused by a plugin that isn’t working right or is clashing with other parts of your site.
- Log in to your site to access the WordPress admin dashboard.
- Go to “Plugins” in the sidebar, select the checkboxes next to the plugins you want to disable, and choose multiple at once.

After selecting the plugins, go to the “Bulk Actions” dropdown at the top, choose “Deactivate,” and click the “Apply” button.
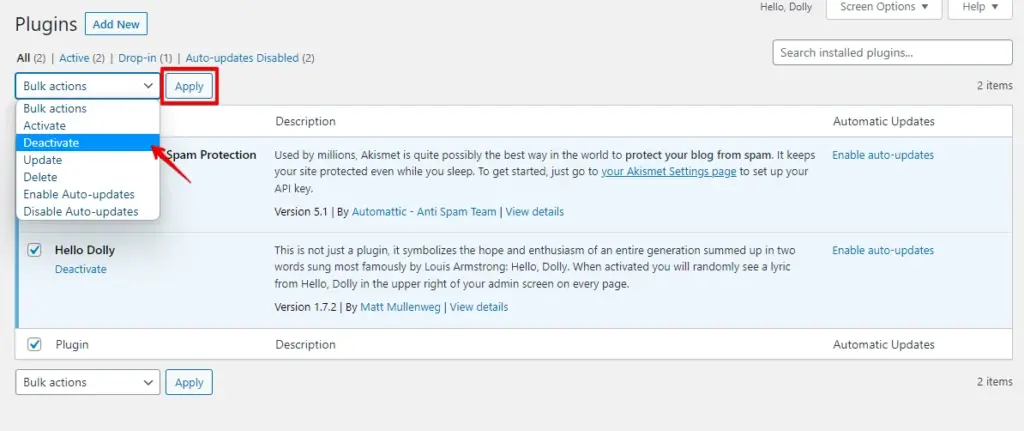
After deactivating all plugins, return to your site to check if the moving to the trash error has been resolved. If the error is gone, reactivate each plugin one by one to determine which one is causing the issue. Keep going until you identify the plugin that triggers the moving to the trash error.
5. Switch to a Default Theme
Switching to a default WordPress theme can help troubleshoot the HTTP 501 Not Implemented Error. This error could stem from conflicts or issues in your current theme that disrupt server communications or site functionality.
Log in to your WordPress dashboard, go to “Appearance” in the sidebar, click “Themes,” and activate the Default Theme.
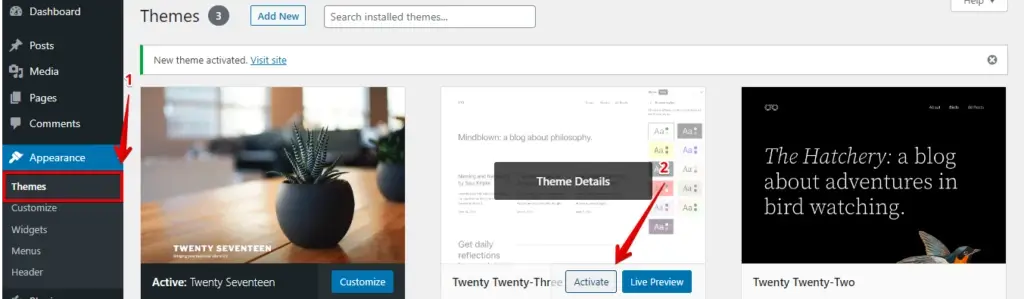
After switching to a default theme, check your site to see if the moving-to-the-trash error is resolved. If it disappears, your original theme is likely the cause.
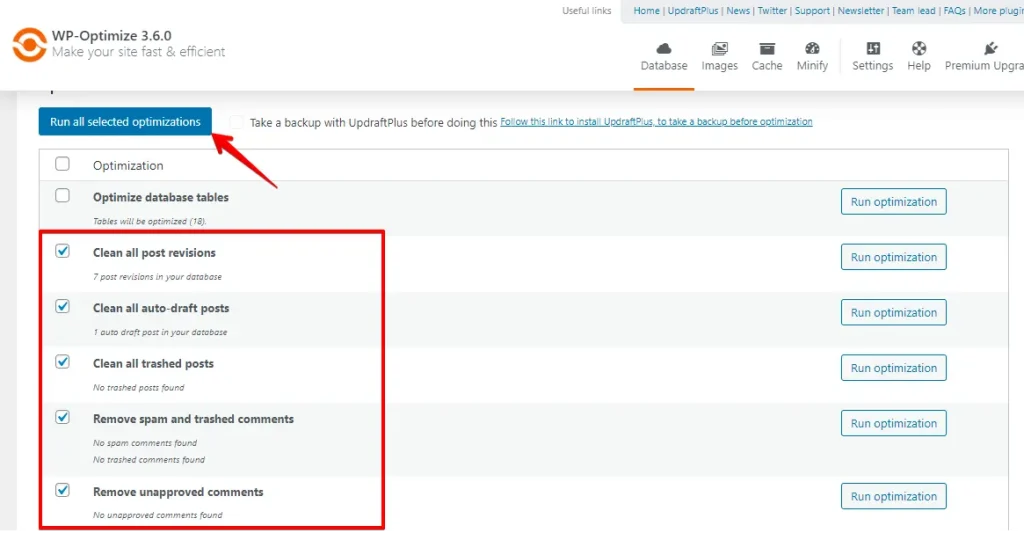
6. Database Corruption
A cluttered WordPress database can contain post revisions, expired transients, and other unnecessary data, contributing to the “Error Moving to Trash” issue.
Go to Plugins > Add New in your WordPress dashboard.
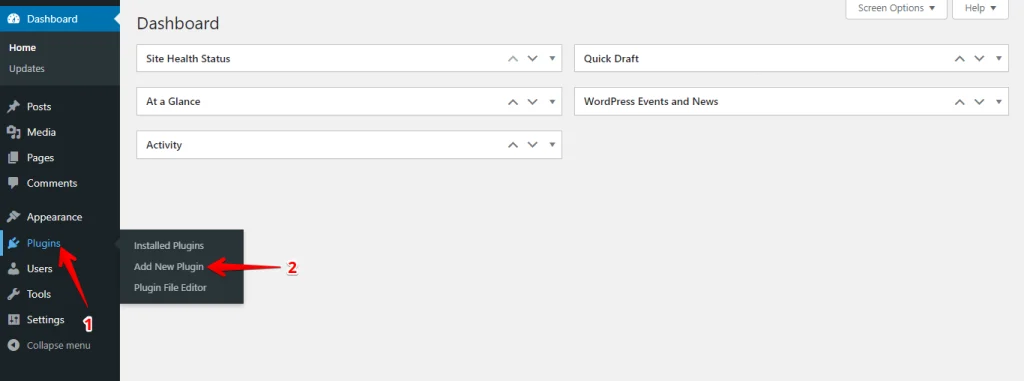
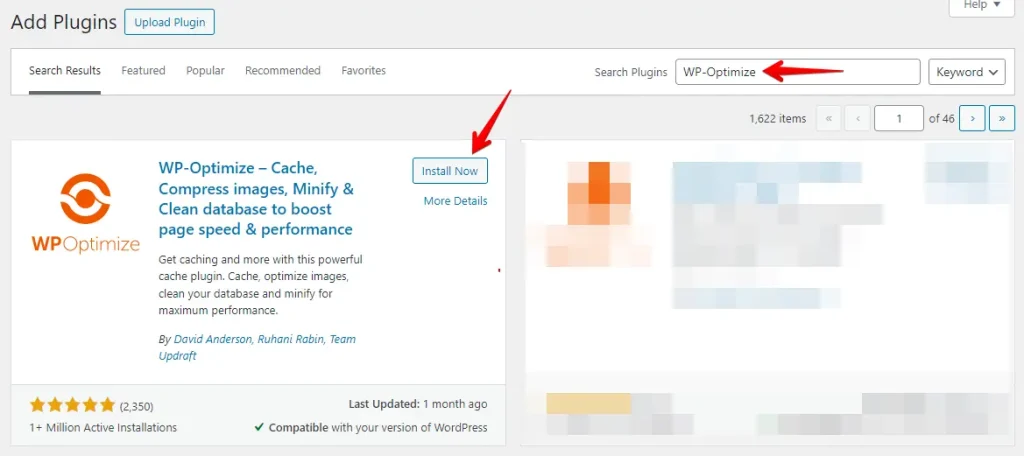
Search for “WP-Optimize” or “Advanced Database Cleaner” and click Install and Activate.
Go to the plugin’s settings page. Select the options to remove post revisions, trashed posts, spam comments, and expired transients. Finally, click Run Optimization to clean the database.
7. Check and Reset the .htaccess File
The .htaccess WordPress files can sometimes become corrupted or misconfigured, leading to errors like the HTTP 501 Not Implemented error. Here’s how to check and reset it:
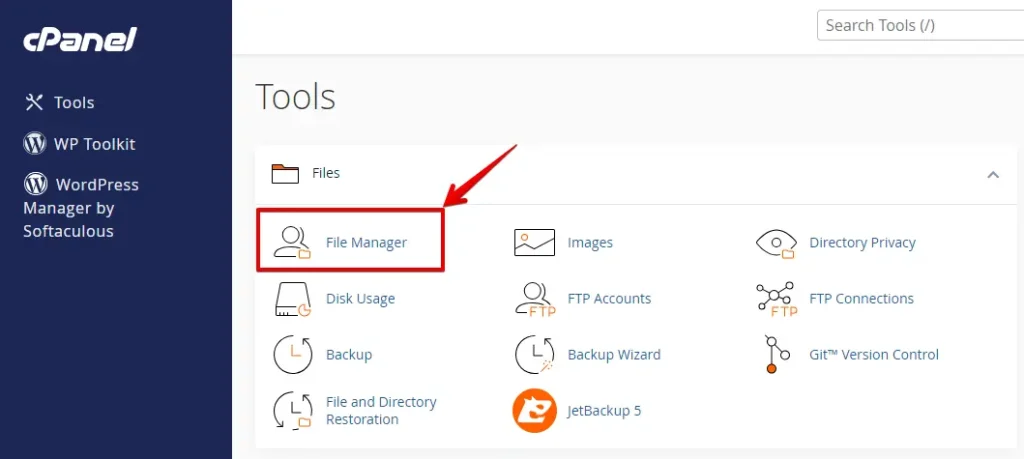
Log in to your hosting account and open the File Manager.
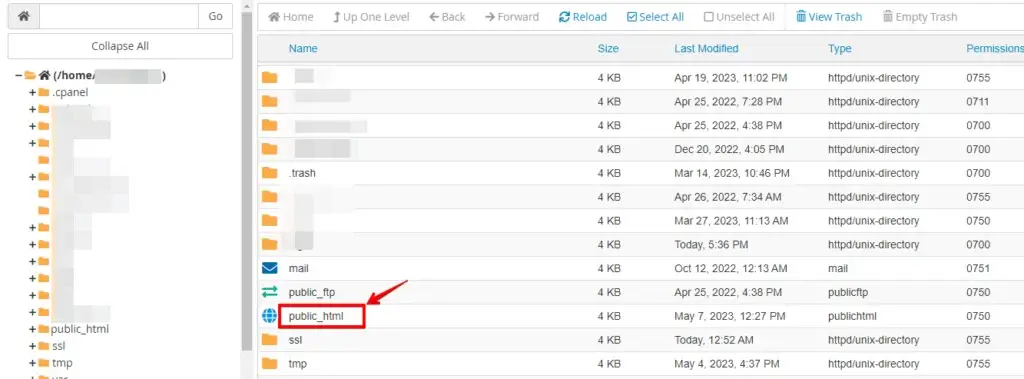
Find the root directory of your WordPress installation, often labeled as public_html or www, and open it.
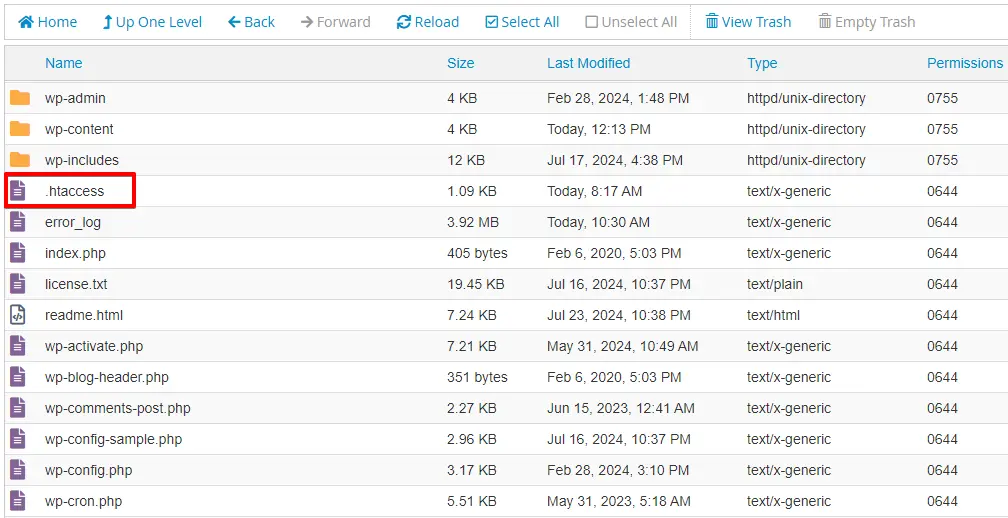
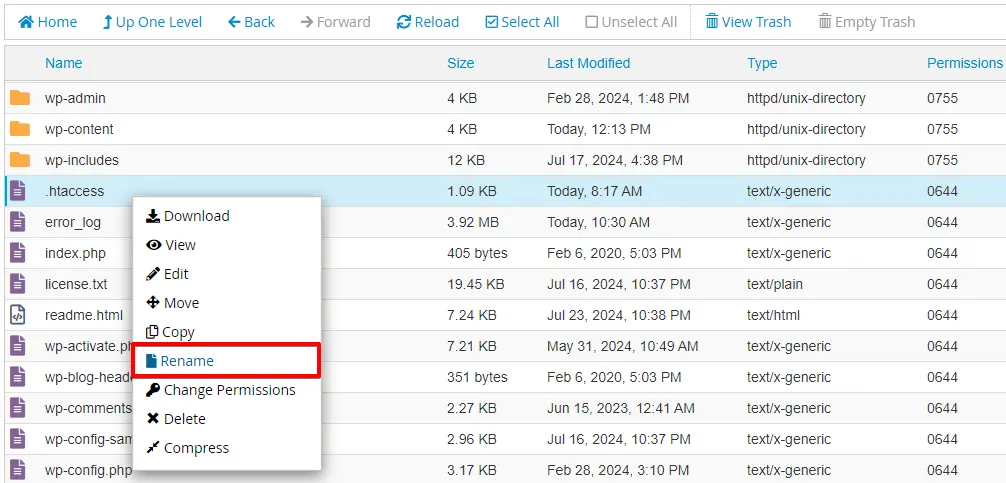
Locate the .htaccess file in the root directory.
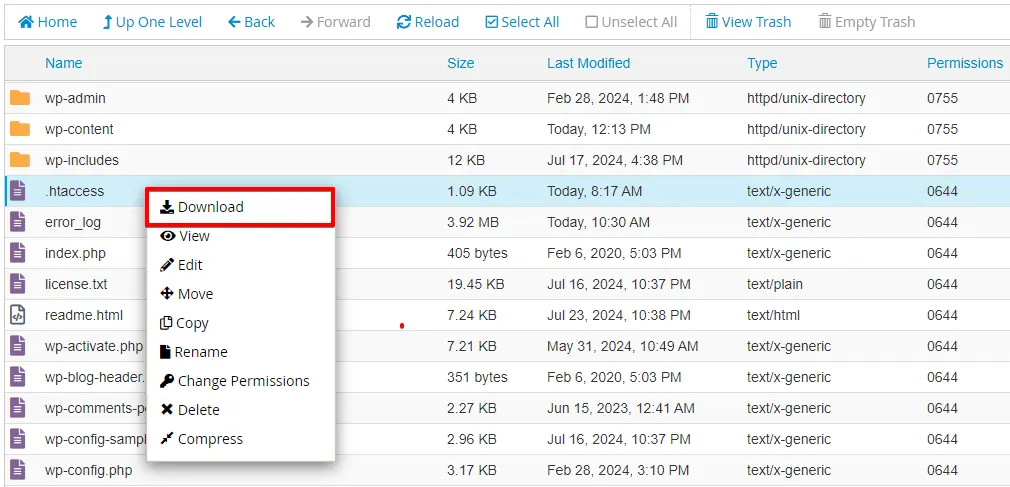
Right-click on the .htaccess file and select “Download” to create a backup on your computer.
After downloading the backup, right-click the .htaccess file again, choose “Rename,” and rename the file. This will temporarily disable it.
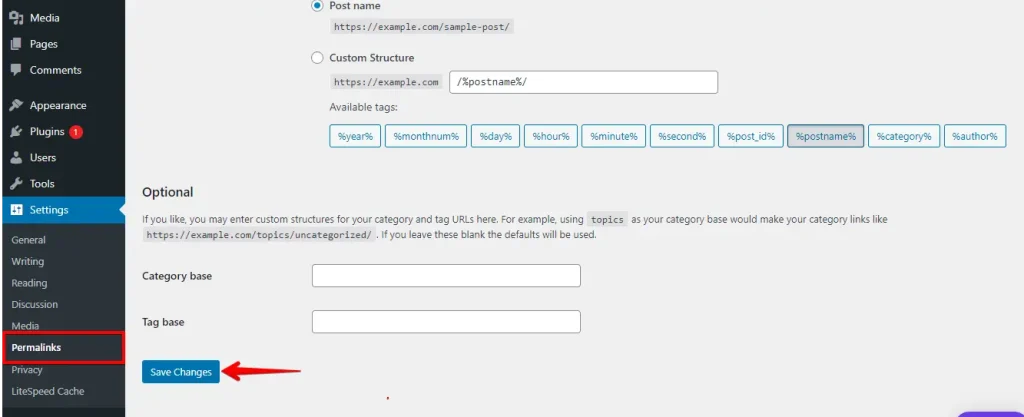
After renaming the file, regenerate a new .htaccess file by going to Settings > Permalinks in your WordPress dashboard and clicking “Save Changes.”
After creating the new .htaccess file, check your website to see if the moving to the trash error is resolved. If not, revert to the old .htaccess file and investigate other potential causes.
Conclusion
WordPress’s ‘Error Moving to Trash’ is manageable with systematic troubleshooting. You can maintain a smoothly running WordPress site by methodically checking for caching issues, plugin and theme conflicts, and database errors and ensuring proper file permissions. Regular maintenance and security measures are crucial in preventing errors and ensuring your site’s integrity.
Related Articles
- How to Fix the HTTP 501 Not Implemented Error in WordPress
- How to Fix the “Installation Failed: Could Not Create Directory.” Error in WordPress
- Featured Images don’t Show up in WordPress
- How to Fix “This Site Ahead Contains Harmful Programs”? (WordPress)
- How to Fix the 400 Bad Request Error on WordPress