Putting your WordPress site in maintenance mode is crucial when making significant updates or changes, acting as a virtual “Out of Service” sign to inform visitors that the site is temporarily unavailable. This precaution helps prevent new data loss, such as comments, posts, registrations, and orders, by blocking user interactions during the update process.
While enabling maintenance mode is essential, it’s common to worry about potential SEO impacts or the ability to revert the changes. Here’s a streamlined guide on how to effectively manage your WordPress site’s maintenance mode with minimal disruption:
- Choosing the Right Tool: Toggling maintenance mode on and off can be simplified by opting for a maintenance mode plugin, such as Maintenance.
- Regular Updates: WordPress automatically engages maintenance mode during routine updates of core files, plugins, and themes. However, manually activating maintenance mode requires extensive modifications like rebranding or server upgrades.
- Preparation Steps: Before initiating significant changes, always back up your site and preferably test updates in a staging environment. Tools like MalCare are recommended for their one-click solutions for automated backups and staging setup.
By following these steps, you can ensure your site remains stable and secure while updating, enhancing the user experience, and maintaining your site’s integrity.
Contents
1. Using a Maintenance Mode Plugin
A maintenance mode plugin effectively manages your WordPress site during updates, redesigns, or other changes. Here’s a detailed guide on how to use such a plugin, focusing on one of our recommended options, the “Maintenance” plugin.
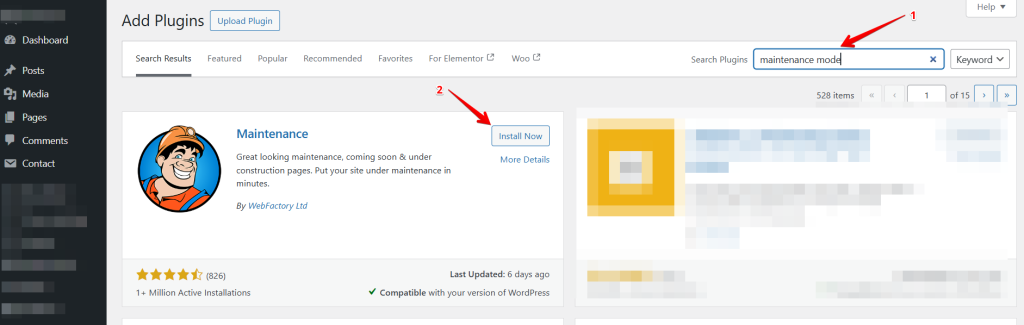
Choose and Install the Plugin
- Navigate to your WordPress dashboard and go to the Plugins section.
- Click on ‘Add New’ and search for “Maintenance.”
- Install and activate the plugin.
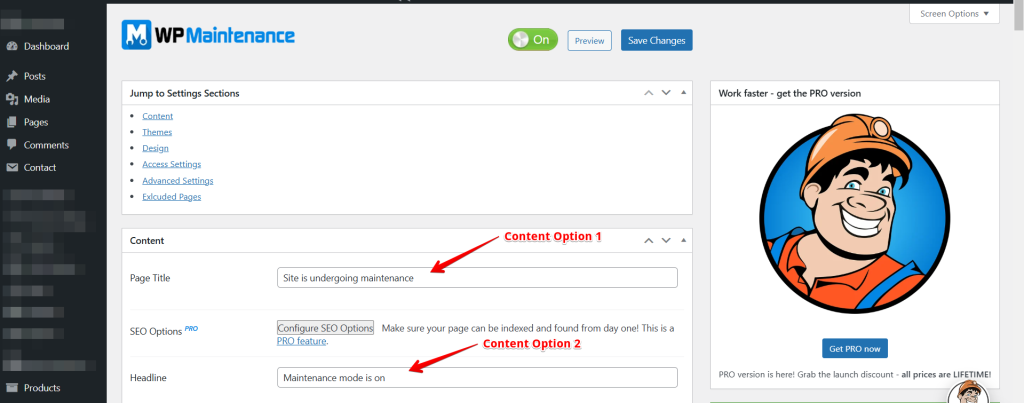
Customize Your Maintenance Page
- Once activated, the plugin automatically applies maintenance mode. If you want to change the content you’ll find the plugin settings under the Maintenance menu in your dashboard.
- Customize the message to inform visitors about the reason for the downtime. Go to the plugin settings, where you can configure various options.
Set Up SEO and Bot Settings
- Configure SEO settings to inform search engines that your site is temporarily down for maintenance. This helps ensure your site’s search rankings are not negatively impacted.
- Set a return time for search bots to revisit your site using the appropriate HTTP response codes or the retry-after header.
Enable Maintenance Mode
- Once everything is set up, enable maintenance mode with a simple toggle. Your site will now display the maintenance page to visitors while you make changes behind the scenes.
Disable Maintenance Mode
- When your updates or changes are complete, simply return to the plugin settings and turn off maintenance mode. This will once again make your site accessible to visitors and search engines.
2. Enabling Maintenance Mode Using functions.php
- Back-Up Your Site
- Always back up your entire website before making any changes to the theme files to avoid data loss in case of errors.
- Access the functions.php File
- In your WordPress dashboard, go to Appearance > Theme Editor.
- Select the functions.php file for your active theme from the list of theme files.
- Insert Maintenance Mode Code
- At the end of the functions.php file, paste the following PHP snippet:
// Activate WordPress Maintenance Mode

function wp_maintenance_mode() {

    if (!current_user_can('edit_themes') || !is_user_logged_in()) {

        wp_die('<h1>Under Maintenance</h1><br />Website under planned maintenance. Please check back later.');

    }

}

add_action('get_header', 'wp_maintenance_mode');- This configuration redirects all traffic to the
maintenance.htmlfile, except when this file is being accessed directly. TheR=307directive ensures that the redirect is recognized as temporary.
Test the Redirection:
Visit your site in an incognito window to confirm the maintenance mode works correctly. You should be redirected to the maintenance page.
Revert Changes:
When maintenance is complete, remove the added lines from the .htaccess file to disable the redirect.
Decide whether to keep or remove the maintenance.html file based on potential future needs.
This structured approach ensures that maintenance mode is implemented safely and effectively, minimizing disruption and maintaining accessibility for future updates.
3. Activating Maintenance Mode via .htaccess
- Create a Maintenance Page:
- Design a simple HTML page, maintenance.html, with a maintenance status message.
- Upload this file to your site’s root directory.
- Modify the .htaccess File:
- Use FTP or your hosting control panel to open the .htaccess file in your WordPress installation’s root directory.
- Add these lines at the top of the file, substituting example.com with your domain:
RewriteEngine On
RewriteBase /
RewriteCond %{REQUEST_URI} !^/maintenance\.html$
RewriteRule ^(.*)$ https://example.com/maintenance.html [R=307,L]- This configuration redirects all traffic to the maintenance.html file, except when this file is being accessed directly. The R=307 directive ensures that the redirect is recognized as temporary.
Test the Redirection:
- Visit your site in an incognito window to confirm the maintenance mode works correctly. You should be redirected to the maintenance page.
Revert Changes:
- When maintenance is complete, remove the added lines from the .htaccess file to disable the redirect.
- Decide whether to keep or remove the maintenance.html file based on potential future needs.
This structured approach ensures that maintenance mode is implemented safely and effectively, minimizing disruption and maintaining accessibility for future updates.
Benefits of Using a WordPress Maintenance Page
Enhanced Professionalism
A well-crafted maintenance page reflects your commitment to quality and user experience, presenting a polished front even during updates. This approach is far superior to exposing visitors to a site with errors or under-construction elements.
Trust and Communication
Openly informing visitors about ongoing maintenance can foster trust and set clear expectations. It reassures them that disruptions are temporary and enhancements are being made to improve their future visits.
SEO Protection
Regular downtime or error messages can harm your site’s reputation with search engines. A temporary maintenance page signals to search engines that the downtime is planned and temporary, safeguarding your rankings from adverse impacts.
Engagement Opportunities
A maintenance page isn’t just a placeholder. It’s a marketing opportunity. It can be strategically used to collect email addresses, encourage social media follows, or preview upcoming changes or offers. This keeps your audience engaged and anticipates your site’s return.
Conclusion
Using maintenance mode when updating your website is crucial to prevent losing data like new sign-ups or orders. To avoid the drawbacks of being offline, it’s essential to plan carefully. Use tools like MalCare for backups and to set up a test environment.
This lets you safely make and test changes without affecting your live site. Also, it enhances security with services that scan for malware, monitor in real-time, and provide firewall protection. These steps help keep your site safe and functional during updates.
Related Articles
- How to Fix the HTTP 501 Not Implemented Error in WordPress
- How to Fix the “Installation Failed: Could Not Create Directory.” Error in WordPress
- Featured Images don’t Show up in WordPress
- How to Fix “This Site Ahead Contains Harmful Programs”? (WordPress)
- How to Fix the 400 Bad Request Error on WordPress