Under rare circumstances, the connection between the staging and production site may get lost. In that case, you must reconnect the staging site with the live website.
There could also be a situation where a staging site was created with another tool and not WP STAGING. Then you may want to connect the existing staging site to use the WP STAGING features like using the PUSH function.
Under WP STAGING > Sites, you will see that your staging site is no listed any longer like this:
There are more situations why this list could be empty even though you still have a staging site available:
- You converted your staging site manually to the production site
- You deleted the database data that contains the WP STAGING settings
- You’ve restored your live site from a previous backup that does not include the latest staging site data.
If you moved your production and staging site to another server, read this guide:
How to reconnect the staging site after moving the website.
Another reason for the missing staging site could be that you created your staging site with an outdated WP STAGING version, like 1.6 or earlier, and then upgraded to the latest WP STAGING | PRO version.
If WP STAGING loses its connection to the staging site, it’s impossible to push the staging site to the production website any longer. You need to fix this first!
Contents
Reconnect Existing Staging Site with the Production Site
The easiest way to fix this is to follow these steps:
- Click on the button CREATE NEW STAGING SITE.

- Stop the staging site process at the first step by refreshing the browser.
- You’ll see a broken/unfinished staging site.
- Go to WP STAGING > Tools and search for the entry ABSPATH.
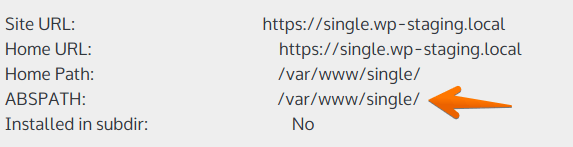
5. Copy the ABSPATH value and go to WP STAGING > Sites.
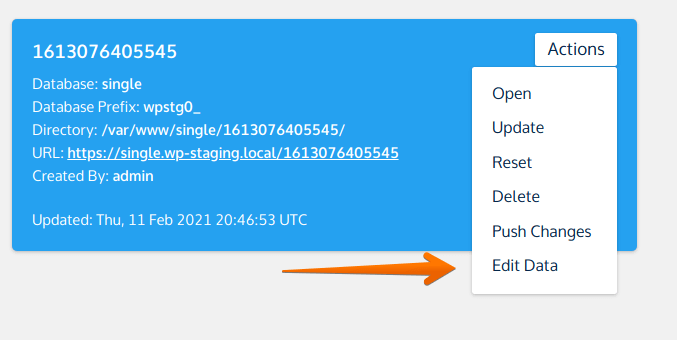
6. Find your staging site and click on Edit Data:
7. Enter the Target Directory full path to your staging site.
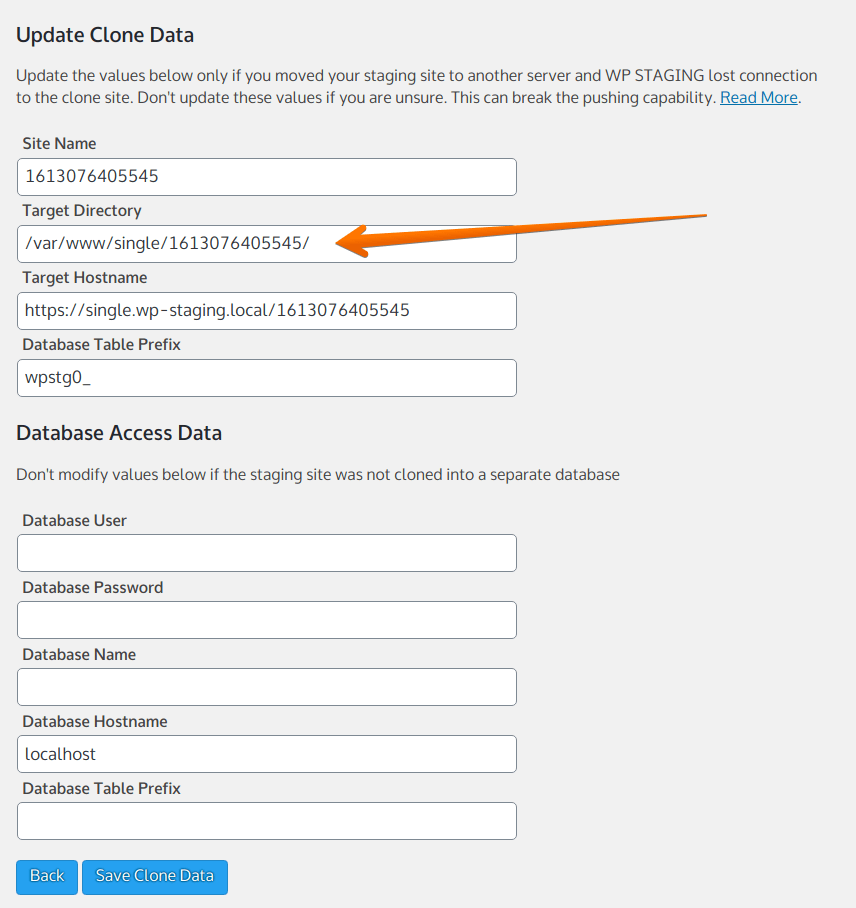
- Update the Target Hostname to the same URL where your staging site is available.
- Don’t change the Database Access Data settings if the staging site is in the same database as the production site.
- Update the database credentials if the staging site is connected to a separate database.
8. Click on “Save Clone Data.”
Refresh the page, and you should be able to push your staging site!
Reconnect Manually By Editing the Database
If you are familiar with PhpMyAdmin and are not scared of modifying the production database, you can reconnect your staging site by changing the database’s relevant data.
You cannot break anything as long as you change the mentioned values only. It’s still a good idea to make a backup first!
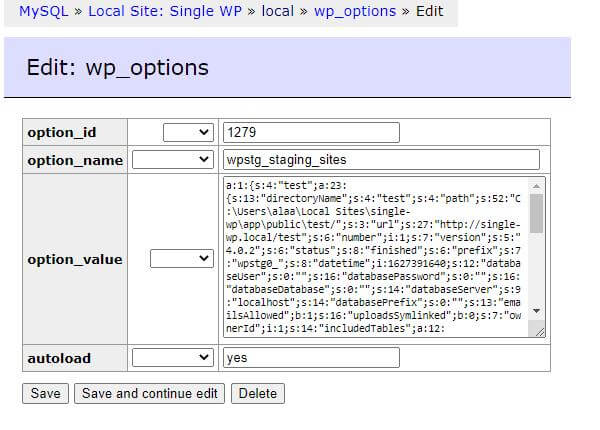
WP STAGING stores all its staging sites as serialized data in the table wp_options and in the row with the option_name wpstg_staging_sites
Note: Since 2.8.7 wpstg_existing_clones_beta has been renamed to wpstg_staging_sites.
- So, create first a new staging site!
- Give it any name but not the same as the staging site you like to connect to.
- To speed up the cloning process, you can exclude all files and database tables!
That will create a data set like this in the table wpstg_staging_sites
a:1:{s:4:"test";a:13:{s:13:"directoryName";s:4:"test";s:4:"path";s:44:"/srv/www/wordpress-default/public_html/test/";s:3:"url";s:32:"http://local.wordpress.test/test";s:6:"number";i:1;s:7:"version";s:5:"2.8.3";s:6:"status";b:0;s:6:"prefix";s:7:"wpstg0_";s:8:"datetime";i:1556125383;s:12:"databaseUser";s:0:"";s:16:"databasePassword";s:0:"";s:16:"databaseDatabase";s:0:"";s:14:"databaseServer";s:9:"localhost";s:14:"databasePrefix";s:3:"wp_";}}Get this data and copy it.
As you can see, this data set is for a staging site with the following parameters:
- name
test - Directory location
/srv/www/wordpress-default/public_html/test/ - URL
http://local.wordpress.test/test
As this is a serialized data set, you can not do a simple search & replace, and you need to follow the instructions below carefully:
- Open phpMyAdmin and look for the
option_namewpstg_staging_sitesin the database tablewp_options. - Get the value of that column and copy it into an empty text file for backup purposes.
- The next step is to open the PHP serialized data online editor from the link below and paste the data into the input-form 1 (Paste in serialized PHP here)
http://sciactive.com/phpserialeditor.php
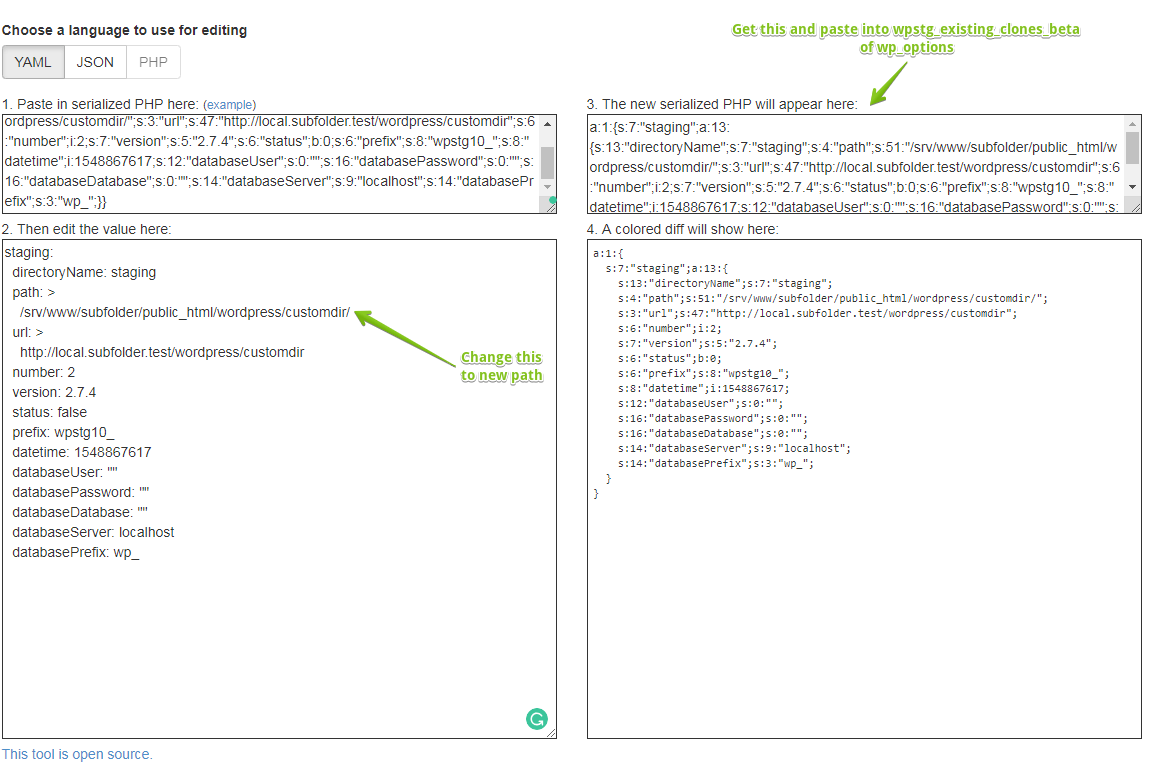
- Now, change the path to the staging site in the input form number 2 to your staging site’s new location!
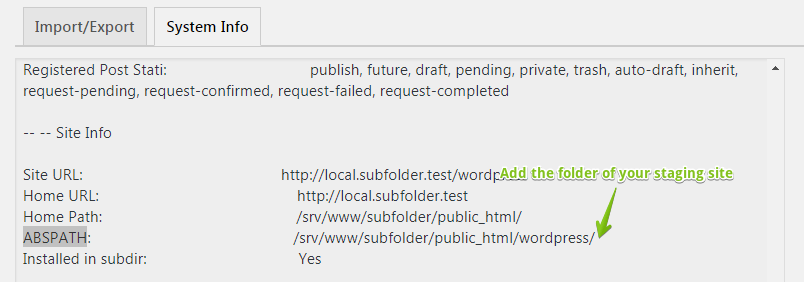
You can get the destination by looking into the system info at
WP Staging > tools > system info and finding the value ABSPATH.
- That is the path to the root directory of your WordPress website.
Just add the subfolder name of the staging site, and you’ll get the full path to your staging site:
- Go back to phpMyAdmin and paste the modified serialized PHP data back into the field,
wpstg_staging_sites.Overwrite the value and save it.
WP Staging has now connected to your staging site, and you can migrate your staging site to live by going to WP Staging > Sites.
If you struggle with these steps, get in contact with us, and we’ll help you with it.