Backing up your WordPress database is crucial for security and stability. It allows quick restoration in case of data loss, hacking, or server crashes.
You can use plugins for automatic backups or manually back up your database, which is important when switching servers or setting up a staging environment.
While both methods are easy to follow, manual backups require more technical skills, whereas WP Staging provides an automated solution.
Contents
Why Copy a WordPress Database?
Backup: Regular backups of your WordPress database ensure that in case of data loss, hacking, or server failure, you can quickly restore your website to its previous state.
Migration: Moving your website to a new hosting provider or changing your domain often requires copying the database to the new environment.
Staging Environment: Creating a staging site allows you to test updates, themes, and plugins without affecting the live site.
Development: Developers often copy the live database to a local environment for debugging or feature development.
Getting the Setup Right
Before proceeding, it’s important to know that this process involves some technical steps. You’ll find it easier to follow along if you’re comfortable with basic tech tasks.
- Database – This is usually stored in a MySQL database and contains your blog posts, comments, settings, and other vital data.
- WP Staging – If you’re using WP Staging, the backup process becomes much easier. This tool automatically creates a safe copy of your site.
Method 1: Copying a WordPress Database Manually
Access the phpMyAdmin Panel – First, log into your hosting account and open the phpMyAdmin panel to back up your WordPress database. This tool lets you manage and export your WordPress database. Click here to learn more about WordPress database structure.
Select Your WordPress Database – Inside the phpMyAdmin panel, locate and select the database linked to your WordPress site. You can find your database name in the wp-config.php file.
Export the Database – After selecting the correct database, click on the “Export” tab at the top. This will show you the available options for exporting your database.
Choose the Format and Save the Backup—Choose a format for your backup (SQL, CSV, etc.). It’s best to go with SQL, as it’s the most complete and compatible with WordPress. Once selected, click “Go” to begin the export, and your browser will ask where to save the backup file.
Once you find phpMyAdmin, log in and go to the ‘Database’ tab to see all your databases. If you’re unsure which one belongs to your WordPress site, you can quickly check by accessing your wp-config.php file via your file manager. Look for this line:
define('DB_NAME', 'database_name');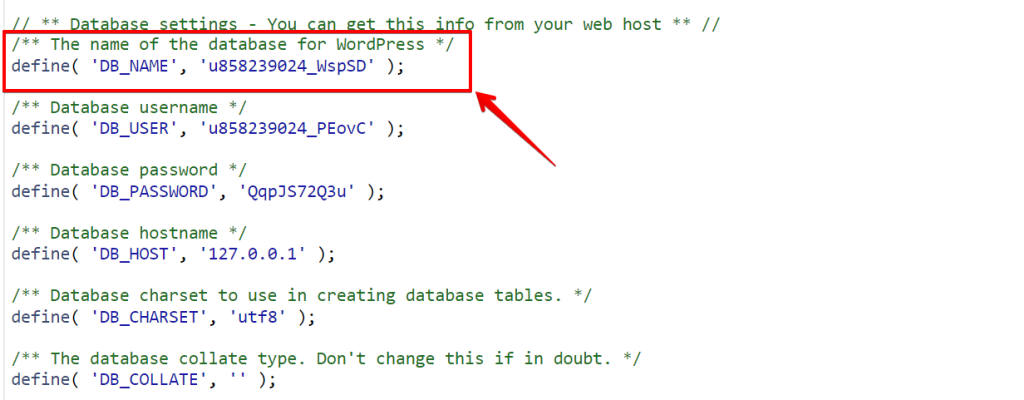
Your database’s name is inside the quotes. Go back to phpMyAdmin, find that database, and open it. You’ll see several tables appear.
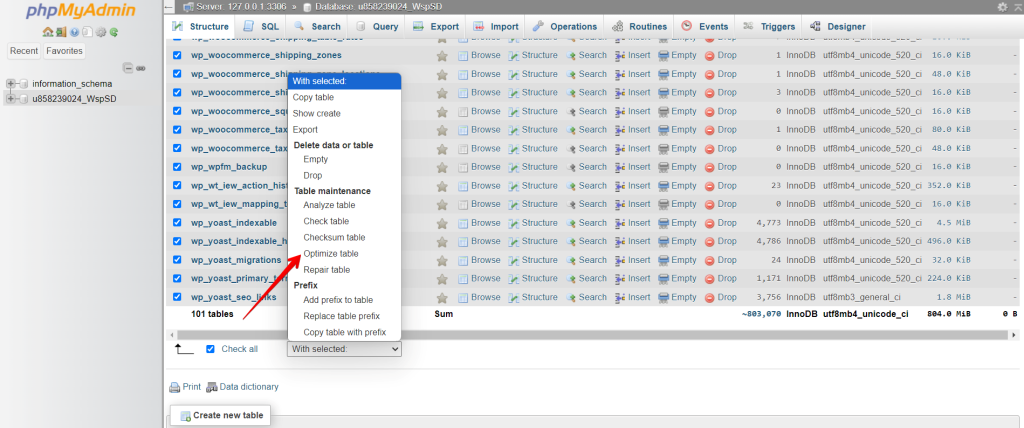
Select them all (use the ‘Check all’ option), and then before exporting its better to optimize the table and click the ‘Export’ tab. Set the format to ‘SQL’ and proceed with the export.
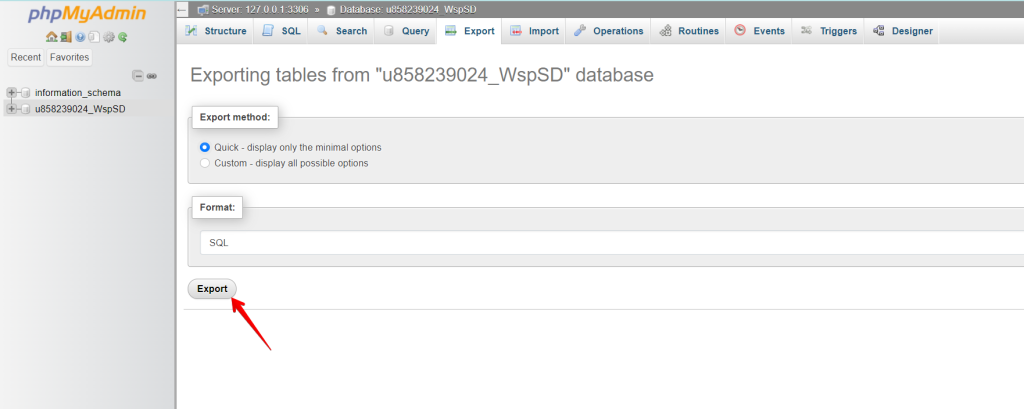
Finally, click ‘Go’ or ‘Export,’ which starts the process. Wait for the download to finish, and you’re done!
Method 2: Copying a WordPress Database Using WP Staging
WP Staging is a WordPress plugin that simplifies creating a clone or staging site of your website, including the database. This is an effective way to fix problems like website glitches or lost data, plugins, or updates without affecting your live site.
- Go to the left menu and click on ‘WP Staging.’
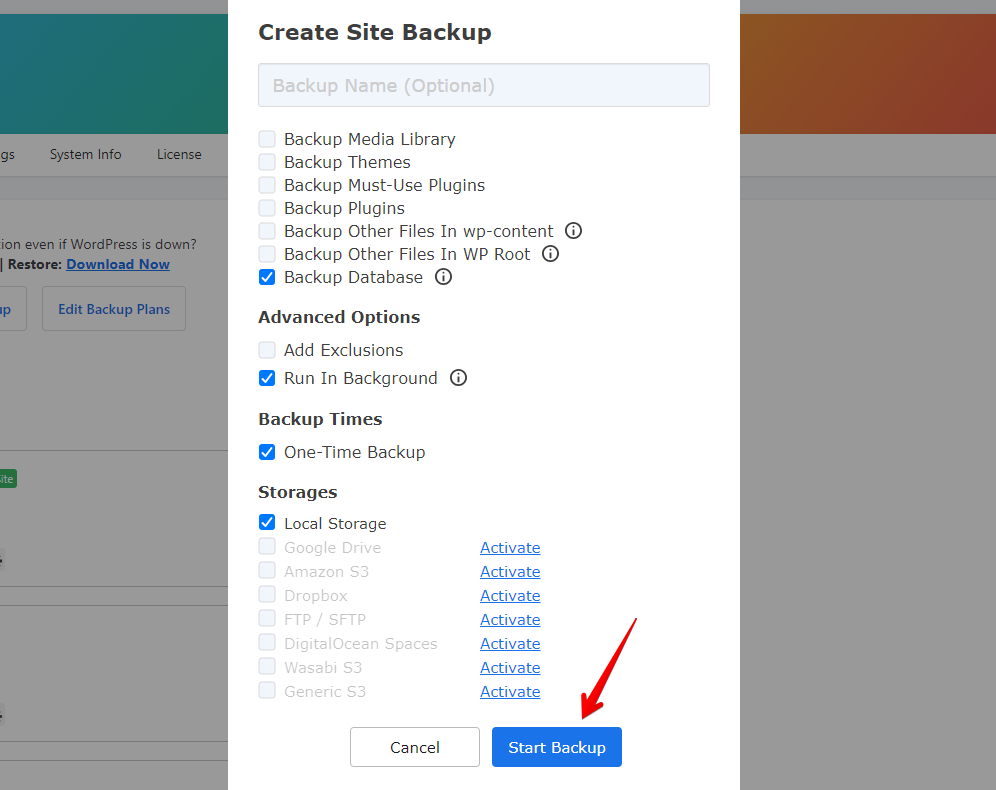
- Under that, choose ‘Backup & Migration,’ then hit the ‘Create Backup’ button.
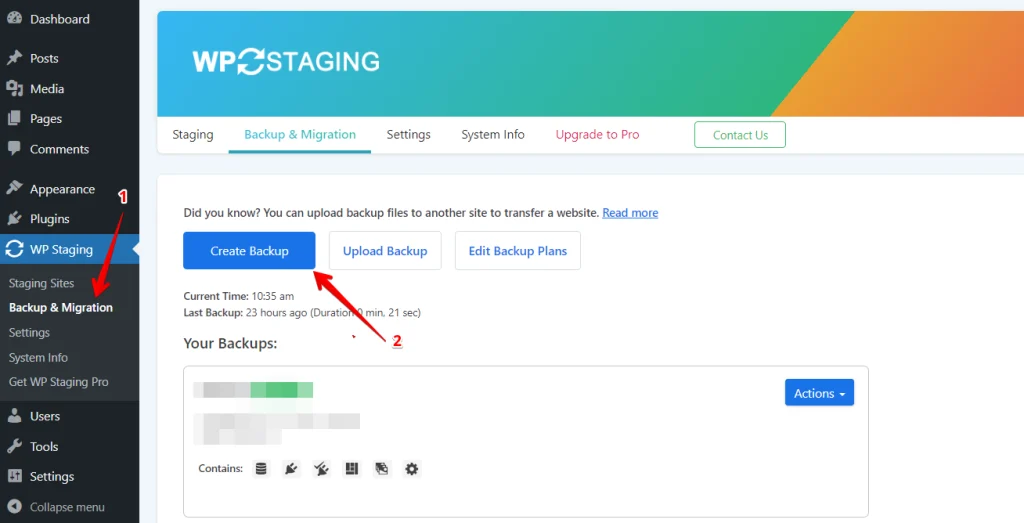
A box will appear, offering various options. Uncheck all other options if you only want to back up your themes or plugins. WP Staging allows you to store your backups on Amazon S3, Google Drive, DigitalOcean Spaces, FTP/SFTP, Wasabi S3, Generic S3, and Dropbox.
Note: To save backups in cloud storage, you’ll need the Pro version of WP Staging.
- Selecting the’ Backup Database’ option creates a backup specifically for the database. You can choose the save location, link it to your account, and click ‘Start Backup’ to initiate the process.
Restore
Next, let’s talk about the restore feature. You’ll see a few options under the action button, like download, restore, and others. Want to keep the backup on your computer? Just hit download. Need to use the backup? Press Restore.
Note: You’ll need the WP Staging Pro version to restore a backup.
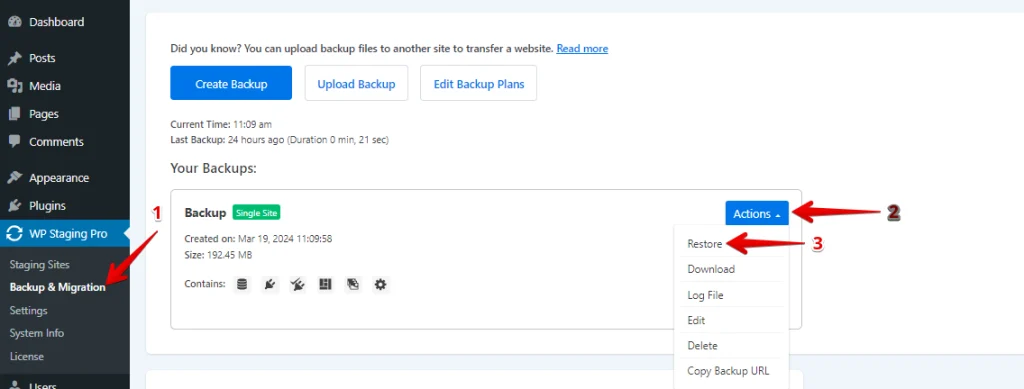
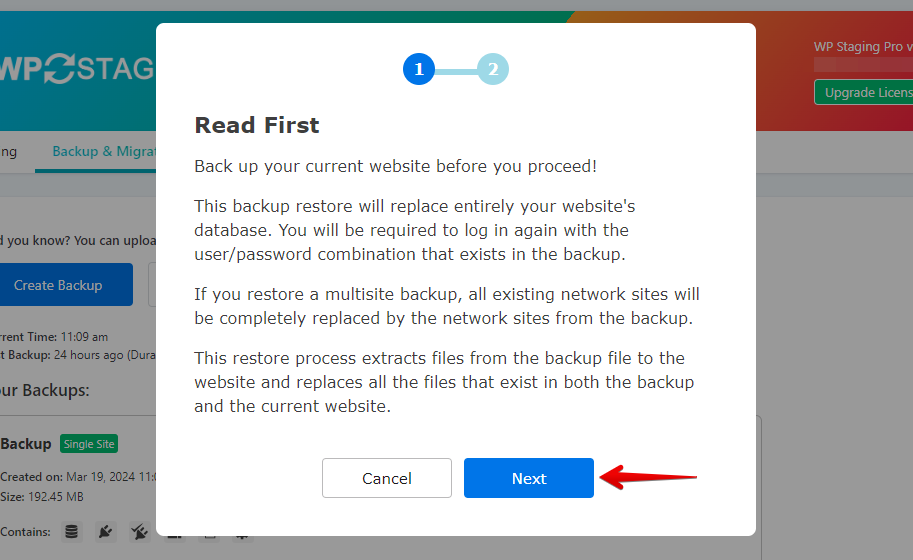
Click the “Restore” button, and a popup will appear. Inside, you’ll see two buttons: “Cancel” and “Next.” Click on “Next” to proceed.
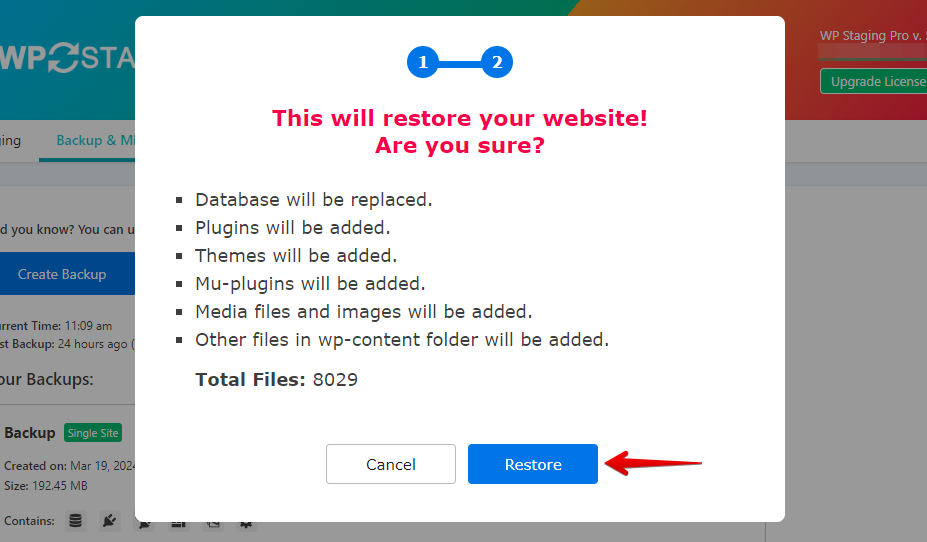
After you click “Next,” a new box will pop up. Then, click “Restore” to start restoring.
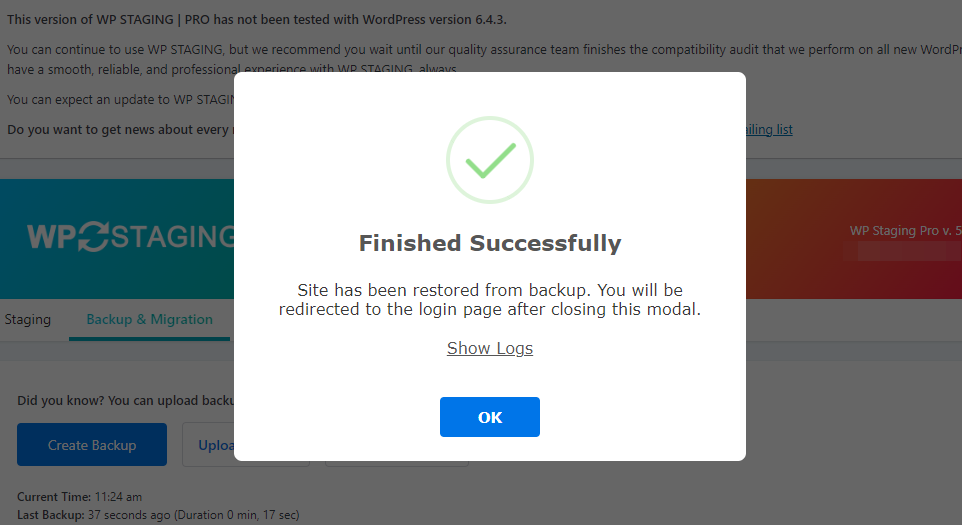
You’ll see a message in the next pop-up saying the restoration is done.
Scheduling Automatic Backups
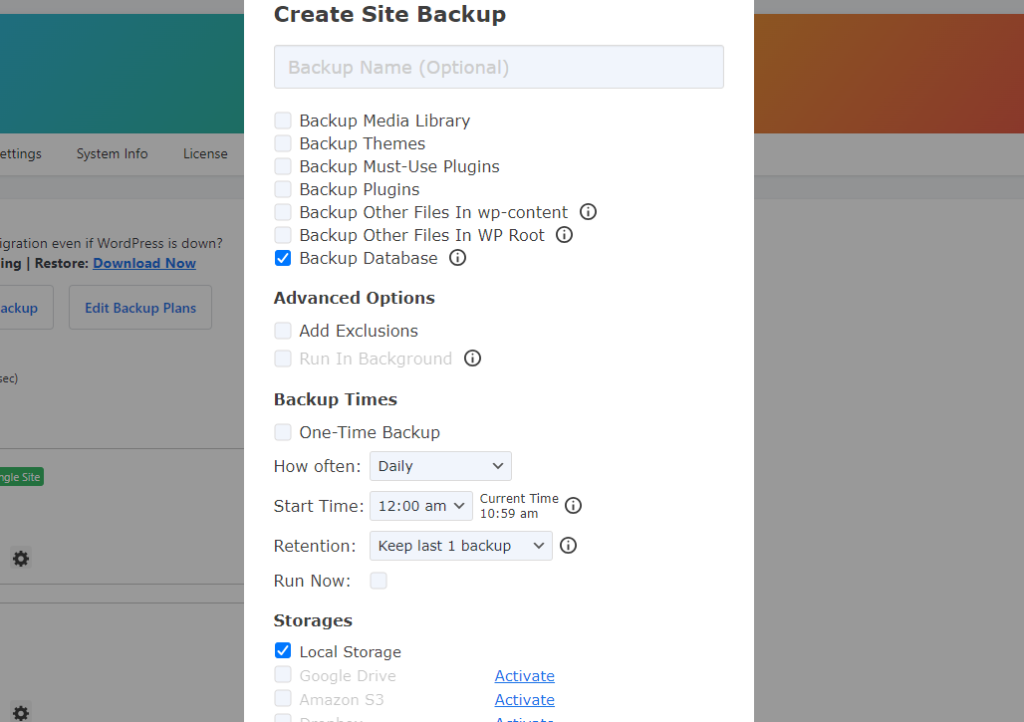
With WP STAGING, you can save time and hassle by setting backups to run automatically. No more having to remember to back up your site every time you make a change. You can chill, knowing your website is always backed up and safe.
Backup “Create Backup,” uncheck “One-Time-Only,” and then choose from the options displayed how often backups happen, when they start, and how many backups to keep.
Conclusion
Copying a WordPress database is essential for site migration, backup, and staging. The manual phpMyAdmin method provides complete control over the process, ideal for those comfortable with technical tasks. Meanwhile, WP Staging offers a more automated and user-friendly approach, especially for creating a clone or staging site for testing.

