I’m sure you love your website and can’t afford to lose it. Every website can get hacked or attacked by malicious software. Especially, WordPress websites are a lucrative target for attackers.
WordPress is a very robust system, but there are situations where your WordPress site can be compromised just because of poorly coded plugins. In that case, you must know how to manually backup your website.
Contents
- Why do I need a WordPress Backup?
- Heads Up!
- Recommendation
- Plan for the Manual WordPress Backup
- Prerequisites of a Manual WordPress Backup
- Steps to Do Manual Backup Of WordPress Website
- Manual Backup of WordPress Files using File Manager from cPanel
- Download the Backup File
- Manual Backup of WordPress Files using FTP
- Below are the reasons why we considered it our secondary option
- List of best FTP Software for Manual WordPress Website Backup
- Step 1. How to Download FileZilla FTP client
- Step 2. Open Filezilla Client to See Local and Remote Sites
- Step 3. Connect to the Remote Site using FTP Credentials
- Step 4. Download the Manual Backup of the WordPress Website using FTP
- How to Manually Download the Backup of WordPress Database
- How to do a Manual Backup of the WordPress Database Using phpMyAdmin
- How to Download WordPress Database Backup without phpMyAdmin?
- Post Backup Tasks and Precautions
- Pros and Cons of a Manual WordPress Website Backup
- Conclusion: What’s the Best Option to Backup the WordPress Website?
- Alternative Automatic Backup Solution
- Related Articles
Why do I need a WordPress Backup?
Maybe you installed a malicious theme, plugin, or addon, which led to locking yourself out of the website. The Hosting server crashed, and you can’t do anything to back up or restore the site. When this happens, you can lose your entire business from one moment to another.
Having a plan to back up the WordPress website is always great. With this guide, you can save yourself from a heart attack by manually backing up the WordPress website using cPanel. (Or create an automatic backup with WP STAGING)
Heads Up!
Manually backing up the WordPress Website is very critical and technical! Perform these steps with intensive care and concentration so you don’t unintentionally delete or move any file to spoil the show.
Recommendation
Create a staging site (i.e., a test environment) or a demo website on a subdomain to perform a manual WordPress backup process. That will ensure the production website works correctly, and you learn to back up the site manually.
Plan for the Manual WordPress Backup
You might have some questions:
- What do I need to take a manual backup?
- What should I include in the manual backup?
- Does the website go down while taking the backup?
- What’s the best time and date to take a backup?
WordPress uses a robust programming language called PHP. It communicates between the files, database, and the front end. A WordPress website consists of two major components:
Files and Database.
So, you need either Cpanel or your website’s FTP account to create a backup. The files and databases are in the manual backup to save the site from disasters. Because you’re working through Cpanel (or FTP), the website won’t go offline for a second.
You still need to be very conscious and don’t unintentionally move or delete any file that can break the whole website. Please see the visitors’ peak time on your website and create a backup when fewer visitors are there.
Prerequisites of a Manual WordPress Backup
Before running the manual backup of the WordPress website, make sure that you have the things below at hand:
- cPanel or Hosting credentials to access files and databases.
- Know which directory points to the WordPress website.
- Access to phpMyAdmin through cPanel
- Know what folder contains the WordPress website
Even if you don’t know a few things, don’t worry; I will explain everything in the next step. Let’s start the backup process to take the first backup of your WordPress website.
Steps to Do Manual Backup Of WordPress Website
As you have everything ready to start the backup, we divide the process into three parts.
- Part one explains how to back up WordPress core and media files using cPanel manually.
- Part two will help you understand how to do the same backup through FTP.
- Part three lets you back up the WordPress database using phpMyAdmin.
Let’s get started with Part One. I’m excited! Are you, either?
Manual Backup of WordPress Files using File Manager from cPanel
cPanel is accessible from your WebHost account and provides additional software to take the manual backup of the WordPress website. The steps may initially vary slightly, but all hosting companies use similar navigation through cPanel.
Step 1. Log in to the cPanel or your web Hosting account.
I’m using the direct cPanel account login. Suppose you must host from Godaddy, Hostgator, BlueHost, or any other Hosting company. You can log in to your Hosting and access the cPanel from there. If you can’t find the cPanel or file manager, please check your Hosting provider’s help documentation.
Warning: If your site is hosted on WordPress.com or uses managed WordPress hosting, you probably can’t access cPanel as the hosting company doesn’t offer it. You can still use the Part Two method to back up the WordPress files manually.
Type the website address for direct access followed by the keyword Cpanel (i,e..example.com/cpanel).
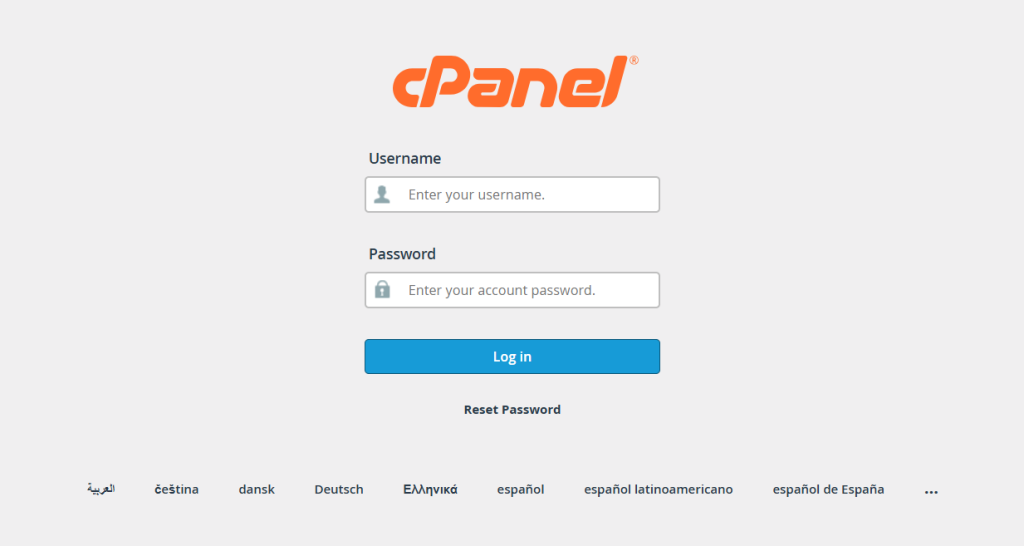
Enter the username and password provided by your Hosting provider
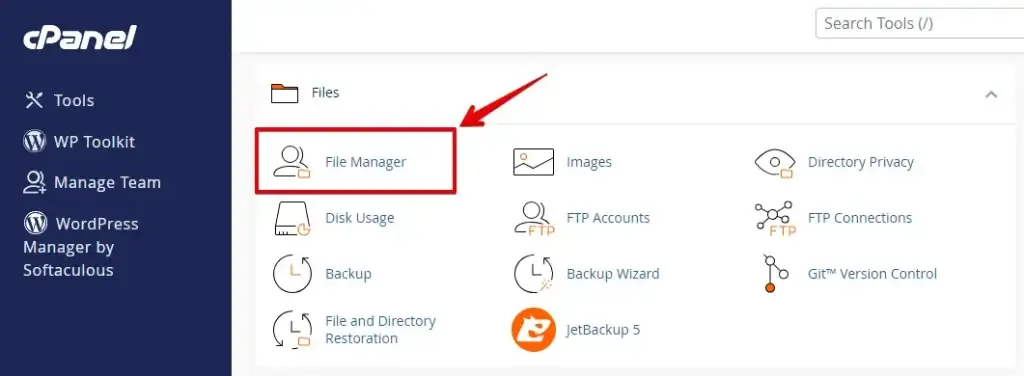
Step 2. Use the File Manager to Manually back up WordPress Core Files and Media Files.
Once logged in to the cPanel or Hosting account, navigate to the File Manager. If you’re using a direct cPanel login, you’ll see a screen like the one below. Click on the File Manager icon to access the files.
Step 3. Compress the Files and Download them to the Local Storage.
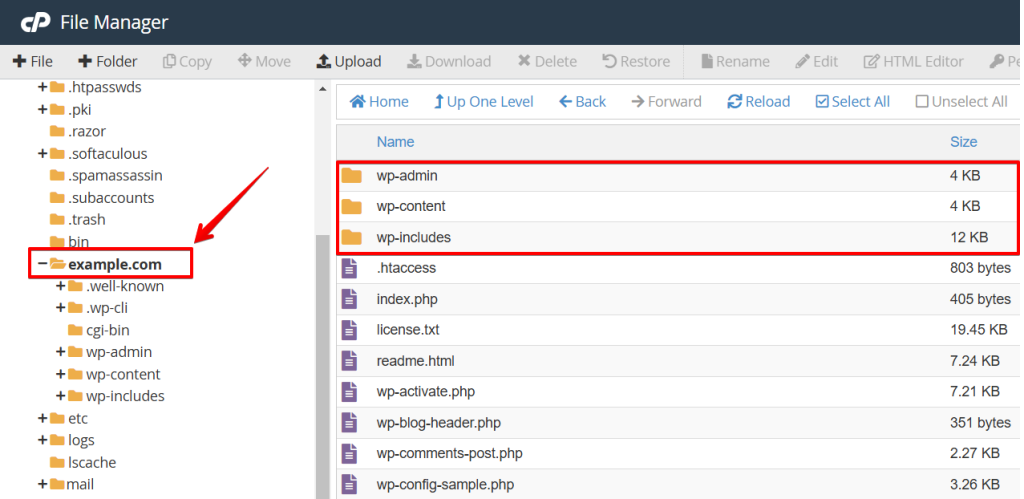
When you open the File Manager, you’re redirected to "public_html." You can see a list of folders and subfolders on the left. Click on the folder that says "public_html." Click on the + icon to expand the folder. In case you have multiple websites. You must select a particular folder associated with your website or domain name.
I’m using wp-staging as an example website. So, I’ve clicked on "public_html"> "wp-staging.fayyazfayzi.com." As you can see, this folder consists of three main folders and some other files.
You see the different operations performed on a directory or files on the top navigation menu. You can use the compress option from the top to compress the entire "public_html" directory. But we don’t recommend this as it increases the server load and consumes more space.
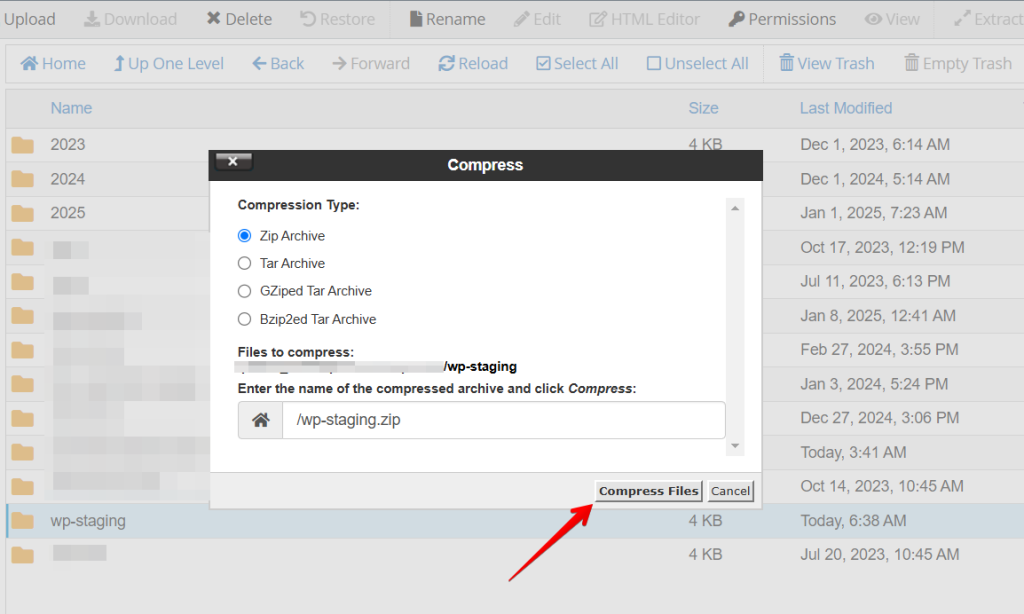
Instead of selecting the entire public_html folder, we recommend compressing only the wp-staging folder. Right-click on the folder and select the shortened link, as shown in the screenshot.
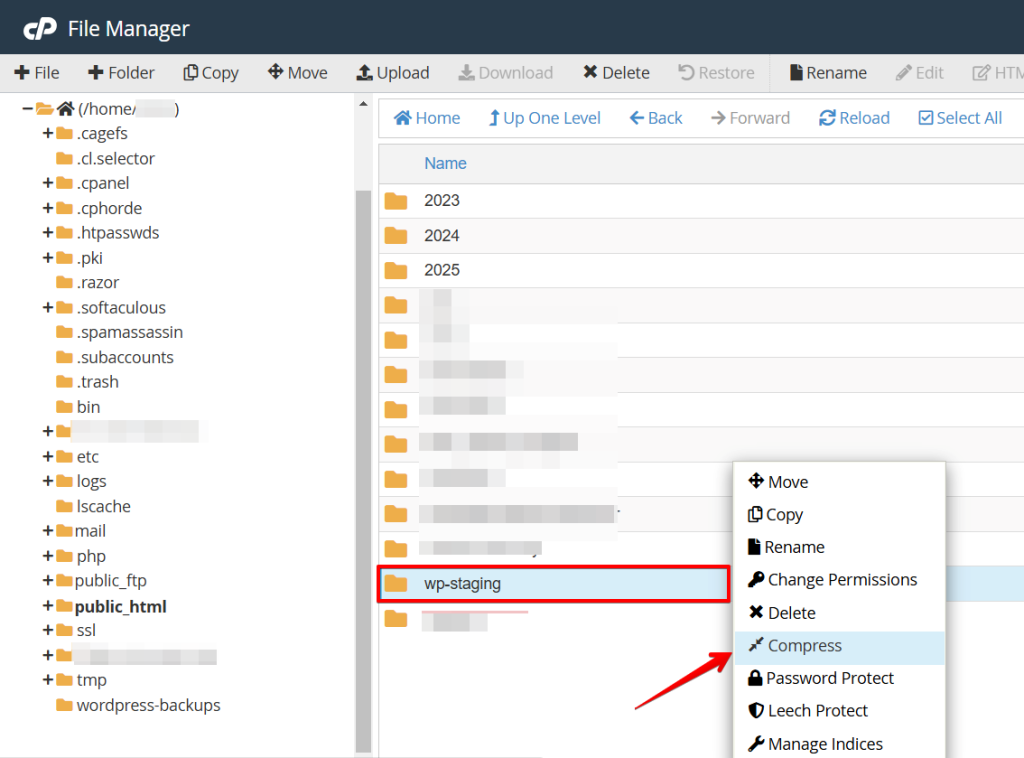
A popup appears to let you select the compression type. Zip Archive and Gzipped Tar Archive are the best compression types.
(Here, we use zip, but GZipped archives are usually processed faster and more efficiently. They use less space. If you are on a Windows system, you might prefer the zip archive for its more significant popularity.)
After that, ensure you’ve selected the correct folder and click the Compress File(s) button.
Download the Backup File
Once the folder is compressed and the .zip file is ready. Select the .zip file and download the manual files backup for your WordPress Website. We recommend creating a WordPress Backups folder and saving the backup file.
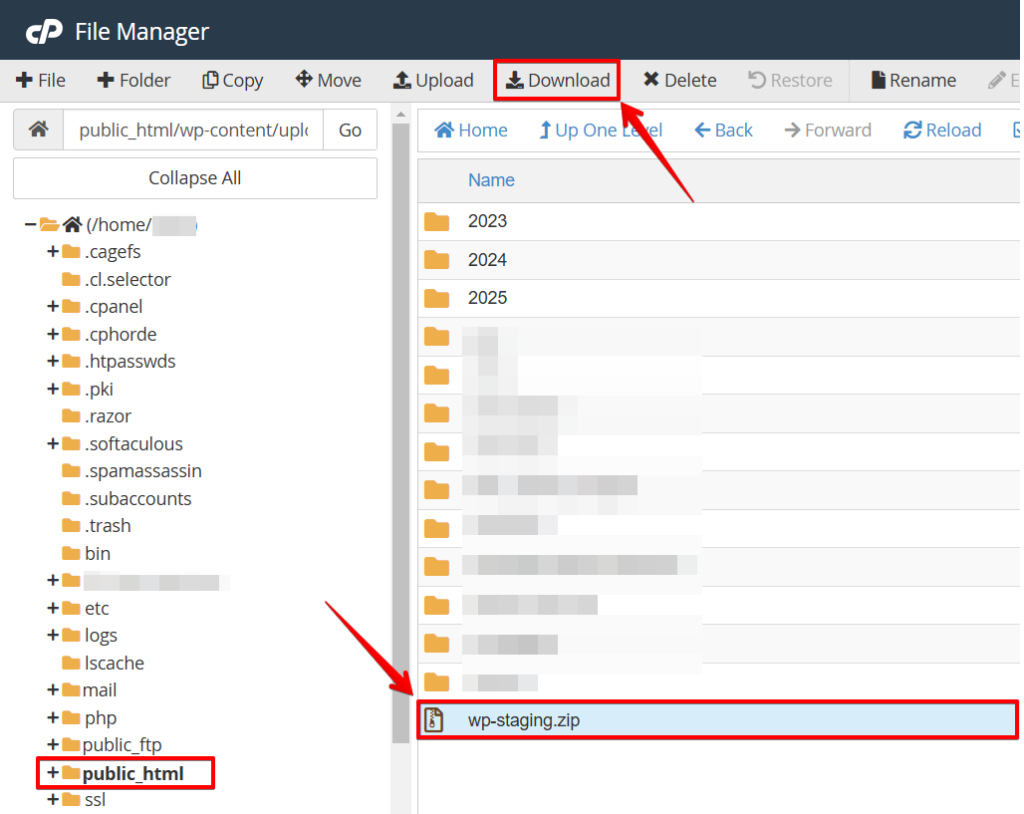
That’s great! You have taken the manual backup of your WordPress website’s core files and media files on your local storage.
Manual Backup of WordPress Files using FTP
The File Transfer Protocol (FTP) is a natural alternative for those who don’t have access to cPanel—probably using a managed hosted service or hosting your WordPress site on WordPress.com.
Below are the reasons why we considered it our secondary option
- You must have valid FTP credentials.
- Third-party software to install is required.
- The manual process depends on the connection between FTP and the webserver. It can increase the time taken to process a manual WordPress Website Backup.
- There are many FTP software clients, so you might not know the best.
Still, it’s one of the most natural processes to take a manual backup of the website. We’ve placed a few of the best free, open-source FTP clients you can use depending on your operating system.
List of best FTP Software for Manual WordPress Website Backup
- FileZilla (for Windows and Mac)
- Cyberduck (for Windows and Mac)
- FireFTP (for Windows and Mac)
- Free FTP (for Windows)
- WinSCP (for Windows)
FileZilla is one of the most user-friendly and accessible software. It works on both Windows and Mac. It’s been our first choice to use when it comes to manually backing websites.
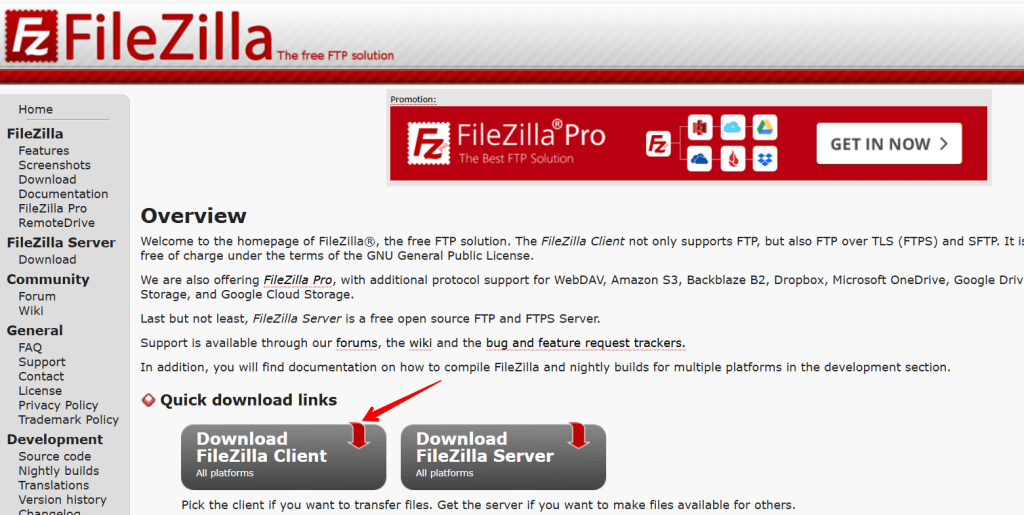
Step 1. How to Download FileZilla FTP client
Open your favorite web browser, download the FileZilla client from https://filezilla-project.org, and install it on your PC or Mac.
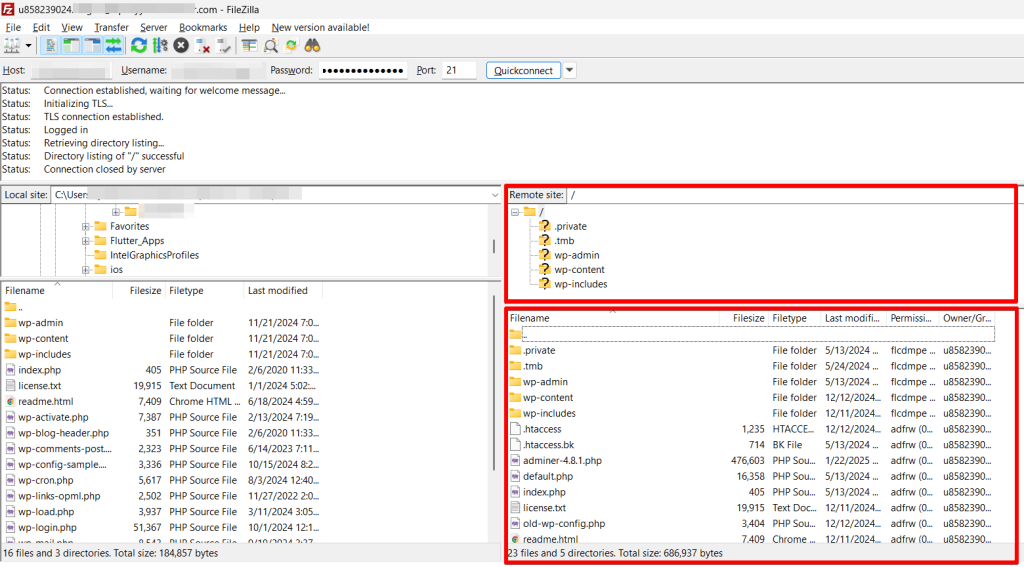
Step 2. Open Filezilla Client to See Local and Remote Sites
As you open Filezilla, you can see ‘local sites’ on the middle left panel with the folders available on your computer. Simultaneously, the remote site pane is disabled because you’re not connected to any remote server.
Step 3. Connect to the Remote Site using FTP Credentials
You need the following FTP credentials to connect with the web server.
- FTP Server: ftp.example.com or IP Address
- FTP Username: user@example.com
- FTP Password: your password
- FTP &explicit FTPS port: 21 normally
Once you have entered the valid FTP credentials, you are connected to the remote location and your web server.
You can see all folders, subfolders, and files:
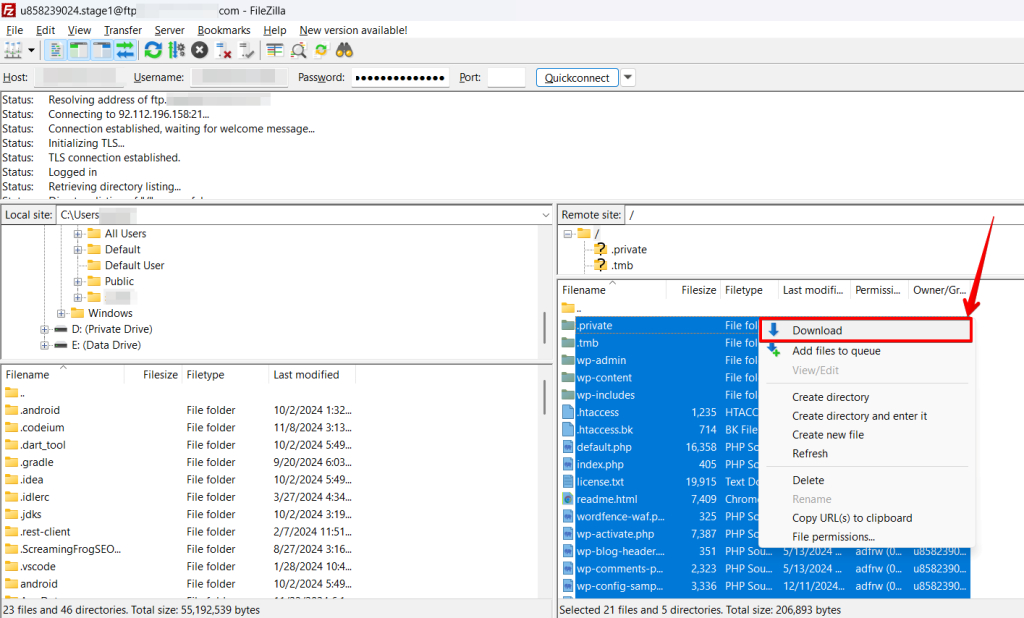
Step 4. Download the Manual Backup of the WordPress Website using FTP
- Select all folders and files associated with your specific website.
- Right-click to get a download popup menu.
- Click the download button to download the backup on your local system.
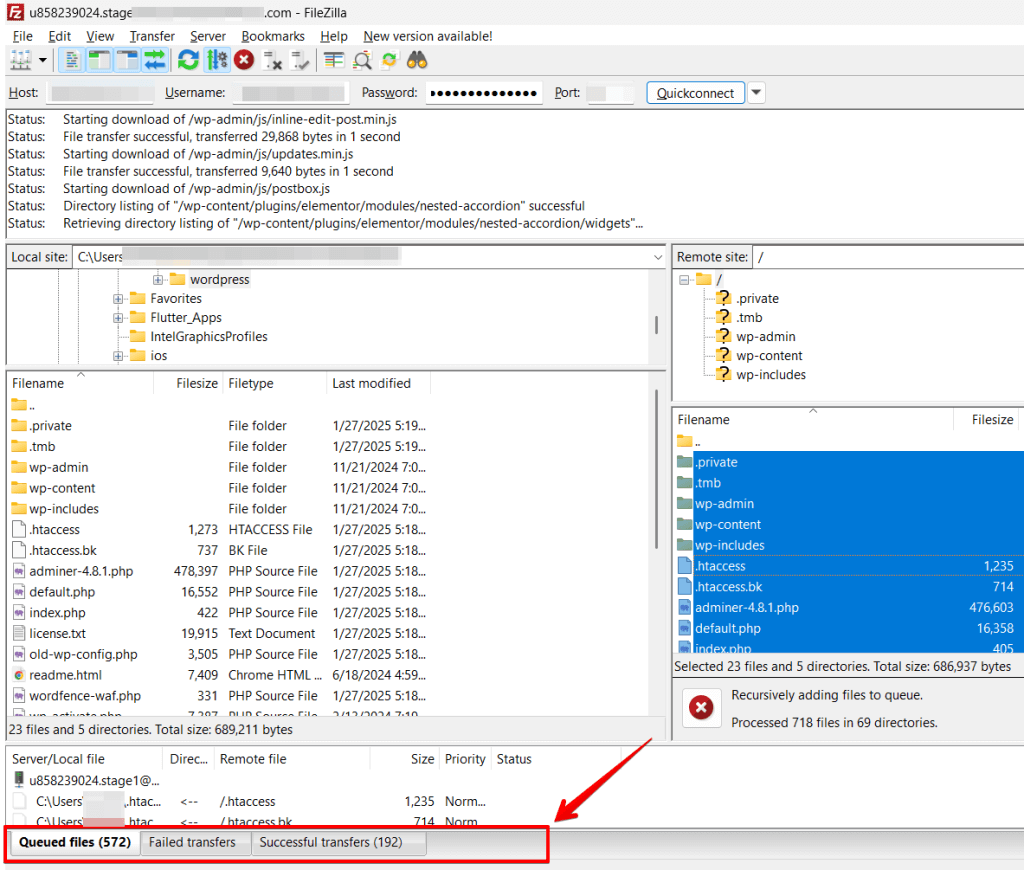
Alternatively, you can create a new WordPress Website Backup folder in your local file system. Then drag all files and folders from the right remote site panel to your left local site panel into the new WordPress Website Backup folder or select all and then download from the right-click context menu:
Make sure to see the transfer queue status bar. You can see the status of queued files, successfully transferred files, and failed data there. That’s a good practice; you should not have any failed files. If files cannot be processed, you must download them manually and place them in the correct folder.
Recommendation
Once you’ve downloaded all your WordPress website files, we recommend encrypting the data using compression software like 7zip or similar.
How to Manually Download the Backup of WordPress Database
The WordPress website manual backup process is incomplete until you download the backup of the database. There are many ways to download the backup of the database. We’re going to share two very important and most natural.
Back up the WordPress Database using phpMyAdmin, or download the WordPress database backup using Adminer if you can’t access cPanel.
Let’s start with phpMyAdmin using cPanel.
How to do a Manual Backup of the WordPress Database Using phpMyAdmin
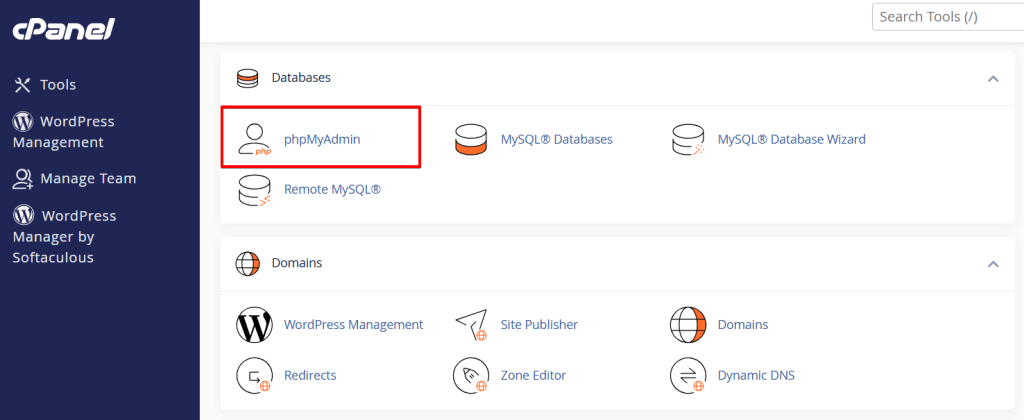
Step 1. Access phpMyAdmin using cPanel
Login to your cPanel (or a Hosting account) and Navigate to the Database section. There, you can see the phpMyAdmin option.
Start it with a click:
Step 2. Select the Database to Export or Download
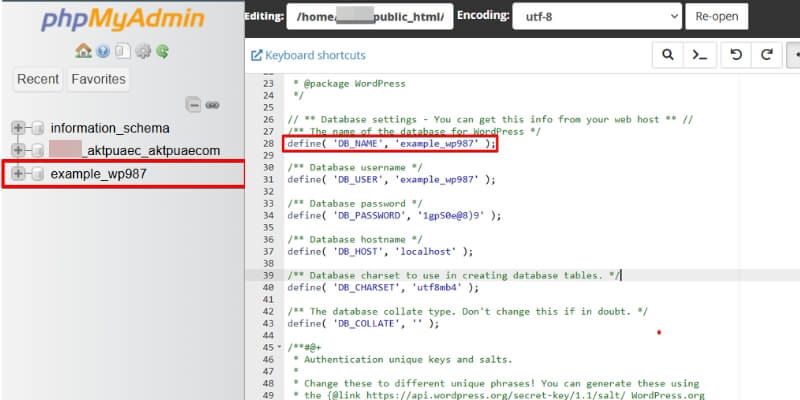
Once phpMyAdmin is opened, you can see all the databases and schema in the left bar. Select the database you want to export or download.
Note: If you don’t know the name of the database connected to your database. Open the file wp-config.php file of your WordPress site to get the database name. You’ll find that file in the root folder path of your website:
Now select the valid database from the left panel. Once you’ve chosen the correct database, click the Export link from the top menu. Select "Quick – display only the minimal options on the next page." The format should be SQL.
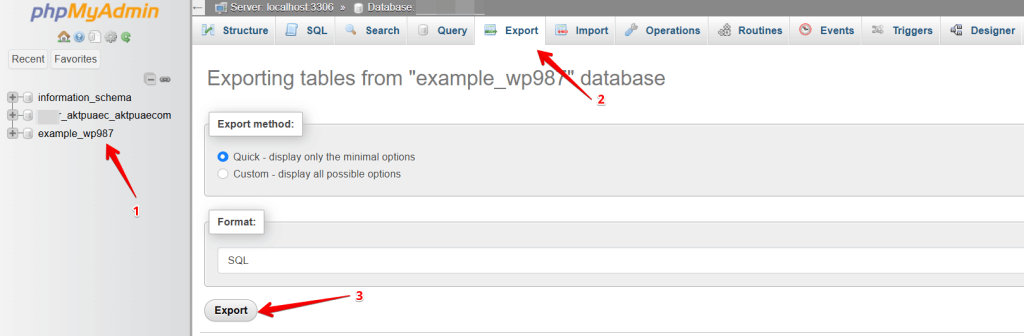
Click on the Go button to download the backup of the WordPress database.
Since you have downloaded the ".sql" file, we recommend moving the file into the same WordPress Website Backup folder on your local computer. A good practice is to create another subfolder for the database backup and paste the file there.
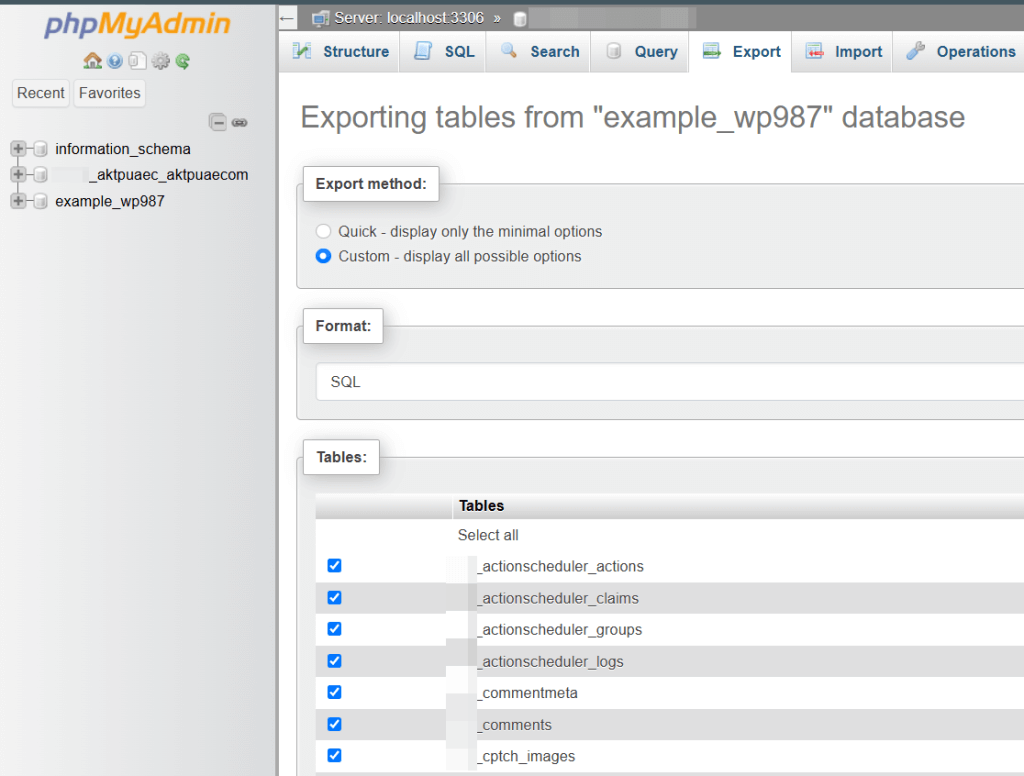
Pro Tip: If your database size is massive. Click on the option "Custom – display all possible options" and select all the tables:
We recommend compressing the database in gzip format:
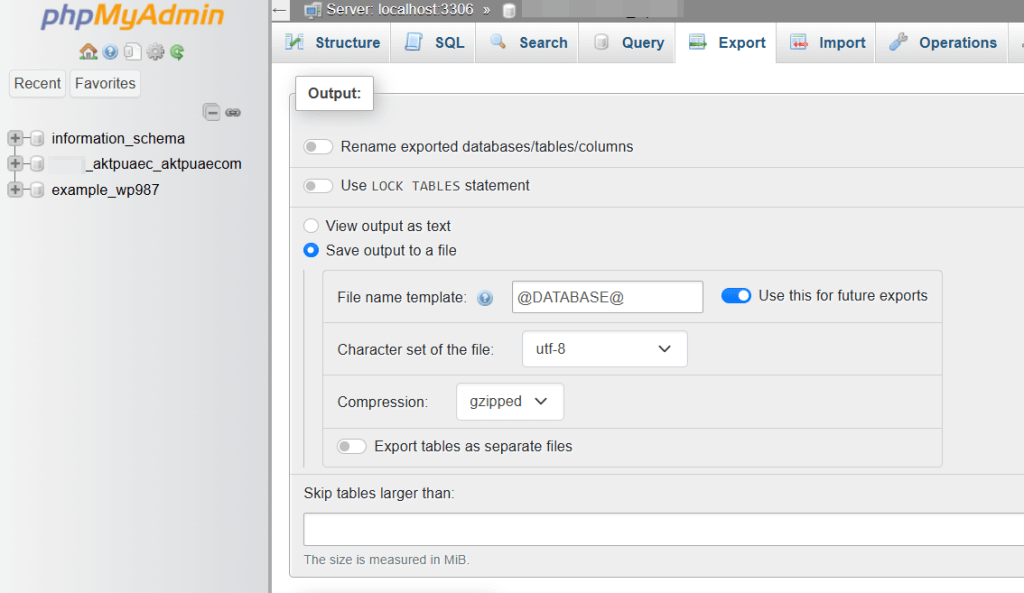
Then click on the Go button to start the database export.
Move it to the database backup folder on your local system, where you already stored your initial file backup.
How to Download WordPress Database Backup without phpMyAdmin?
If you don’t have access to phpMyAdmin (as your Hosting company doesn’t offer you access to cPanel.), you can’t download the backup of your WordPress Website manually. But we still have a way to download it—all you need is FTP access.
Step 1. Access the WordPress Database using Adminer
Adminer is a software script like phpMyAdmin to access, manage, and manipulate the database on your MySQL server. It is not the replacement of phpMyAdmin but an alternative.
Warning: We only recommend using it when you don’t have access to phpMyAdmin and deleting it as you completed the backup process. Download the latest version of Adminer from the official website Adminer; we’re using Adminer 4.7.7 with English only.
Step 2. Upload Adminer into the WordPress Website Main Directory
Once you have downloaded the latest version of Adminer, it’s good to rename the file to adminer.php to access it more easily. It is recommended to give it an entirely new name to make it hard for attackers trying to find that tool on your website.
- Upload the file adminer.php to the WordPress website root folder using your FTP client.
Step 3. Access the database using Adminer
Once you upload the Adminer to your website, open the admin login panel by entering the website address example.com followed by adminer.php (i.e., example.com/adminer.php)
Step 4. Enter valid database credentials
Suppose you don’t know the valid credentials for a connected database. Open the wp-config.php file to get the credentials and access the database.
Step 5. Export the database using Adminer
Once you enter the valid database credentials, you’ll see the database tables in the left sidebar. On top of the database tables, see the operations that must be performed. Click on the Export link.
In Output, select gzip. Select all database tables and click on the Export button below.
Once the download file is downloaded, copy the file to your WordPress Backup Folder on your local computer.
Congratulations, you have manually created a complete WordPress website backup without plugins. That’s highly commendable!
But we are not done yet. We have created the backup, but that does not mean it’s also secured. Next, we must ensure its security because the backup files can be accidentally deleted. So follow the steps below after taking the WordPress website backup.
Post Backup Tasks and Precautions
You can do a manual backup at any time. The best part is that it’s free and requires no plugins. However, there are many problems you can face. You can follow the post-backup tasks and precautions to avoid these problems.
- Encryption: The backup contains all the website data. Suppose an attacker or hacker gets that. He probably has all the information and can do anything with it. It’s a good practice to encrypt the file and use a strong password on the encrypted data. So, even if the hacker gets the record, he won’t decrypt the backup file quickly.
- Manage Permission: Manage the permissions on drives and files—a better way to use BitLocker and restrict file permission.
- Test Restore: A backup is valid only if you can restore it and it is not broken. So, testing the backup on a subdomain or staging site is a good practice.
- Multiple Copies: Create multiple copies of the same backup file. As the backup is stored on your local system, you could delete it unintentionally. We recommend creating multiple backups in different locations.
- Upload on Cloud: Upload the backup files on cloud storage like Google Drive, Dropbox, OneDrive, or Mega. Anything can happen to your local device; it can be stolen, corrupted by malicious software, and damaged files. A cloud storage backup can restore the website in a few clicks.
- Use Antivirus: Use antivirus software and keep it updated. This can keep your backup files safe from malicious software.
Pros and Cons of a Manual WordPress Website Backup
| Pros | Cons |
| Free of cost | Time-Consuming |
| No need for external plugins | Increase of disk space if backup files are not deleted after downloading |
| Allows local downloading | Users can leave vulnerabilities on the server after downloading the backup and not deleting it from the server. |
| FTP allows both Cpanel and non-cPanel website backups | Creating a database export can lead to loading issues for the production website if the database is huge. |
| Standard file types allow restoring the site without using extra software. |
Conclusion: What’s the Best Option to Backup the WordPress Website?
Regular backups should be the top priority if you have a website. Most hosting companies offer backup features in their Hosting packages.
Some hosting companies charge an additional amount for backups and have many space and memory limitations.
We don’t recommend you rely on the hosting backups only.
You would give your backup into the hands of your Hosting provider. You have to trust them not only when it comes to data privacy; you also have to trust them in data reliability. Even the biggest Hosting companies will not guarantee that your backup data is never lost or corrupted. Google and you will find several cases where the user has lost their entire website, including all backups, due to hosting companies’ faults.
Manual backups are a viable alternative. Although taking manual backups saves a lot of money, it’s a time-consuming process that increases disk space.
Alternative Automatic Backup Solution
An excellent alternative to creating backups is using a plugin like WP STAGING. It establishes a WordPress staging and development website with one click. WP STAGING includes a complete backup solution that allows you to export your entire website as a compressed file with another click.
You can use that file to restore your entire site or even restore your site to another server or domain.
Related Articles
- How to back up a WordPress Website in Multiple Locations.
- How to Prevent Downtime on Your WordPress Website
- How to Repair & Optimize the WordPress Database
- How to Create and Modify WordPress Cron Jobs
- How to fix the “Sorry, You Are Not Allowed to Access This Page” Error in WordPress?