The “Failed to Import Media” error happens when WordPress cannot import media files like images, videos, or audio during the import process. This can be particularly annoying when moving your site to a new host, setting up a demo site, or importing content from another platform.
Instead of successfully uploading the media files, WordPress skips over them, leaving you with missing content in your posts and pages.
Fortunately, this problem can be resolved with a few simple steps, and your content can be transferred without too much trouble.
Contents
Common Causes of the ‘Failed to Import Media’ Error
There are several common reasons this error can occur:
- File Permissions – Incorrect permissions on the WordPress upload folder can prevent access to media files.
- Server Limitations – Low upload or memory limits on your server may block larger media files from importing.
- Inaccessible Media Files – Media files from another website may not be available, causing WordPress to fail to fetch them.
- Corrupted Import File – A corrupted or incomplete XML import file can result in missing media files.
- Timeout Issues – Larger imports can time out before all media files finish uploading, leading to the error.
5 Quick Fixes for WordPress Media Import Errors
- Check for Corrupted Media Files
- Increase PHP Memory Limit
- Increase the Maximum File Upload Size
- Check File Permissions
- Temporarily Deactivate your Plugins
Note: Before making any changes, it’s a good idea to back up your website. You can quickly restore something to its previous state if something goes wrong. WP Staging provides an easy way to set up automatic backups. For more help, check out the backup and restore guide.
1. Check for Corrupted Media Files
First, to fix the “Failed to Import Media” error in WordPress, check if the media files are corrupted. Try opening them on a different computer or device to see if they display correctly.
If the files are damaged or won’t open, you’ll need to replace them with new copies or choose alternative files that are intact and compatible. This step ensures that you’re working with functional files that your WordPress site can process and display correctly.
2. Increase PHP Memory Limit
The “Failed to Import Media” error can happen if your server runs out of memory during the upload. Increasing the PHP memory limit gives WordPress more resources to handle larger imports.
Access your WordPress files through FTP or a file manager provided by your hosting provider.
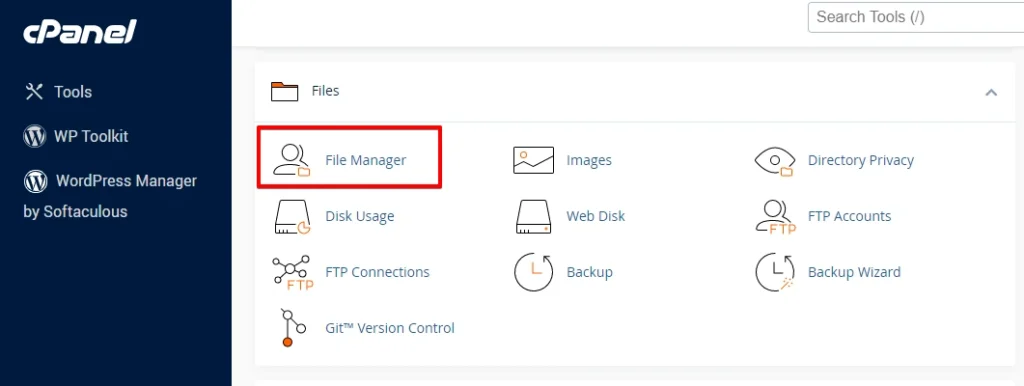
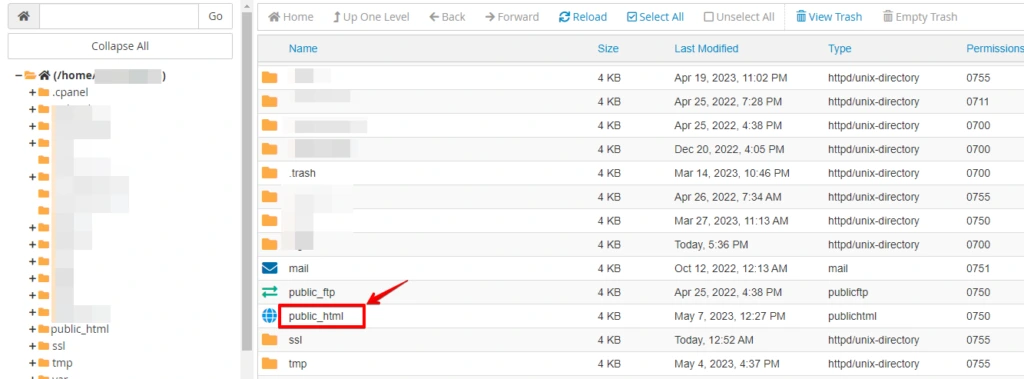
Locate the root directory of your WordPress installation (usually named “public_html” or “www”).
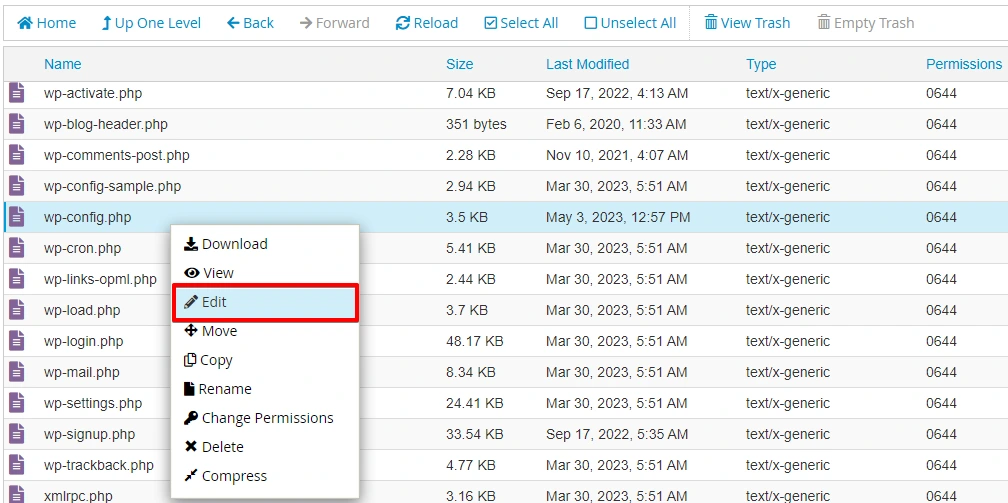
Look for the wp-config.php file and open the wp-config.php file.
Scroll down to the section that contains the PHP settings and Add the following line of code just above the line that says, “That’s all, stop editing! Happy blogging.”
define('WP_MEMORY_LIMIT', '256M');You can adjust the memory limit value (e.g., ‘256M’) based on your specific requirements. Save the changes to the wp-config.php file.
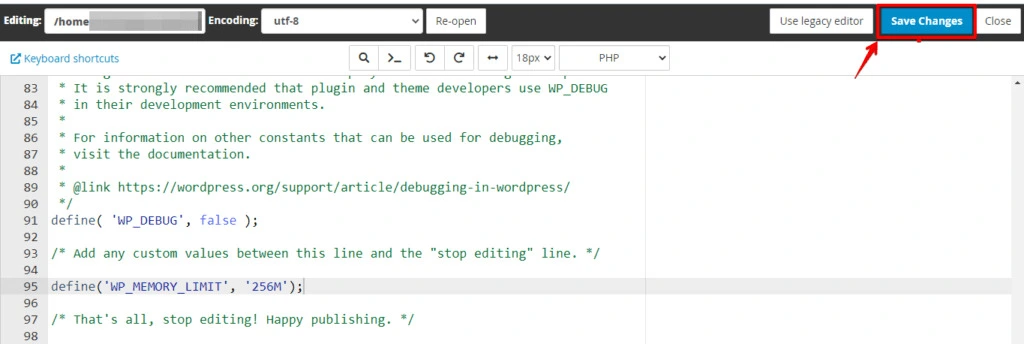
Increasing the PHP memory limit can help if your server runs out of memory during the import process, ensuring that WordPress has enough resources to complete the task.
3. Increase the Maximum File Upload Size
If your media files are too large, the “Failed to Import Media” error can occur due to server limits on file uploads. You can increase the upload size limit to fix this:
Use FTP or your hosting provider’s file manager to access your WordPress files.

Locate the root directory of your WordPress installation (usually named “public_html” or “www”).

Right-click on the .htaccess file and select Edit.
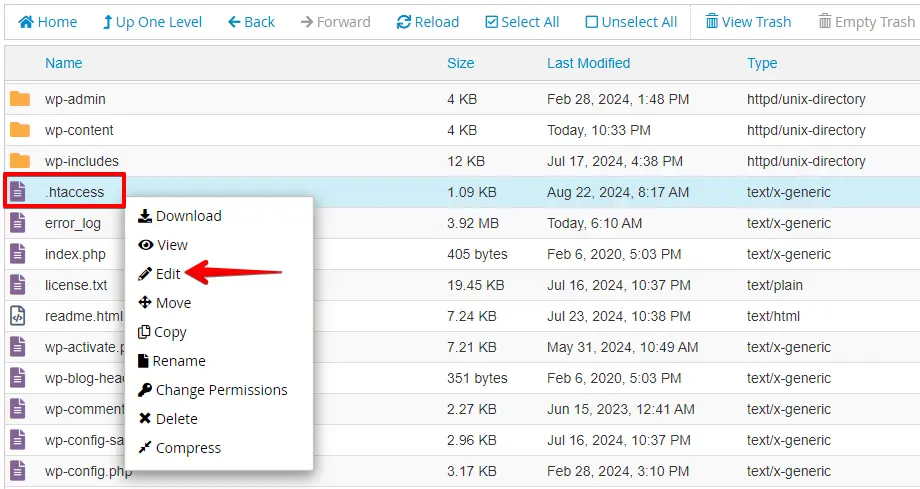
Next, add the following code to increase the file upload limit, then click Save Changes to save the file:
php_value upload_max_filesize 64M
php_value post_max_size 64M
php_value max_execution_time 300
php_value max_input_time 300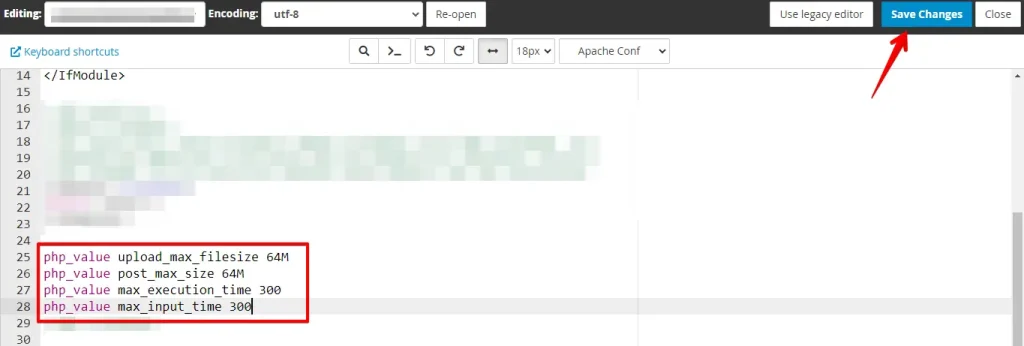
Once you’ve increased these limits, try the import again. This should allow larger media files to be successfully uploaded without triggering the error.
4. Check File Permissions
Incorrect permissions on your WordPress upload folder can block access to media files, resulting in the “Failed to Import Media” error. To resolve this, ensure the correct permissions are set:
Log in to your cPanel account. Locate the File Manager icon and click on it to open the file management tool.
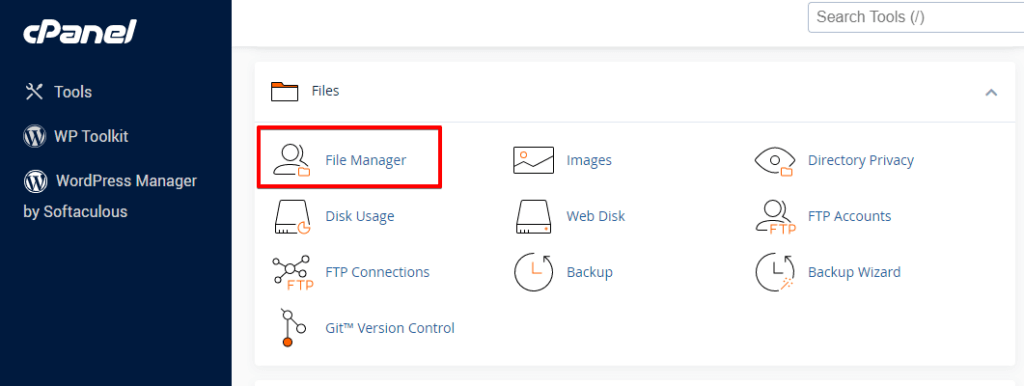
In the File Manager, navigate to the directory where your WordPress installation is located. This is usually the public_html or the “www” directory.
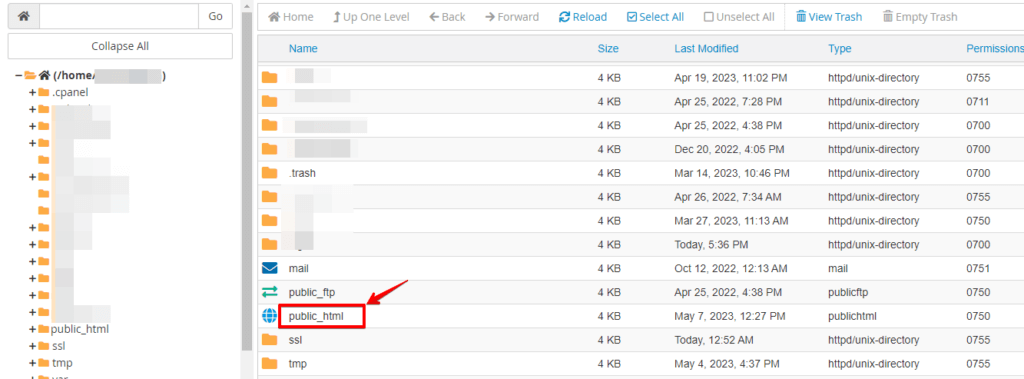
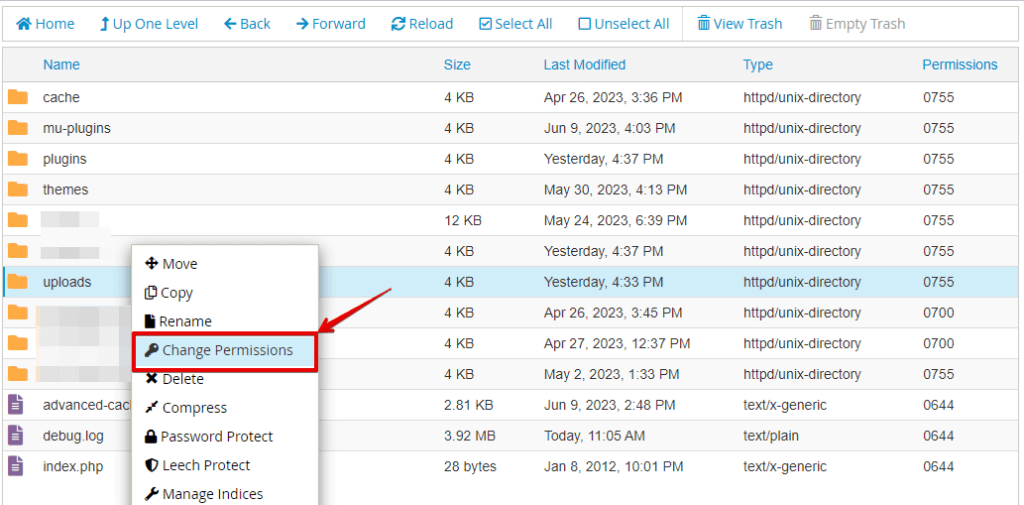
Locate the uploads folder, then right-click on it. From the context menu, select Change Permissions or Permissions.
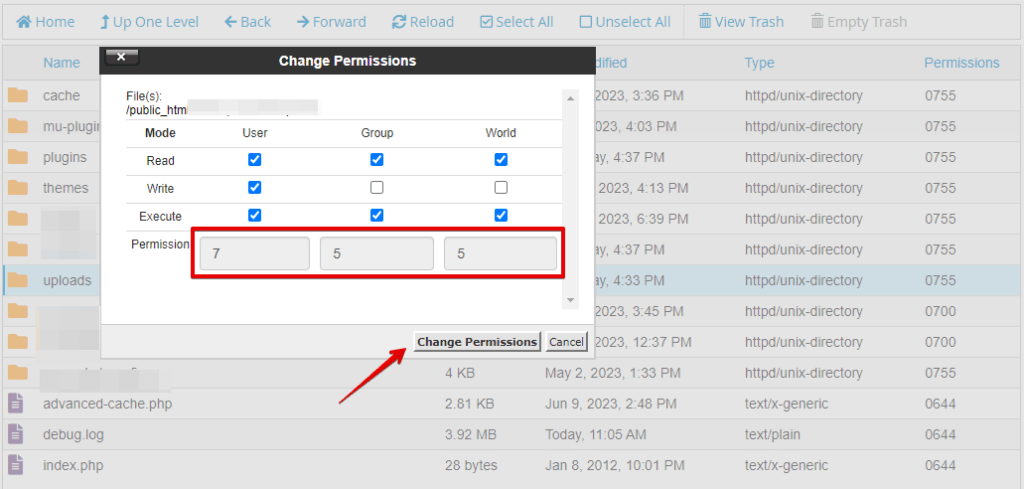
Ensure the folder permissions are set to 755 (for folders) and 644 (for files). If they are incorrect, update them accordingly. Then, click the Change Permissions button.
Try importing your media files again. Setting the correct file permissions ensures that WordPress has the access necessary for successful media file imports.
5. Temporarily Deactivate your Plugins
Plugins can sometimes interfere with the media import process, leading to the “Failed to Import Media” error. Temporarily deactivating them can help identify the culprit. Here’s how to do it:
Log in to your WordPress admin dashboard. From the sidebar menu, navigate to Plugins and click on it. You will see a list of installed plugins.
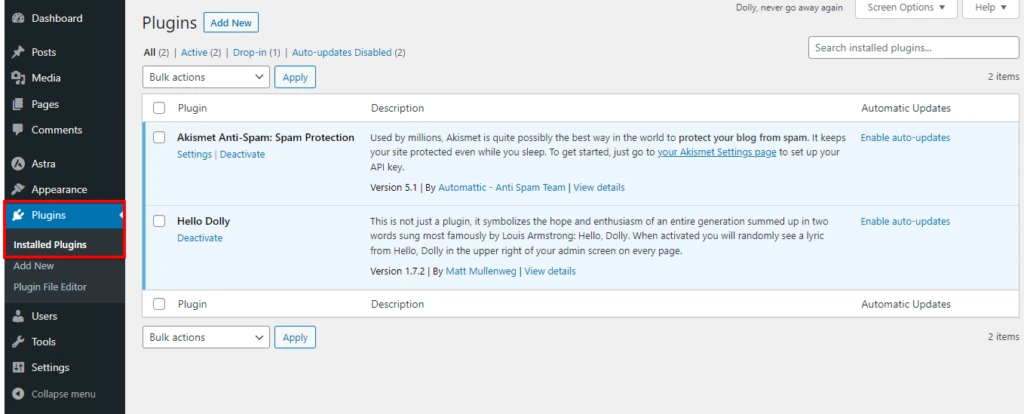
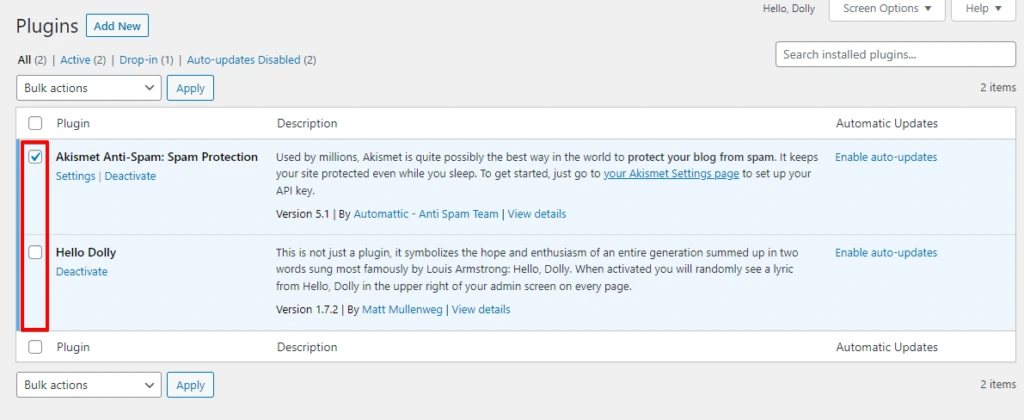
Select the plugins you want to disable by checking the boxes next to their names. You can choose multiple plugins at once.
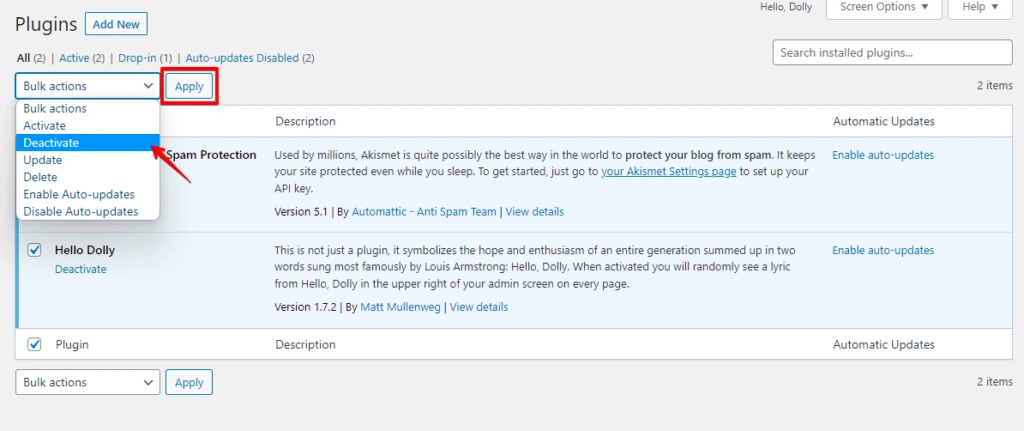
After selecting the plugins, locate the Bulk Actions dropdown menu at the top of the list and choose Deactivate. Then, click the Apply button next to the dropdown menu.
With all plugins deactivated, try importing your media files again. If successful, reactivate the plugins one by one. Check the import process after each activation to identify any plugin causing the issue.
Conclusion
Fixing the ‘Failed to Import Media’ error in WordPress can make managing your site easier. Check for corrupted files, increase your PHP memory limit and upload size, ensure correct file permissions, and temporarily deactivate plugins.
These steps can help resolve the issue quickly, improve the smoothness of your site’s operation, and ensure that your media files upload without problems.

