サブフォルダにあるデフォルトの Staging サイトを作成すると、WP STAGING は Staging サイトの「Permalinks」オプションを「Plain」に設定し、「投稿名パーマリンク」オプションを無効化します。これは、Staging サイトがあらゆる種類のサーバーで正しく開けるようにするためです。
Contents
WP STAGING の Pro 版には「Keep permalinks」オプションがあります。新しい Staging サイトを作成するときにこのオプションを有効にすると、Staging サイトは本番サイトとまったく同じパーマリンク構造を使用します。このオプションは WP STAGING > Settings > Keep Permalinks にあります。
このオプションを有効化していても、Staging サイトが本番サイトにリダイレクトしたり 404 エラーを表示したりする場合は、この記事に従ってください!
一般的には、Staging サイトで単純なパーマリンクを使用しても問題ありません。多くの場合、Staging サイトの利点を享受するためにカスタムパーマリンクを有効化する技術的必要はありません。
とはいえ、同じリンク構造にするために Staging サイトでカスタムパーマリンクを有効化したい場合は、まず、サーバーまたはホスティングプランで動作している Web サーバーを特定する必要があります。
投稿名パーマリンクを有効化するには、WordPress Staging サイトの管理ダッシュボードにアクセスする必要があります。
Staging サイトの管理ダッシュボードにアクセスしようとして本番サイトにリダイレクトされる場合は、URL の末尾にスラッグ wp-admin を追加してください (例: https://example.com/stagingsite/wp-admin)。
これによってサイトの wp-admin にアクセスできます。
(このようなリダイレクトは、URL に言語スラッグを追加する WPML や Polylang のような言語 Plugin を使用している場合に発生することがあります。これらの Plugin はパーマリンクの有効化を必要とすることがよくあります。)
Apache Web サーバー
サイトを提供するのが Apache Web サーバーであれば、検索エンジンに優しいパーマリンクが追加作業なしで動作する可能性が高いです。
次のページでパーマリンクを有効化するだけです:
Staging Site > wp-admin > Settings > Permalinks
最初からうまく動作する可能性が高いです。
期待どおりにならず、Staging サイトのリンクがエラー 400 を返す場合は、新しい .htaccess ファイルを作成し、FTP クライアントまたはファイルマネージャー Plugin を使って Staging サイトのルートに貼り付けてください。
そのファイルの内容は次のようになります:
# BEGIN WordPress
RewriteEngine On
RewriteBase /staging/
RewriteRule ^index\.php$ - [L]
RewriteCond %{REQUEST_FILENAME} !-f
RewriteCond %{REQUEST_FILENAME} !-d
RewriteRule . /staging/index.php [L]
# END WordPress強調されているテキスト staging を Staging サイトが配置されているサブフォルダ名に置き換えてください!
Apache Web サーバー | マルチサイト
通常、WordPress マルチサイトをクローンすると、WP STAGING が .htaccess に必要な調整を行います。
次のルールが、サブドメインおよびサブフォルダのマルチサイト用に Staging サイトのルートにある .htaccess ファイルに配置されます:
サブドメインのマルチサイト (例: staging.example.com)
RewriteEngine On
RewriteBase /
RewriteRule ^index\.php$ - [L]

# add a trailing slash to /wp-admin
RewriteRule ^([_0-9a-zA-Z-]+/)?wp-admin$ $1wp-admin/ [R=301,L]

RewriteCond %{REQUEST_FILENAME} -f [OR]
RewriteCond %{REQUEST_FILENAME} -d
RewriteRule ^ - [L]
RewriteRule ^([_0-9a-zA-Z-]+/)?(wp-(content|admin|includes).*) $2 [L]
RewriteRule ^([_0-9a-zA-Z-]+/)?(.*\.php)$ $2 [L]
RewriteRule . index.php [L]サブフォルダのマルチサイト (例: example.com/staging)
RewriteEngine On
RewriteBase /staging/
RewriteRule ^index\.php$ - [L]

# add a trailing slash to /wp-admin
RewriteRule ^([_0-9a-zA-Z-]+/)?wp-admin$ $1wp-admin/ [R=301,L]

RewriteCond %{REQUEST_FILENAME} -f [OR]
RewriteCond %{REQUEST_FILENAME} -d
RewriteRule ^ - [L]
RewriteRule ^([_0-9a-zA-Z-]+/)?(wp-(content|admin|includes).*) $2 [L]
RewriteRule ^([_0-9a-zA-Z-]+/)?(.*\.php)$ $2 [L]
RewriteRule . index.php [L]強調されているテキスト staging を Staging サイトが配置されているサブフォルダ名に置き換えてください!
Nginx Web サーバー
サイトが Nginx を使っている場合、まず Staging サイトで検索エンジンに優しいパーマリンクを有効化してみてください。それでうまくいかなければ、以下の手順に従って Nginx でパーマリンクを有効化してください。
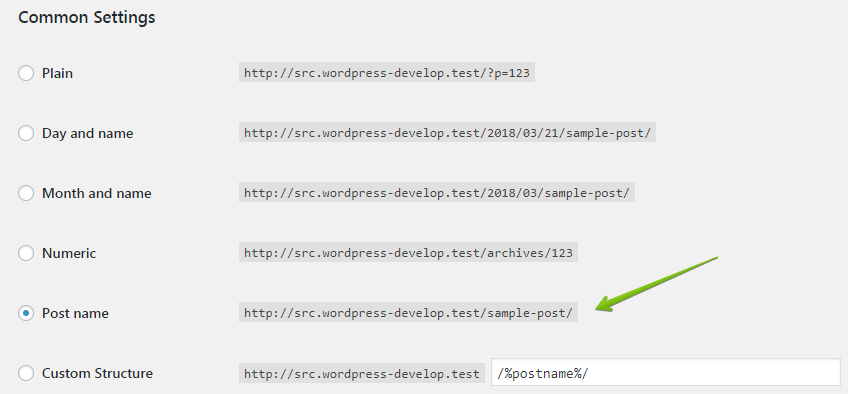
wp-admin を開き、Settings > Permalinks に移動してPost nameを選択します。
テストするには、サイトのトップページを開いて任意のリンクをクリックしてください。
ページが期待どおりに開けば完了です。404 エラーが返る場合は、以下の上級手順を使ってください:
nginx.conf に、次のスニペットに似た新しいサーバーブロックを作成します:
location /staging{
        try_files $uri $uri/ /staging/index.php?$args;
}強調されているテキスト staging を Staging サイトが配置されているサブフォルダ名に置き換えてください!
また、システムで PHP ソケットファイルのパスが異なる場合は、それも変更してください。これは変更すべきもののイメージを示すだけのものです。NGINX 設定が異なる場合は、これらの値をそのまま使わず、確認してから使ってください。
上記の手順に従うにはサーバーへのフルアクセスが必要であることに注意してください。これらの行が何をするかわからない場合は、誰かに変更を手伝ってもらうか、パーマリンクを無効化したままにするのが最善でしょう。
変更後は Nginx サーバーを再起動する必要があります。再起動後はカスタムパーマリンクを有効化した Staging サイトを使えます。
この方法では、常に Staging サイトのフォルダ名に合わせた特定の Nginx ブロックをセットアップする必要があります。
もう 1 つの選択肢は、サーバーブロックを作成し、サブフォルダから WordPress が読み込まれるたびに Nginx に自動リライトを行わせる方法です:
# Matches /<folder>/... – except for WP core folders
location ~ ^/(?!wp-admin|wp-content|wp-includes)([a-zA-Z0-9_-]+)(?:/|$) {
    set $first_seg $1;
    # First try static files/folders …
    try_files $uri $uri/ @maybe_staging;
}

# Checks whether /<folder>/index.php exists; if so, rewrite there,
# otherwise fall back to the live front controller.
location @maybe_staging {
    if (-f $document_root/$first_seg/index.php) {
        rewrite ^ /$first_seg/index.php?$args last;
    }
    rewrite ^ /index.php?$args last;
}NGINX Web サーバーのマルチサイト
WordPress マルチサイトはやや異なる設定が必要です。
下に、サブフォルダの Staging マルチサイト用のサンプル nginx.conf を示します。
関連箇所を強調しています。この設定を nginx.conf に追加した後は、NGINX サーバーを再起動する必要があります。
サーバーが NGINX を使用していて、この設定をどこに追加すべきかわからない場合は、ホスティング業者に問い合わせてください。
サブフォルダの Staging サイト (例: example.com/staging)
server {
listen 80; listen [::]:80;
server_name example.com/staging;

root /var/www/multi; # This is the path to your multisite website

if (!-e $request_filename) {
rewrite /wp-admin$ $scheme://$host$request_uri/ permanent;
rewrite ^/staging(/[^/]+)?(/wp-.*) /staging$2 last;
rewrite ^/staging(/[^/]+)?(/.*\.php)$ /staging$2 last;
}

location / {
try_files $uri $uri/ /index.php?$args;
}

location /staging/ {
try_files $uri $uri/ /staging/index.php?$args ;
}

location ~ \.php$ {
include fastcgi_params;
fastcgi_intercept_errors on;
fastcgi_pass php7-fpm;
fastcgi_index index.php;
fastcgi_param SCRIPT_FILENAME $realpath_root$fastcgi_script_name;
fastcgi_param DOCUMENT_ROOT $realpath_root;
}
}強調されているテキスト staging を Staging サイトが配置されているサブフォルダ名に置き換えてください!
サブドメインの Staging サイト (例: staging.example.com)
Staging サイトがサブドメインにある場合は、上記と同じ設定を使えますが、少し変更が必要です:
server {
listen 80; listen [::]:80;
server_name staging.example.com;

# Below should be the path to your staging site
root /var/www/multi/staging;

if (!-e $request_filename) {
rewrite /wp-admin$ $scheme://$host$request_uri/ permanent;
rewrite ^/(/[^/]+)?(/wp-.*) /$2 last;
rewrite ^/(/[^/]+)?(/.*\.php)$ /$2 last;
}

location / {
try_files $uri $uri/ /staging/index.php?$args ;
}

location ~ \.php$ {
include fastcgi_params;
fastcgi_intercept_errors on;
fastcgi_pass php7-fpm;
fastcgi_index index.php;
fastcgi_param SCRIPT_FILENAME $realpath_root$fastcgi_script_name;
fastcgi_param DOCUMENT_ROOT $realpath_root;
}
}強調されているテキスト staging を Staging サイトが配置されているサブフォルダ名に置き換えてください。
Bitnami (Apache)
Bitnami インスタンスで WordPress を使用する場合は、追加の手順が必要です。
WordPress の Bitnami インスタンスでは、Bitnami がサイトのルートフォルダで .htaccess を使用しないため、投稿名パーマリンクが標準でサポートされません。そこにある .htaccess ファイルはすべて無視されます。
Bitnami はサイトのルートにあるデフォルトの .htaccess ファイルを使用しません。代わりに、すべての htaccess 設定は /opt/bitnami/apps/APPNAME/conf/htaccess.conf というファイルに追加されます。
そのため、パーマリンクを動作させたい場合は、htaccess.conf を変更する必要があります。
そのファイルに移動し、次を追加してください:
<Directory /opt/bitnami/apps/wordpress/htdocs/STAGING>
 <IfModule mod_rewrite.c>
 RewriteEngine On
 RewriteBase /STAGING/
 RewriteRule ^index\.php$ - [L]
 RewriteCond %{REQUEST_FILENAME} !-f
 RewriteCond %{REQUEST_FILENAME} !-d
 RewriteRule . /STAGING/index.php [L]
 </IfModule>
</Directory>もう 1 つの選択肢は、パーマリンクを Plain 設定のままにしておくことです。この場合、htaccess.conf を変更する必要はまったくありません。
Microsoft Azure
Azure は Microsoft IIS サーバーを使用しており、Staging サイトの Web ディレクトリのルートにカスタム web.config が必要です。
まず、「本番」サイトの web.config ファイルを開いて、次の行のルール名を記録しておいてください:
<rule name="WordPress: http://wordpress-arc.azurewebsites.net" patternSyntax="Wildcard">この例では WordPress: http://wordpress-arc.azurewebsites.net です。
続いて、「Staging」サイトのディレクトリに次の内容で新しい web.config ファイルを作成します:
<?xml version="1.0" encoding="UTF-8"?>
<configuration>
  <system.webServer>
    <rewrite>
      <rules>
      <remove name="WordPress: http://wordpress-arc.azurewebsites.net"/>
      <rule name="staging" patternSyntax="Wildcard">
        <match url="*"/>
          <conditions>
            <add input="{REQUEST_FILENAME}" matchType="IsFile" negate="true"/>
            <add input="{REQUEST_FILENAME}" matchType="IsDirectory" negate="true"/>
          </conditions>
        <action type="Rewrite" url="index.php"/>
      </rule></rules>
    </rewrite>
  </system.webServer>
</configuration>次の行が、
<remove name="WordPress: http://wordpress-arc.azurewebsites.net"/>本番サイトの web.config ファイルで定義されたルール名と同じであることを確認してください。私たちの例では WordPress: http://wordpress-arc.azurewebsites.net でした。
Microsoft IIS
- まず、本番サイトのルートディレクトリにある
web.configファイルを開いて、次の行を記録します:
<rule name=”WordPress: https://example.com/” patternSyntax=”Wildcard”>
特にルールの名前:WordPress: https://example.com/ - 続いて、Staging サイトのディレクトリに次のコードスニペットで新しい
web.configファイルを作成します:
<?xml version="1.0" encoding="UTF-8"?>
<configuration>
   <system.webServer>
     <rewrite>
      <rules>
        <remove name="WordPress: https://example.com/" />
        <rule name="WordPress: https://example.com/staging" patternSyntax="Wildcard">
         <match url="*"/>
          <conditions>
           <add input="{REQUEST_FILENAME}" matchType="IsFile" negate="true"/>
           <add input="{REQUEST_FILENAME}" matchType="IsDirectory" negate="true"/>
          </conditions>
         <action type="Rewrite" url="index.php"/>
        </rule></rules>
       </rewrite>
   </system.webServer>
</configuration><remove name="WordPress: https://example.com/" /> の行が、本番サイトの web.config にあるものと同じ「name」になっていることを確認してください。
また、<rule name="WordPress: https://example.com/staging" patternSyntax="Wildcard"> の行に、Staging サイトの正しいディレクトリ名が含まれていることを確認してください。