
This guide explains different methods for avoiding SEO issues on WordPress staging and testing websites. A staging or testing website is necessary for every WordPress website that needs continuous development and updates.
Whenever there is a plugin update, theme update, code customization, or new plugin trial, I test it on my staging website first.
Ideally, your staging website replicates the live website with most of its content. And you don’t want Google to index the staging website and end up with duplicate content issues. Duplicate content would hurt your website’s SEO.
Contents
- What Are Staging Sites?
- The Role of Staging Sites in Website Development
- Staging Sites and SEO: The Connection
- Common SEO Problems with Development & Staging Sites
- How to Prevent Staging Sites from Being Indexed
- How to Prevent Staging Sites from Duplicate Content
- How to Prevent Staging Sites from Robots.txt File
- Secure the Staging Website with a Password
- Conclusion
- Related Articles
What Are Staging Sites?
You’re not alone if you’ve heard the term "Staging Site" and wondered what it meant. Staging sites are copies of your live website used for testing and development.
Think of them as a "Safe Zone" where you can make changes without affecting your website. It’s like having a secret workshop where you can tinker, experiment, and even break things without anyone noticing.
The Role of Staging Sites in Website Development
Staging sites are crucial for WordPress website development. They’re used to test new features, update plugins, or redesign pages without impacting the live site. It is essential for websites with high traffic or critical business operations.
You wouldn’t want your website to crash during a peak sale or when Google crawls it, right? That’s why staging sites are a game changer.
Staging Sites and SEO: The Connection
So, what do staging sites have to do with SEO? A lot. SEO (Search Engine Optimization) is about making your website visible to search engines like Google. When you change your site, you risk affecting its SEO ranking.
However, you can test these changes with a staging site without affecting your SEO. It’s like trying out a new haircut in a virtual mirror before entering the real world.
Common SEO Problems with Development & Staging Sites
- Indexing of Staging Sites
- Duplicate Content
- Robots.txt file
How to Prevent Staging Sites from Being Indexed
Method 01: Create a Staging Site with a WP-Staging Plugin
Do you need to set up a staging site on the same server but are worried about it being indexed? The WP Staging plugin is your go-to solution. This handy tool lets you clone your entire website and create a staging site with just one click.
With WP Staging, you don’t have to worry about search engines finding your test site. It automatically adds a "no index, nofollow" tag to the staging site, ensuring it won’t appear in Google searches or other search engines.
This plugin is excellent for testing changes, plugins, or themes on your site without affecting your live website. It gives you a safe space to try and fix bugs before changing your site. Plus, it’s super easy to use, even if you’re not a tech expert. Just click a button, and you’re ready to test and experiment with your website.
Step-by-Step Guide for One-Click Cloning
WP Staging makes cloning your WordPress site easy with just one click. This means you can test new stuff without messing up your leading site. Here’s how to get it done fast:
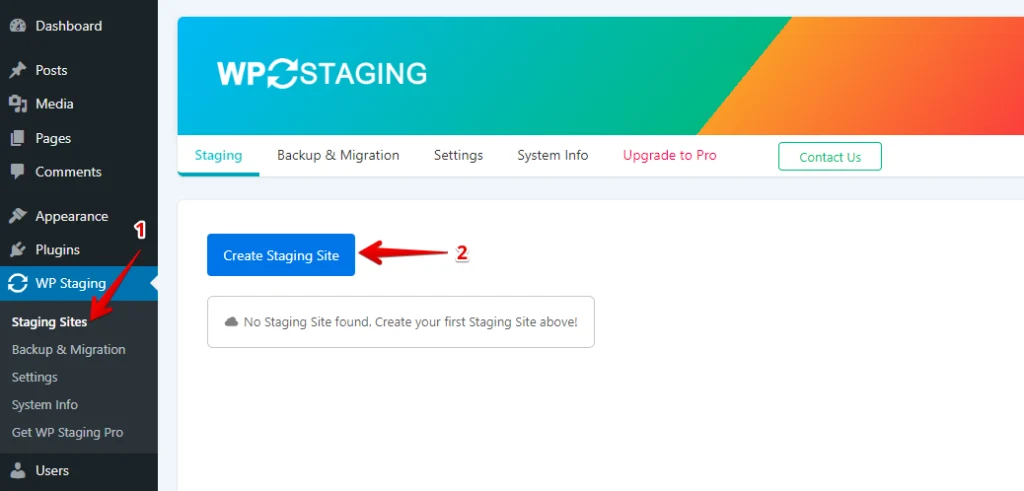
In WP Staging, find “Staging Sites,” click on it, and then press the “Create Staging Site” button.
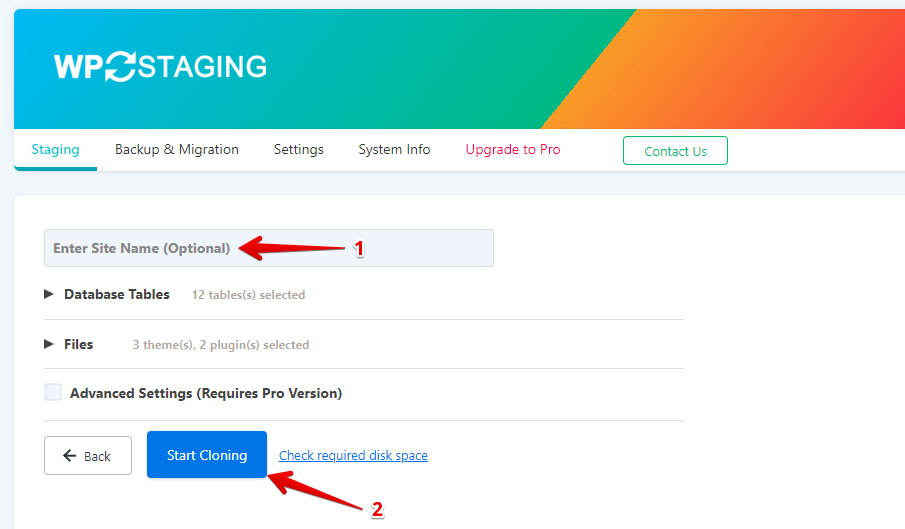
Next, enter the name of your staging site and skip any tables or files you don’t want. Check out Advanced Settings for extra tweaks, then click “Start Cloning” to finish.
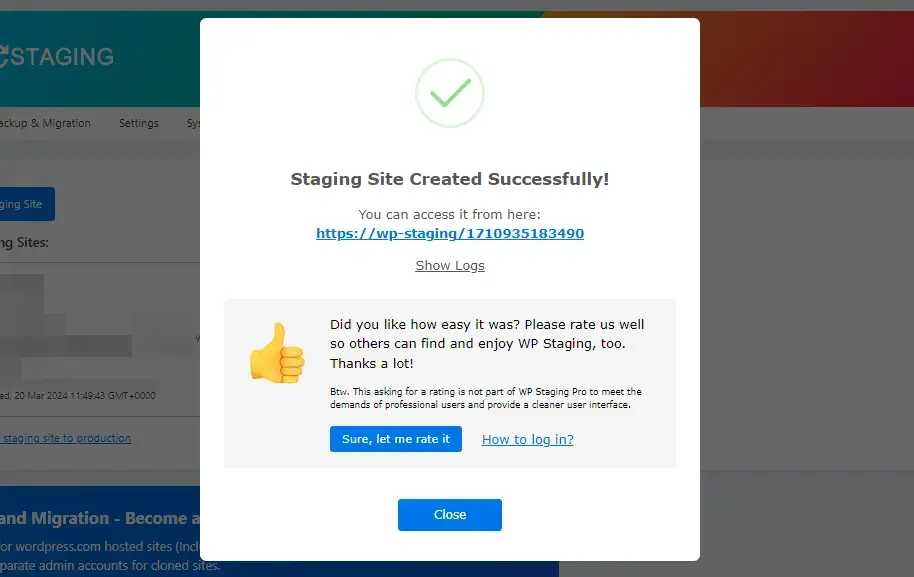
Finally, a popup will appear, letting you know your staging site is ready to use.
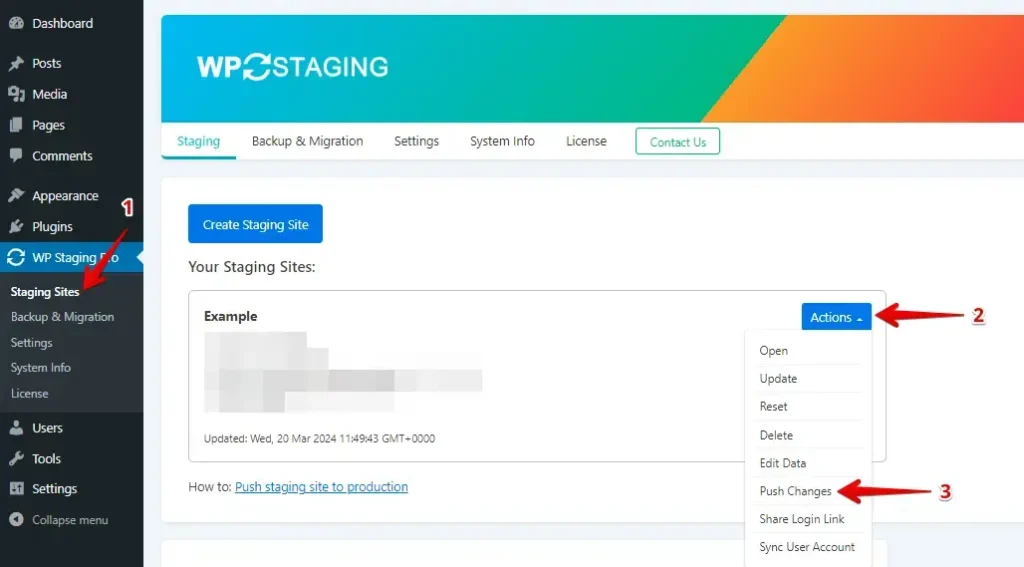
Push Changes
Once you’ve tested changes on your staging site, transferring them to your live site is crucial. Here’s a straightforward guide on how to do this with WP Staging:
Note: To push changes from Staging Site to Production Site, you’ll need the WP Staging Pro version.
Navigate to the “Push Changes” option within the staging site area and activate it. This initiates the process of transferring your updates to the main site.
After that, if there are any files or database tables you don’t want to add, deselect them and press the “Confirm Push” button.
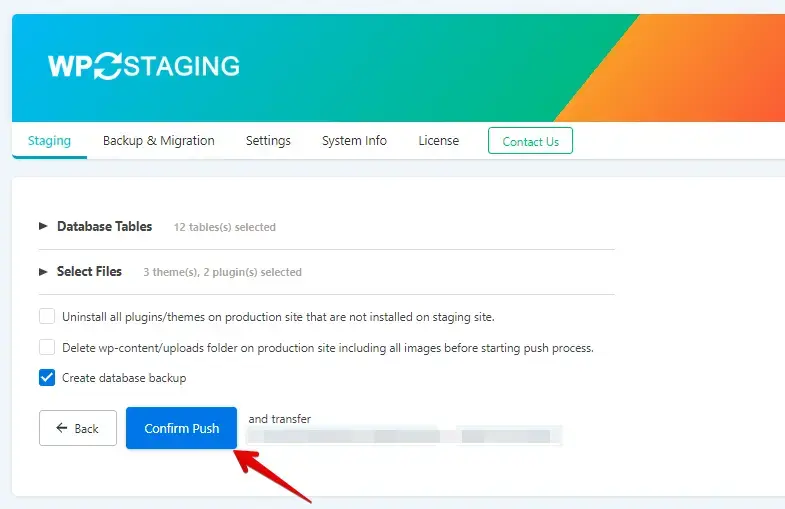
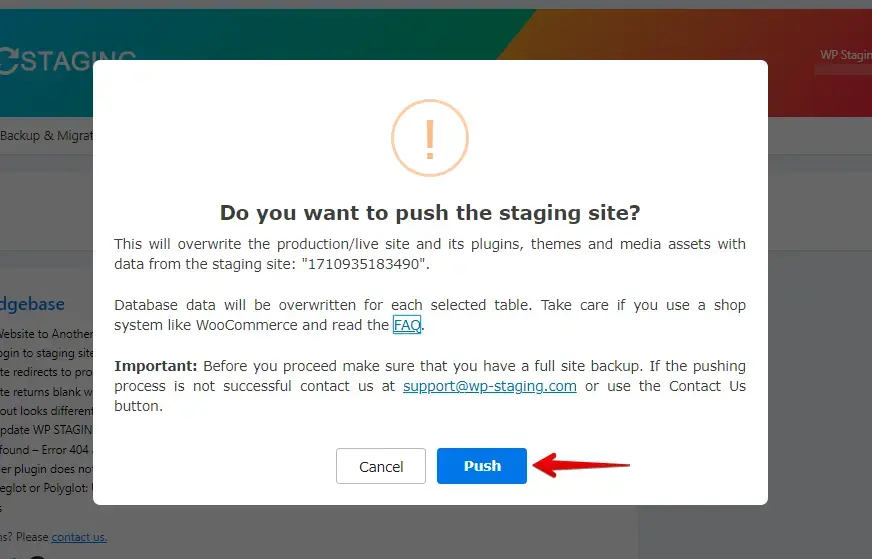
A popup will appear; click the “Push” button within that pop-up.
Method 02: Hide Your WordPress Site from Search Engines
WordPress has a built-in feature that lets you discourage search engines from indexing your site’s pages.
To turn on this setting, go to your WordPress dashboard and click on "Settings". Then, choose "Reading" from the menu. You’ll find a section labeled "Search Engine Visibility". Check the box next to "Discourage search engines from indexing this site," then scroll down and click "Save Changes".
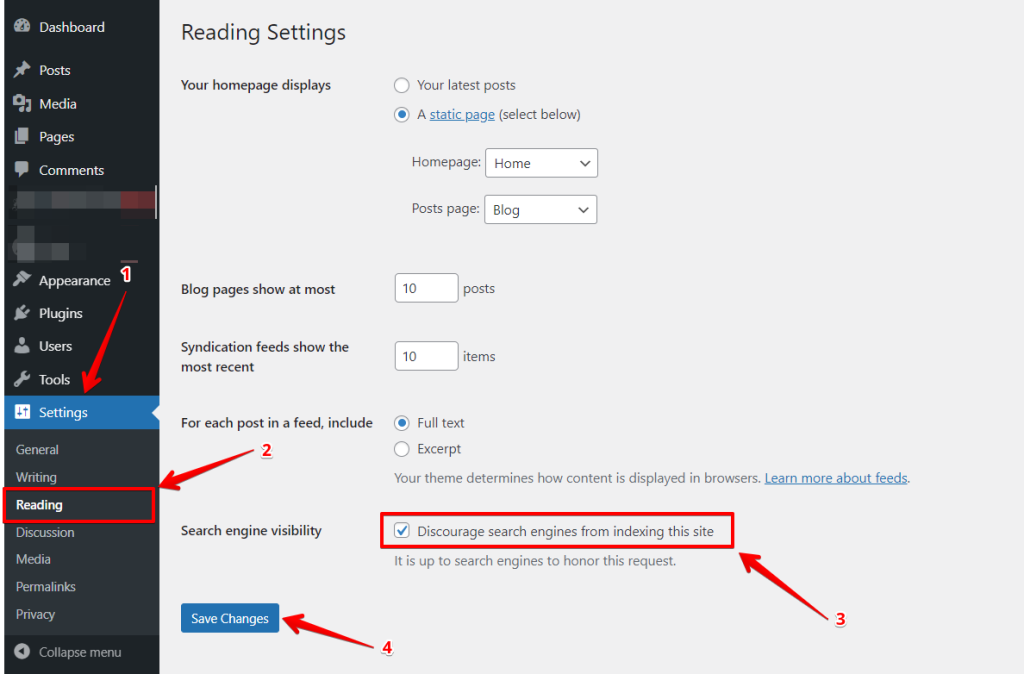
By doing this, you’re telling search engines not to list your site in search results. This is great for staging sites or when you’re still working on your content and need more time to be ready for the public to see.
Note: Remember to uncheck the box when you’re ready to go live, or your site won’t appear in search results.
How to Prevent Staging Sites from Duplicate Content
What is Duplicate Content?
Duplicate content refers to copied, slightly altered, or reused material that offers little or no value to readers and can confuse search engines. This issue typically arises either within a single website or across various websites.
For example, if I republish this article at example.com/blog/duplicate-content-copy/, it qualifies as duplicate content, and the same applies if it’s posted on another website. Google indicates that most cases of duplicate content are not created with the intent to deceive.
Avoiding Duplicate Content
It will prevent them from being removed from the index using a meta no-index tag because Google can’t crawl the pages to detect the tag.
If staging URLs have been indexed and still need to exist, follow these steps:
- Add meta noindex tags to each staging URL.
- If urgent, consider making a URL removal request in Webmaster Tools, though this is generally unnecessary.
- Wait for the staging URLs to be marked as noindex. You can periodically check their status by performing site: searches on Google.
- Only after the URLs are noindexed should you block search engines from crawling them with the robots.txt file. Check your robots.txt file to make sure bots can crawl the site properly.
How to Prevent Staging Sites from Robots.txt File
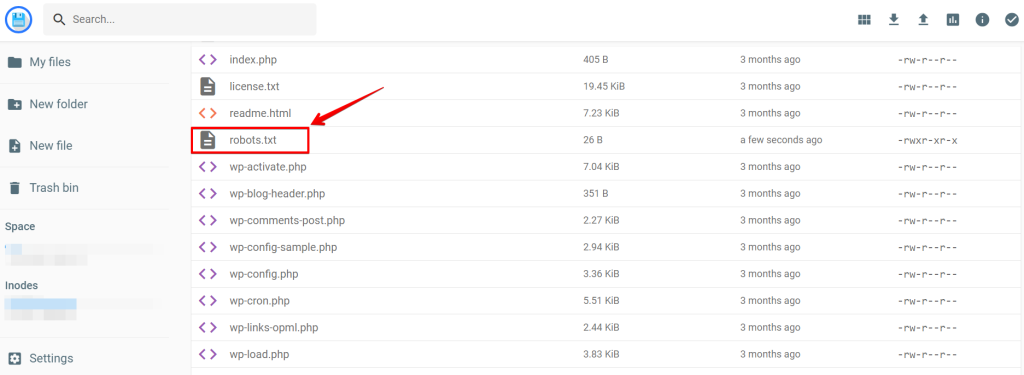
The robots.txt file is a simple text file that tells search engine bots which parts of a website they should not visit. It helps control how these bots crawl and index the content on your site.
You can prevent search engine bots from accessing parts of your WordPress site by adding rules to the robots.txt file in your root directory. Here’s how you do it:
- If you don’t already have a robots.txt file, you’ll need to create one.
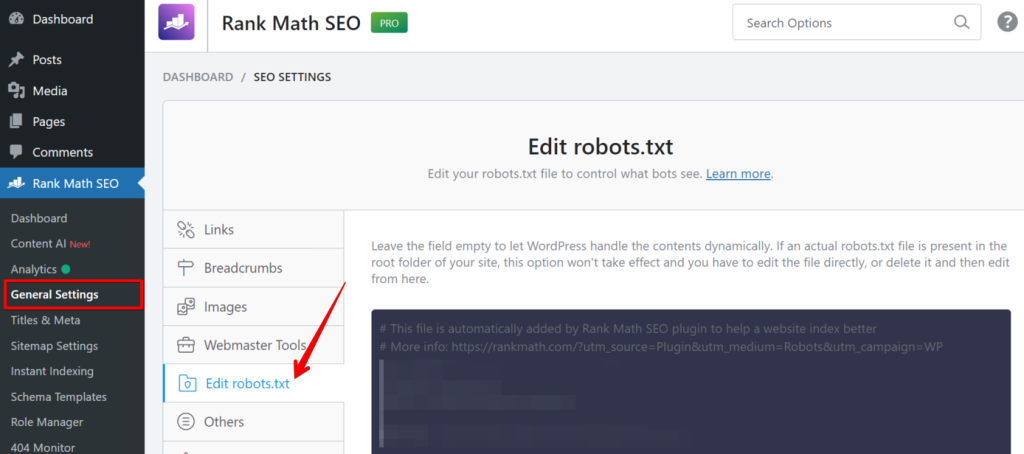
- If you’re using the Rank Math SEO plugin, you can edit the robots.txt file directly through the plugin’s settings, as described below.
Method 1: Using Rank Math SEO Plugin
In this robots.txt file, use the following code:
User-agent: *
Disallow: /
Method 02: Using Rank Math SEO Plugin
Using the Rank Math SEO plugin, you can edit the robots.txt file using the settings below.
Secure the Staging Website with a Password
Password protection is an excellent method to prevent Google from seeing your staging website, as even Google suggests it. By setting up a password for your site, only people with the password can access it.
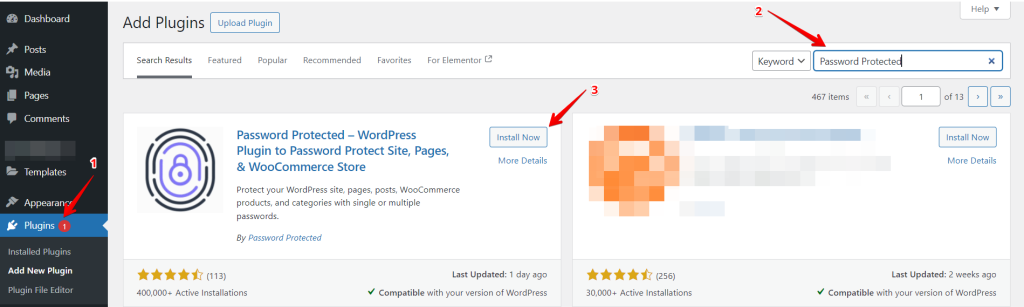
You can easily set this up with the free Password Protected WordPress plugin. This plugin ensures that Google does not index all content secured by a password by automatically not adding a ‘noindex,nofollow’ tag.
Here’s how to enable password protection across your entire staging website:
- Go to the WordPress plugins section, find the "Password Protected" plugin, install it, and then activate it.
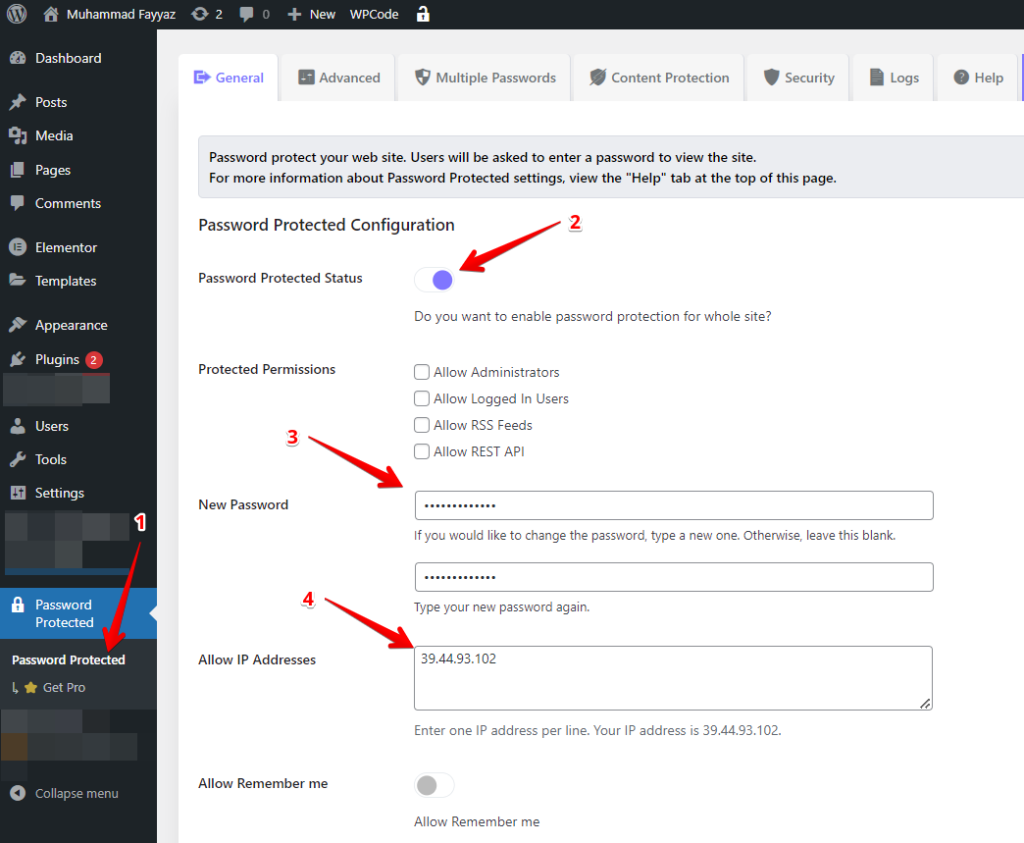
Go to the settings to turn on the password protection status, and enter a new password.
You can only allow your IP to be in the Allowed IP addresses field. As such, there is no requirement to put in a password because the staging site is accessible without it. By searching "What is my IP" in a Google search, you can bring up the public IP of your system.
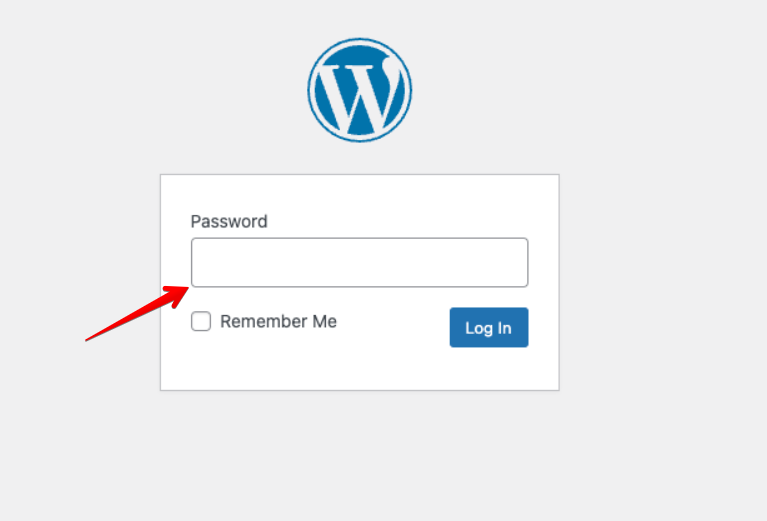
To verify this, please try visiting the staging site with a guest profile or through incognito mode. You should see the following page, prompting for a password.
Conclusion
Dev or Staging sites can negatively impact your website’s SEO performance. If Googlebot crawls, indexes, or ranks the dev site, it can cause issues, but these are usually easy to fix.
The primary solution is to restrict access to the dev site. Using password protection or IP-based authentication is the best way to keep bots and people away.
Additionally, avoid exposing links to the dev site to ensure that neither people nor bots can find it.
Related Articles
- How to Backup and Restore Your WordPress Website
- Can I Create Multiple Staging Sites?
- A Complete Toolbox for WordPress Developers & Users
- Can not Update WP STAGING on the Staging Site
- Migrate Your WordPress Site to Another Host