This article explains how to activate the WordPress debug mode and create the WordPress debug.log file.
Are you experiencing a fatal error or a blank white page on your WordPress live site?
Try out WP STAGING to prevent such fatal errors on your production site!
Read this developer short novel to learn why working on a staging site is so important.
When you open your WordPress website, do you get an error 500 or a blank page?
To determine which plugin or code is causing this error, you can tell WordPress to write all errors to a log file called debug.log.
Alternatively, you can display the errors on the screen instead of seeing a blank white page.
Contents
How to activate WordPress Debug Mode
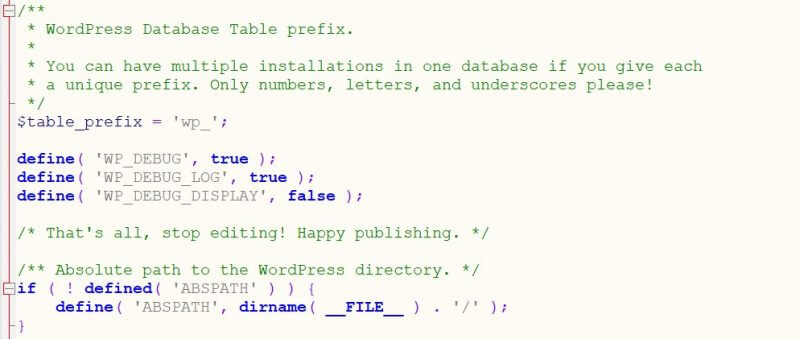
You can enable the WordPress “debug mode” by editing a few lines in the wp-config.php file of your WordPress installation:
- Login to cPanel or log in to your site via FTP
- Use the cPanel File Manager or your FTP client and edit the file
wp-config.php - Copy the lines below to the file
wp-config.phpor if they already exist, change their values to true:
define( 'WP_DEBUG', true );
define( 'WP_DEBUG_LOG', true );
define( 'WP_DEBUG_DISPLAY', false );
Attention: Make sure you copy the lines exactly as shown, and don’t forget a semicolon or other characters!
- Paste the copied lines directly above the line that says
/* That's all, stop editing! Happy publishing. */

After reloading the website, WordPress will write all PHP errors into the file debug.log.
WordPress saves that file into the folder: wp-content/debug.log
Display Errors on the WordPress Frontend
You and your visitors can see any PHP warning and error message on the front page.
For security reasons, disable the WP_DEBUG_DISPLAY constant after fixing the site errors.
If you want to see the debug log errors directly on the screen instead of activating the debug.log file, change the line that says define( 'WP_DEBUG_DISPLAY', false );
Rename it to: define( 'WP_DEBUG_DISPLAY', true );.
Alternative Method to Debug Fatal Errors When debug.log Isn’t Generated
WordPress Does not Create the debug.log Log File.
Some hosting providers[1] do not allow the creation of the WordPress debug.log. They catch all PHP errors and let WordPress write them into a separate log file.
If WordPress can not create the debug.log, check if you see another file in the root directory, such as error_log or a folder/logs or similar.
If you do not see any error logs, please ask your hosting provider where they store the log files.
Alternatively, you can use the method mentioned above and changedefine( 'WP_DEBUG_DISPLAY', false ); todefine( 'WP_DEBUG_DISPLAY', true );
If this works, you will see the relevant errors on the front end. That will help you to resolve the fatal error.
You can find more detailed instructions about enabling the WordPress “debug” mode at https://wordpress.org/support/article/debugging-in-wordpress/.
At the time of writing this article: [1] HostGator
Alternate Method to Debug Fatal Errors When debug.log Isn’t Generated
Sometimes, when you enable WP_DEBUG mode to troubleshoot a fatal error, you might find that your hosting provider prevents the debug.log file from being created. Even setting WP_DEBUG_DISPLAY to true It doesn’t always help to show the error on the front end.
If you’re stuck in this situation, here’s a handy workaround that works when nothing else does!
The Fix: Forcing Error Display in wp-config.php
This snippet forces the fatal error to be displayed:
register_shutdown_function(function () {
    $error = error_get_last();
    if ($error) {
        print_r($error);
    }
});
🚨 Remember to remove the snippet after debugging and use only when you have FTP access for safe rollback.
Change the Location of the debug.log
You can change the position of written errors by changing the value of the constant WP_DEBUG_LOG.
Open wp-config.php and search the line that contains WP_DEBUG_LOG.
Search: define( 'WP_DEBUG_LOG', true );
Rename to: define( 'WP_DEBUG_LOG','/logs/errors.log' );
That allows WordPress to write error messages into another log file.
As a destination path, you can also write dev/stderr or /dev/stdout. That can help if you use Docker or another development environment and want all the logs in a shared location.
Disable Debug Mode in WordPress After Troubleshooting
We have already mentioned this before, but if you are investigating WordPress website issues with the debugging mode, don’t always keep it activated. After using the debug.log, delete the file, and disable further error logging by changing the following lines from define( 'WP_DEBUG', true ); to define( 'WP_DEBUG', false );.
Otherwise, unauthorized persons could access that file and would be able to get sensitive information from your server.
