If you have a website, you likely want to give your visitors an option to contact you directly from your site. You can do that easily by adding a contact form so visitors, customers, clients, or even potential partners can get in touch with you when they need help or have something to share with you.
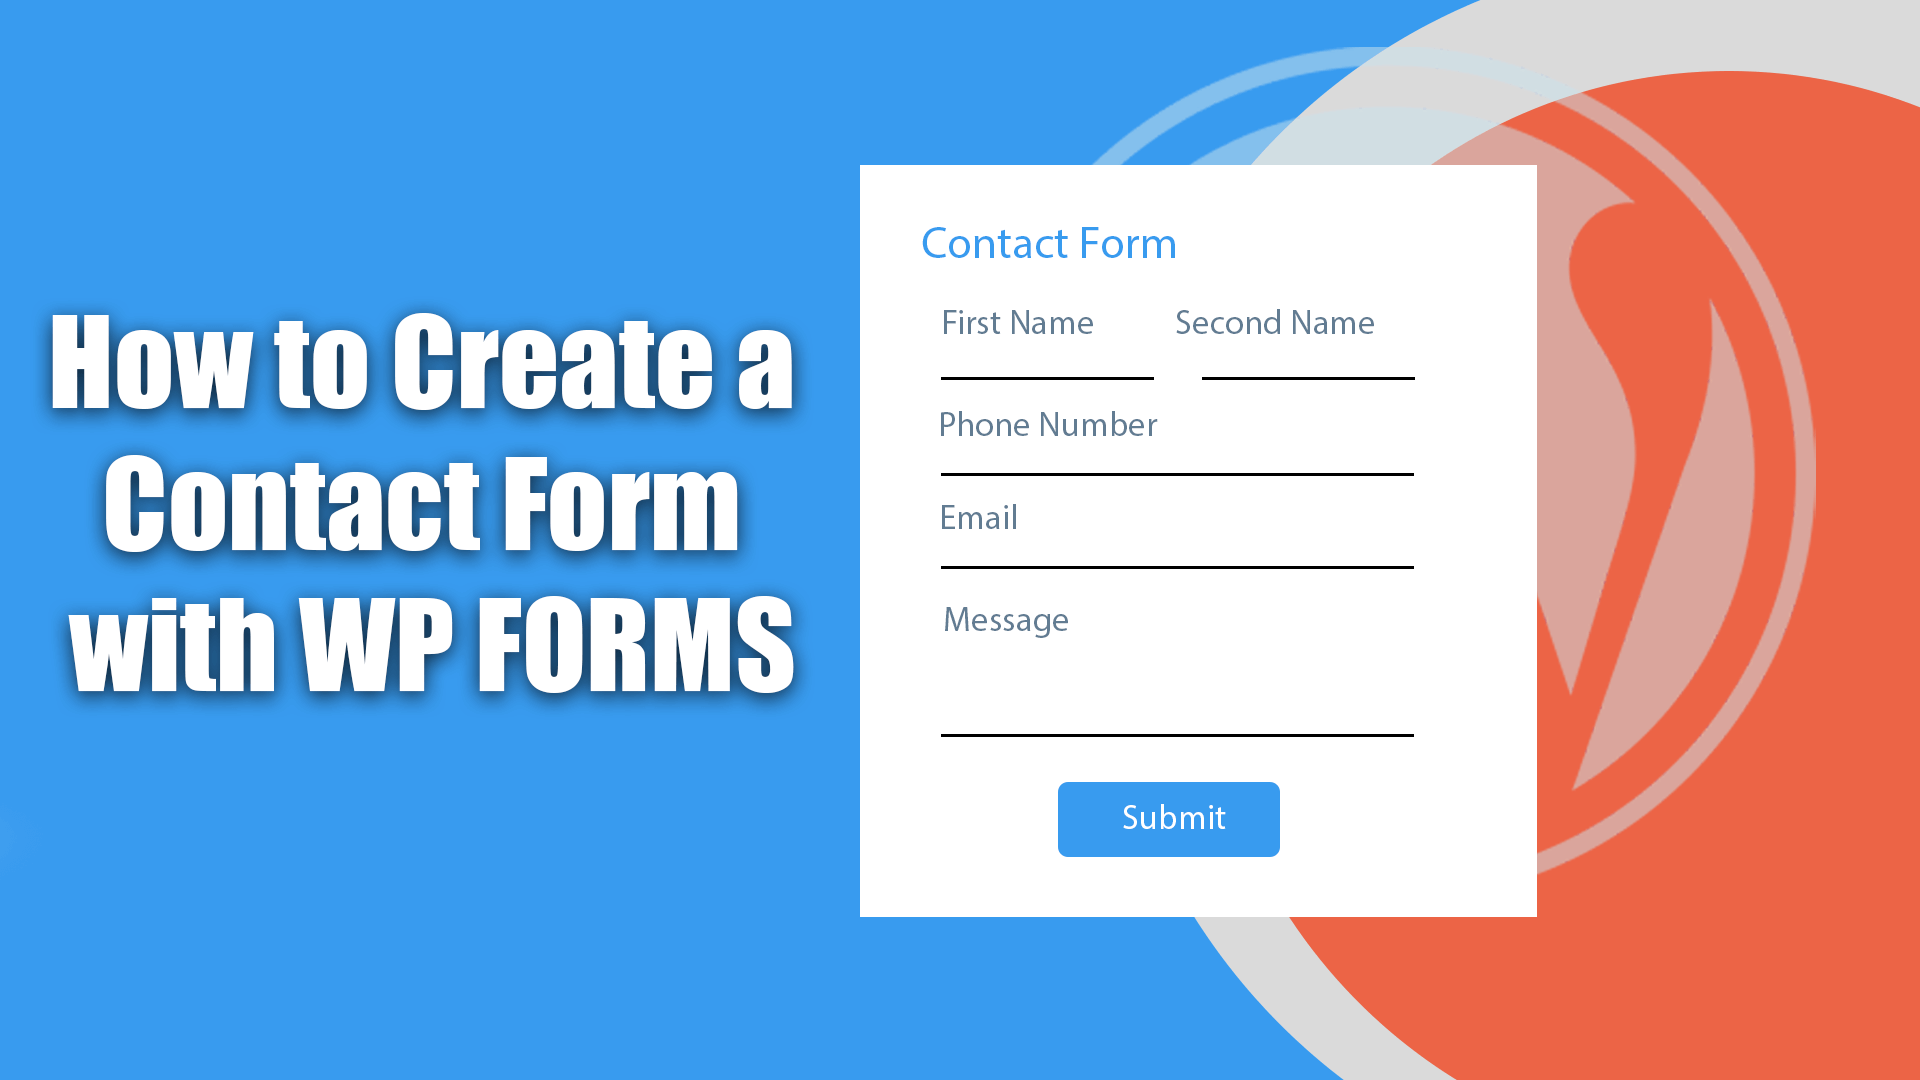
In just four simple steps, I´ll show you how to create a contact form like the one below, where anyone can fill out their name, email, and message, and then whenever they click Submit, you’ll get an instant notification in your email inbox.
Contents
How to Create a WordPress Contact Form With WPForms / Video
If you prefer watching a video instead of reading this article on how to speed up WordPress, you can watch this entire article as a video:
Four Good Reasons Why You Should Create a Contact Form
To increase your motivation to build a good contact form, I’d like to show you four reasons why you should have a contact form on your website for your visitors.
1. It looks professional:
Having a clean and clear contact form makes your website look more professional. A displayed email address doesn’t quite have the same effect. The contact form shows that you’re organized and have invested time in your website.
2. It reduces spam:
Putting an email address out on the internet is asking for spam. Hiding your email address by using a contact form makes it harder for spammers to find you.
3. It’s easier for the user and keeps them on your website:
A contact form allows visitors to stay on your site. Only posting an email address requires the visitor to open up their email client, copy and paste your email address, and then write the message there.
4. It gets you more leads:
When you run a business, you want to get more leads. Leads are a big reason why you need a contact form. In addition to the increased effort of manually writing an email, as mentioned above, there is also the fact that if visitors use a public or shared computer, they may not be able to create an email. Contact forms and their professional appearance can help you get more leads. They are more comfortable and faster; your visitor can use them from any device.

Install WPForms
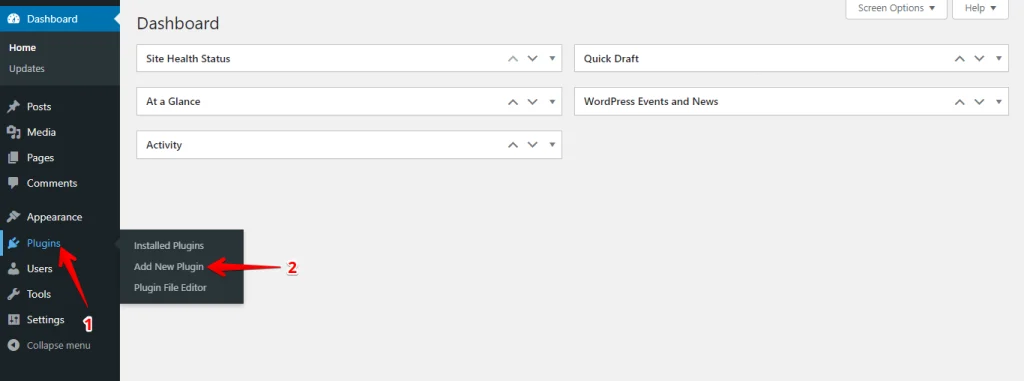
We will use a plug-in named "Contact Form by WPForms.” It’s straightforward to set up. To do this, go to the "Plugins" menu tab from the WordPress dashboard and click "Add New.”
Enter "WP Forms" in the search box. First is "Contact Form by WPForms – Drag & Drop Form Builder for WordPress.” Click on "Installation,” wait a few seconds, and activate the plug-in directly by clicking on "Activate.”

Creating the First Contact Form
Adjusting the Contact Form
Once it’s activated, you’ll see the dashboard where it says, "Welcome to WP forms.” The next step is to create a new form; you can go down to "Create your first form," you can also come over to the menu at the left whenever you need to create a new contact form; go to WP forms and click "add new.”
First, give it a name. Then, you can select a template, but you can also start from a blank form, meaning there are no fields.
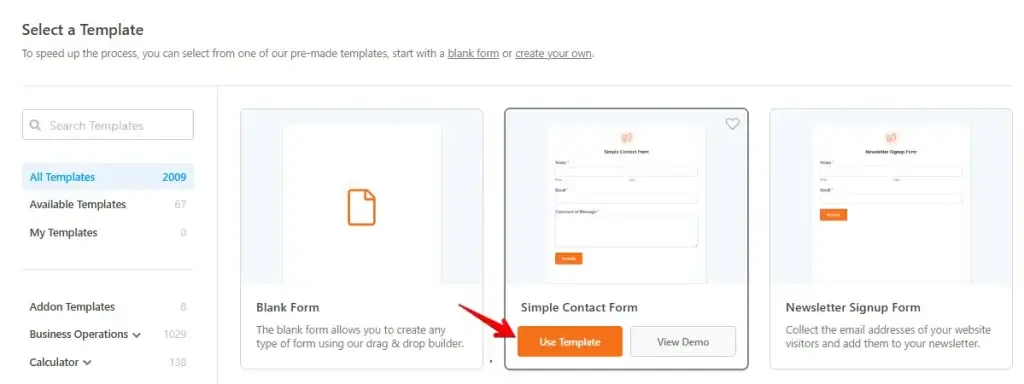
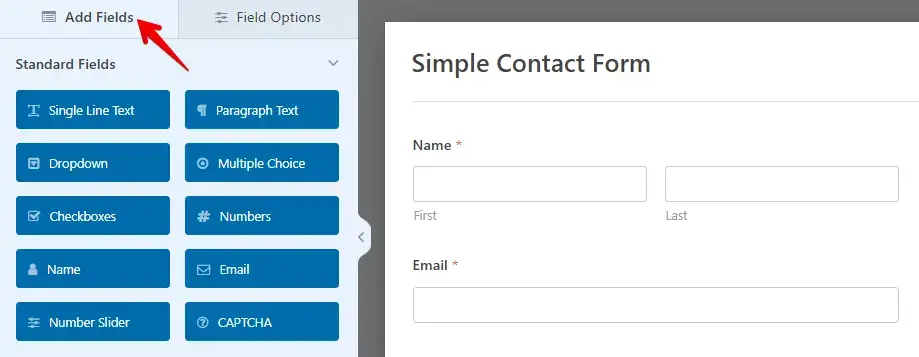
We’re going to do the "Simple contact form.” The main fields you might need for a simple contact form are already here.
You can click on any of these fields to make any changes. After doing that, you see that you can make all of these fields required by clicking "Required.” You can even change what the fields say by clicking "Label" and then changing it.
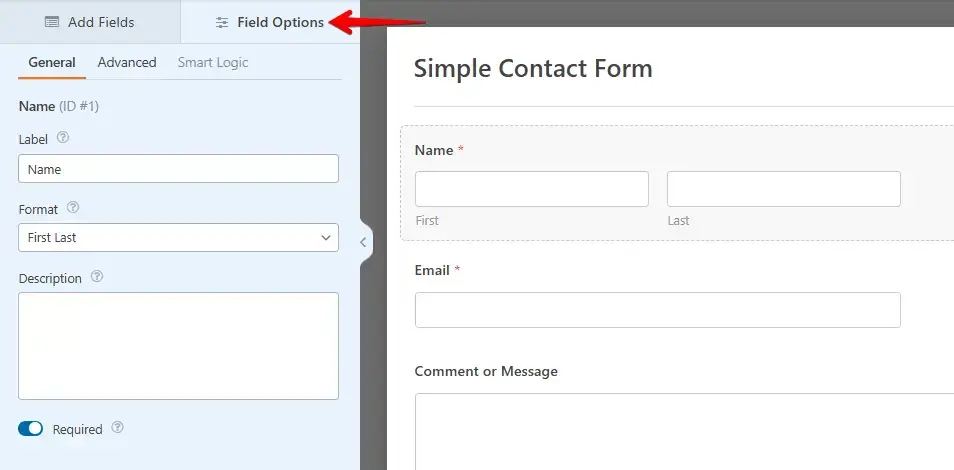
If you have another field that you want to add, go to "Add Fields," and you can click on it, then it’ll drop down. The,n you can left-click and drag this wherever you want.
Finally, you can change the submit button a little bit by clicking on it, and it’ll come to this area where we can change the button text. I’m going to go ahead and click "Save."
Adjusting the Notifications
By clicking the "Submit" field, we landed in the "General" area in the "Settings" menu. We can go to "Notifications" because the next thing we want to do is set up the notifications. That means where the email goes and what is in the email. By default, the notification gets sent to the admin email, which means the email you used to sign up for WordPress.

You can remove that and add your preferred email here, and this can be any email, whether it´s your Gmail or Yahoo address. If you want to send it to multiple emails because more than one team member should get notified, then you can do that as well. Just do a comma and then add the other email addresses.
We set up the notifications; click "Save."
Adjusting the Confirmation Message
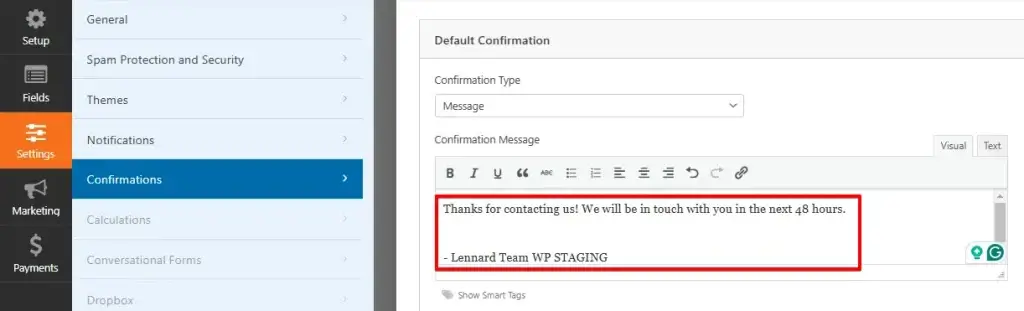
The third and final part of the set-up is the configuration of the "Confirmation Message.”
The confirmation message is what your visitor sees when they submit the contact form to you. By default, it says, "Thanks for contacting us! We will be in touch with you shortly.
You can change this to handle their expectations; if you know it takes you or your support 48 hours to respond, you can mention that. Or you could add your name to personalize the message. For example, "Lennard Team WP STAGING."
You can display the message, show a specific page on your website, or redirect the visitor to a different URL.
But I will just leave the confirmation type as "message.” Click on "save" and then click on the "X.” You can see the newly created contact form.
Add the Contact Form to Your Website
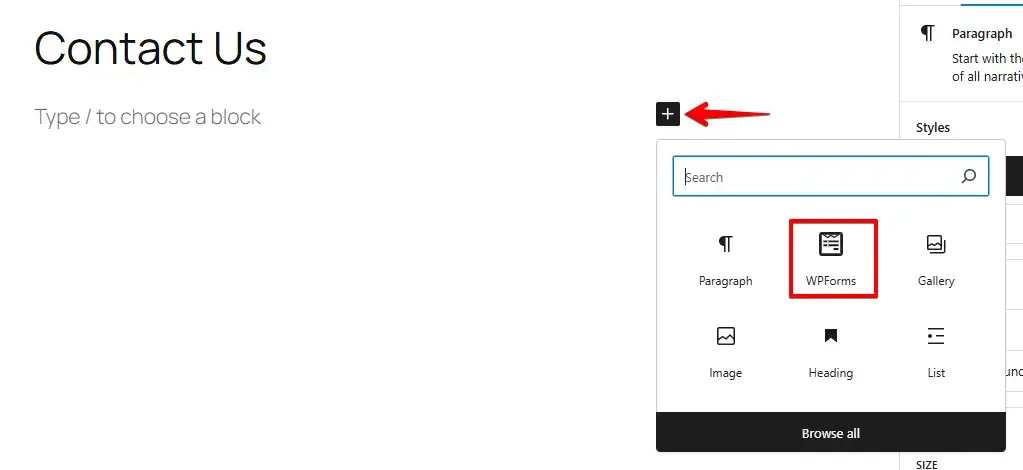
First, we need to create a contact page, so let’s go up to "pages" in the WordPress sidebar and then go to "add new." Now, I’m just going to name this "Contact."
To add the contact form, go up to the little plus button, and then if we scroll down to widgets and open this up, you’ll see "WP forms." Click on that, and then we can select the form from the drop-down.
Now, click Publish, then click Publish again. The contact form has been successfully added.
Send a Test Email
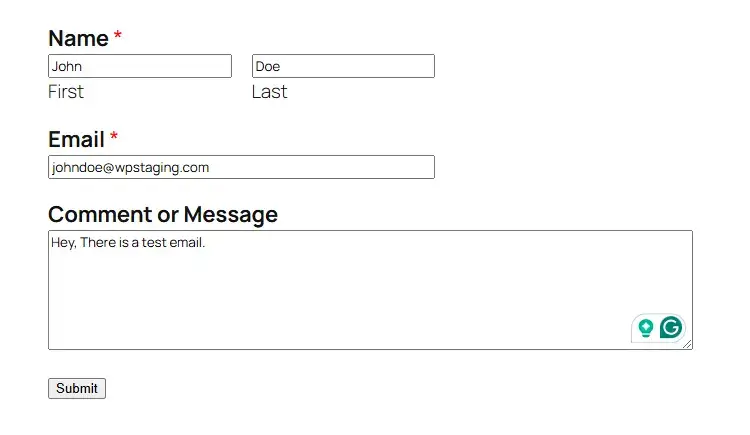
Open the "Contact" page with the new contact form. Send a test email, enter your details in the contact form, and click ‘submit.’
Now, we have to check our email inboxes. If you’re like me, the email didn’t appear in your inbox. What’s happening is that the email is ending up in your spam folder, so we need to make sure that we mark it as not spam.
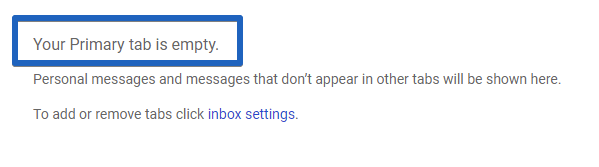
To do this, let’s go over to the spam folder. Click on spam, and now you’ll see the email here. Go click on the email and on "report, not spam.” Now, it says the conversation was unmarked from spam and moved to the inbox. Let’s go back to our inbox, and now the email shows up; any email that comes through that contact form will not be marked as spam anymore.

If you want to respond to this email, click on the email, and then you can write a response.
Bonus: Using an SMTP server
If your test email wasn´t successful and you cannot find it in your inbox or your spam folder, I will show you in this bonus part how to activate sending emails in WordPress using an SMTP server.
What does SMTP mean?
SMTP, or Simple Mail Transfer Protocol, is the industry standard for sending emails, and since it uses proper authentication, it increases your email deliverability. Using an SMTP server keeps your emails from going to spam.
Installing an SMTP-Plugin
To set things up on your website, we’ll install a plugin called "WP Mail SMTP by WPForms,” as the name suggests; it comes from the same developer as the "WP Forms" contact form plugins we use.
Go to "Plugins" and "Add New" in the WordPress sidebar. In the search box, type in "SMTP." Once you install it, you’ll also want to make sure you activate it. Once it’s activated, you can go to "WP MAIL SMTP" in your sidebar menu.

Setting Up the SMTP-Plugin
Enter the "From Email.” Your wp-admin email address, which you assigned when setting up WordPress, is displayed here by default.
It´s the email address that WordPress uses to send emails.
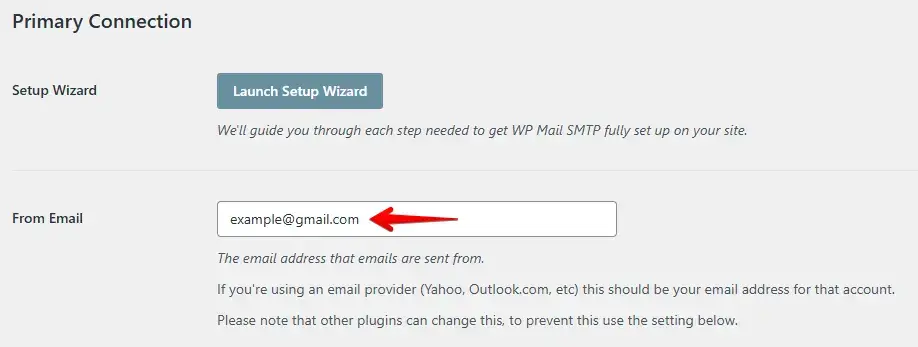
Make sure to enter the email address you will be using to send SMTP emails, which would be the email address associated with your Yahoo or Gmail account, for example.
Then, enter the field "From Name.” This field will be displayed to your visitors as the sender when the e-mail is received. I like to use "Lennard @ WP STAGING" to give it a personal touch.
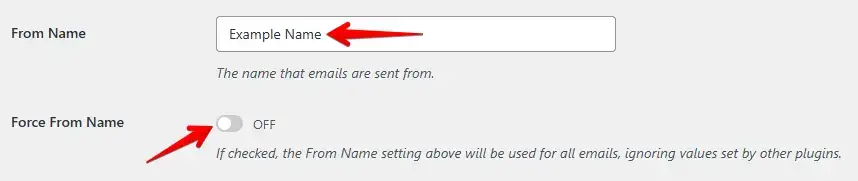
You can select "Force" for the email address and the name. This checkbox will apply the setting to the entire WordPress site, including other plugins.
Activate the "Return-Path" checkbox, and you’ll get informed if there are issues with the recipient’s email.
The selection of the "mailer" is the most important decision on this page. You can set up the SMTP server from one of the recommended mail services, or you can use your standard email provider.
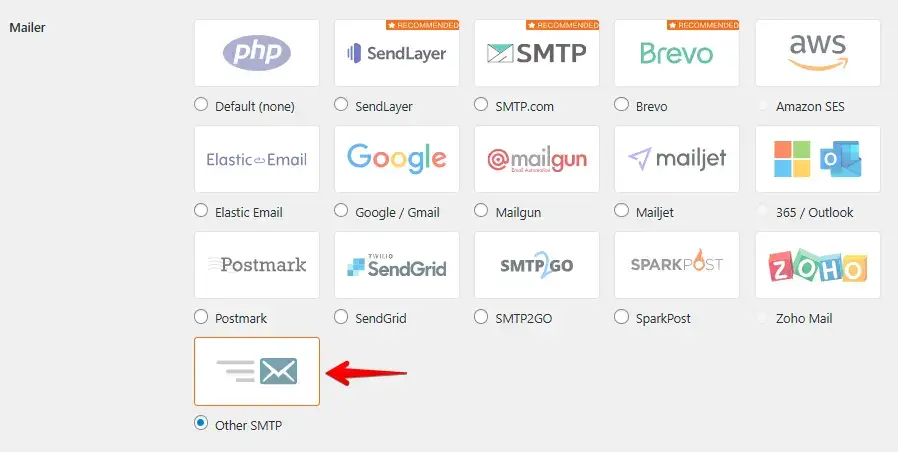
To set up SMTP using your standard email provider, click the "Other SMTP" checkbox. You get all of the required data from your hosting provider or email service. Otherwise, you can click on "SMTP documentation." It will show you more details about the most popular providers.
Enter "smtp.example.com" as the SMTP Host. Select your provider’s encryption method and verify the port. For an SSL-encrypted connection, use 465.
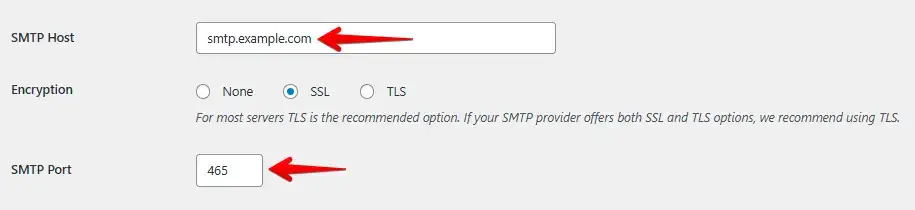
Now, add your SMTP username and password. For most providers, the SMTP username is your email address, and the SMTP password is the one you used to register the email.

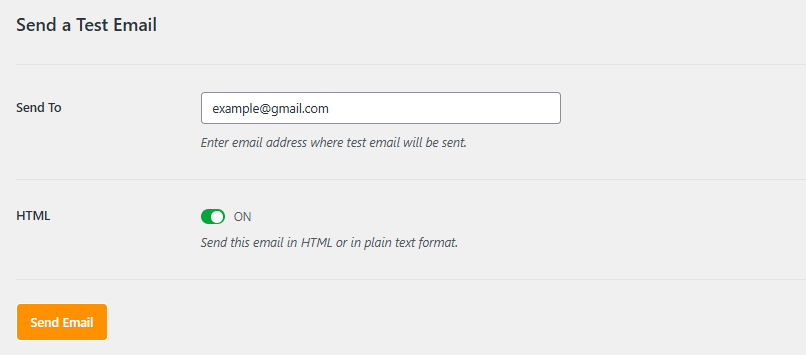
Now click "Save Settings" and go to the "Email Test" tab to check whether all entries were correct and no problem occurred.
Everything is set up! Congratulations! Test your WPForms contact form to ensure it works. If needed, review your settings or check WPForms’ documentation.
Conclusion
Setting up a contact form with WPForms is simple and doesn’t take much time. Now that your form is ready, visitors can easily get in touch with you. Just make sure to test it to confirm everything works. If needed, you can tweak the settings anytime. Your website is now set to receive messages smoothly!
Related Articles
- How to Fix WordPress Not Sending Email Issue
- 5 Best Form Plugins for your WordPress Site
- Deactivate Sending Emails From Staging Site
- These 7 WordPress Plugins are Installed on More Than 25 Million Websites