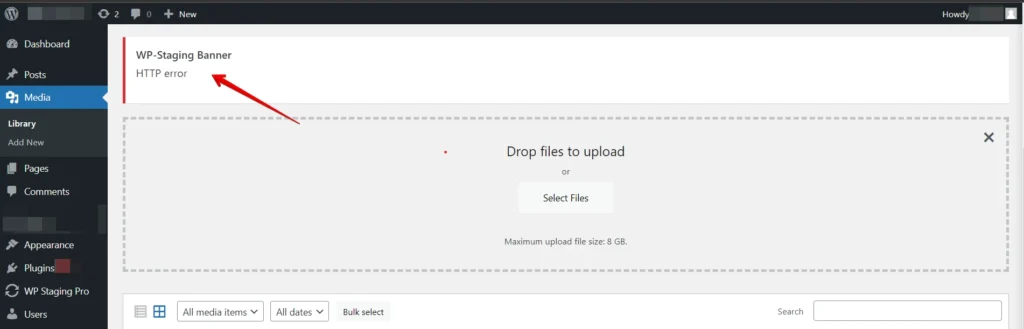
Do you get an HTTP error while trying to upload images to WordPress?
Find out how to solve this within a few steps.
Contents
What does an HTTP Error Mean?
The "HTTP error" message usually occurs when trying to upload an image to your WordPress site via the media library or directly into a post or page. This error doesn’t provide specific information about its cause, making it challenging to pinpoint the issue.
However, there are several common reasons behind this error, and we will address each one.
5 Common Causes of HTTP Errors
Several factors can lead to HTTP errors when uploading images in WordPress. Here are some of the most common culprits:
- Image Size – Large image files can overwhelm your server, causing HTTP errors. WordPress has a maximum upload size; if your image exceeds this limit, it will result in an error.
- PHP Memory Limit – WordPress relies on PHP to handle image uploads. If your server has a low PHP memory limit, it can lead to HTTP errors when processing large images.
- Incorrect File Permissions – Incorrect file permissions on your server can prevent WordPress from saving uploaded images to the designated folder.
- Corrupted Image – Sometimes, the image you’re trying to upload might be corrupted or have an incompatible format, leading to HTTP errors.
- Conflicting Plugins or Themes – Incompatibility between your current theme or plugins and WordPress core files can also trigger HTTP errors.
Now that we understand the potential causes let’s explore some solutions to resolve this frustrating issue.
7 Practical Methods to Fix the "HTTP Error" When Uploading Images
- Refresh your browser.
- Rename the file.
- Resize the file.
- Increase your PHP memory limit.
- Temporarily deactivate your plugins.
- Switch to a default theme.
- Edit your .htacess file.
Method 1: Reload the Page might fix the http error
One of the simplest and quickest solutions to try is to reload the page where the "HTTP Errors" occurs. Sometimes, the error is temporary, and reloading the page can resolve it.
Pressing the refresh button or using the keyboard shortcut (Ctrl + F5 or Command + R) can trigger a new request to the server and potentially eliminate the error.
🔥PLAY SAFE:GET STARTED WITH WP STAGING TO EFFICIENTLY MANAGE BACKUPS & CREATING STAGING ENVIRONMENTS.
Method 2: Rename the File
Once you’ve located the problematic file, right-click on it (or use the file manager’s context menu) and select the "Rename" option. Then, choose a new, meaningful name for the file.
Ensure the new name contains only letters, numbers, and hyphens (avoid special characters and spaces).
Method 3: Resize the File
If you’re still encountering the HTTP image upload error message, the issue may stem from the image file’s size exceeding the maximum upload limit. To address this problem, you can resize and compress the image to make it more suitable for uploading.
Before uploading, resize images to fit within WordPress’s default size limits, usually around 2MB.
Method 4: Increase PHP Memory Limit
Here’s a step-by-step guide on how to increase the PHP memory limit:
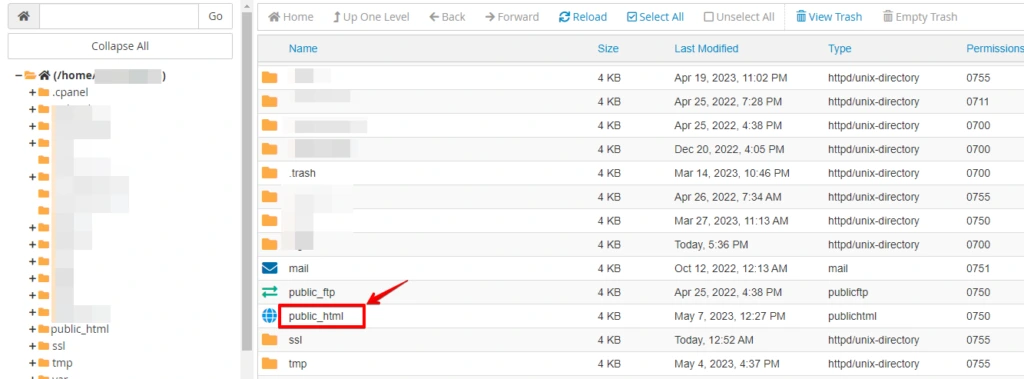
- Access your WordPress files through FTP or a file manager provided by your hosting provider.

- Locate the root directory of your WordPress installation (usually named "public_html" or "www").
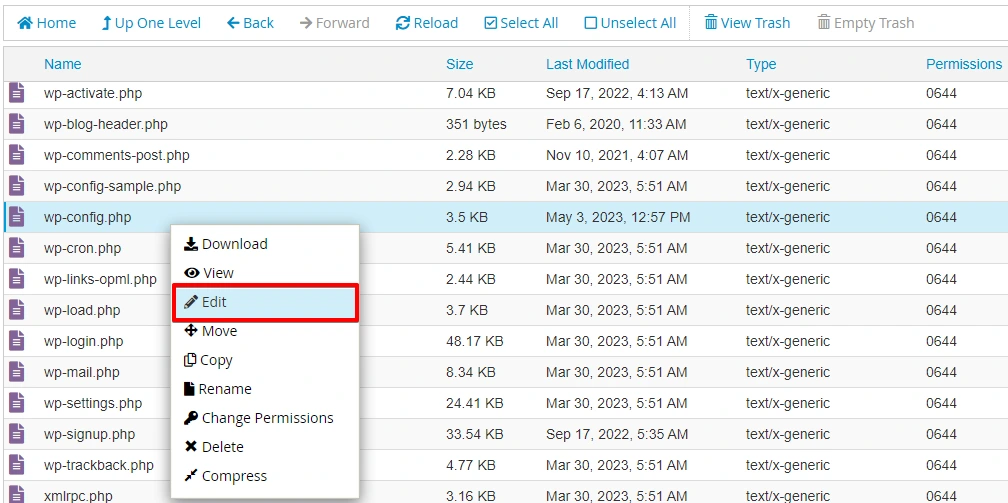
- Look for the wp-config.php file and open the
wp-config.phpfile.
- Scroll down to the section that contains the PHP settings.
- Add the following line of code just above the line that says, "That’s all, stop editing! Happy blogging."
define('WP_MEMORY_LIMIT', '256M');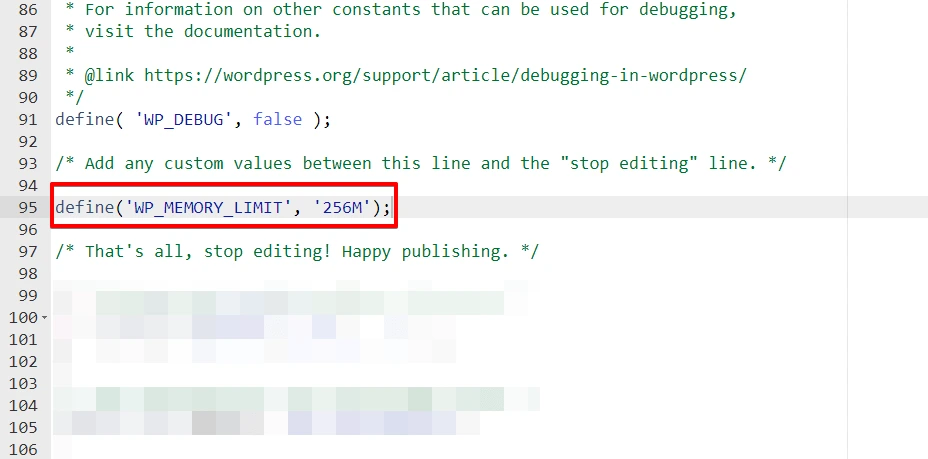
You can adjust the memory limit value (e.g., ‘256M’) based on your specific requirements.
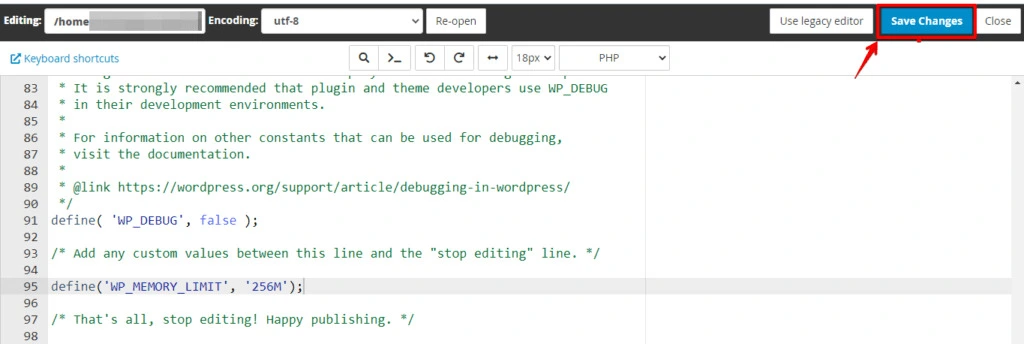
- Save the changes to the wp-config.php file.
Method 5: Temporarily Deactivate your Plugins
Deactivate plugins to identify if any are causing conflicts resulting in the HTTP error.
To disable plugins in WordPress, follow these steps:
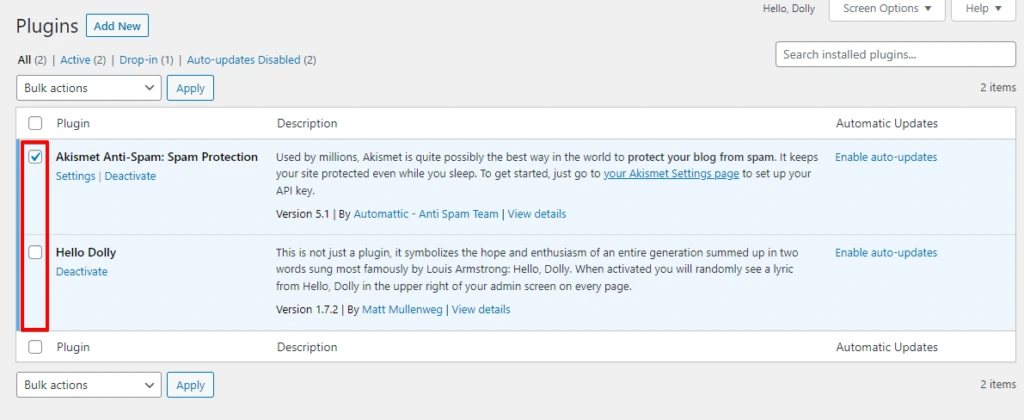
- Access your WordPress admin dashboard by logging in to your site.
- Go to "Plugins" from the sidebar menu and click on it.
- You will see a list of installed plugins.
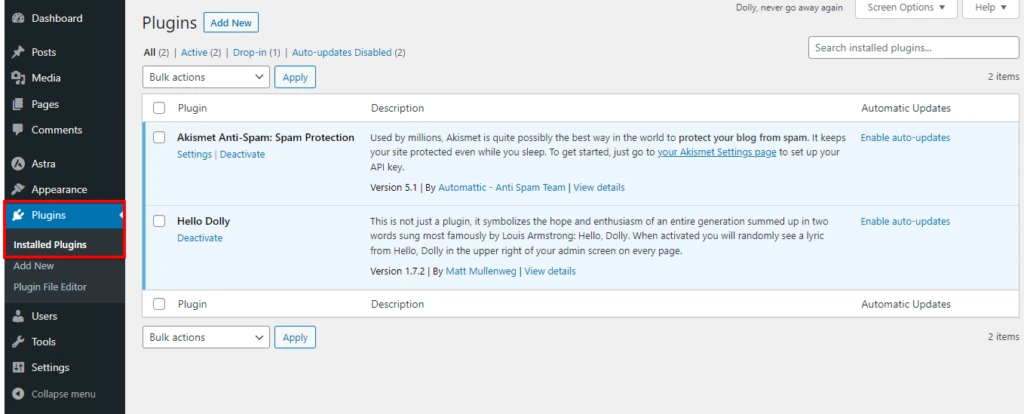
- Select the plugins you want to disable by clicking the checkboxes next to their names. You can choose multiple plugins at once.
- Once you have selected the plugins, look for the "Bulk Actions" dropdown menu at the top of the list and select "Deactivate."
- Click the "Apply" button next to the dropdown menu.
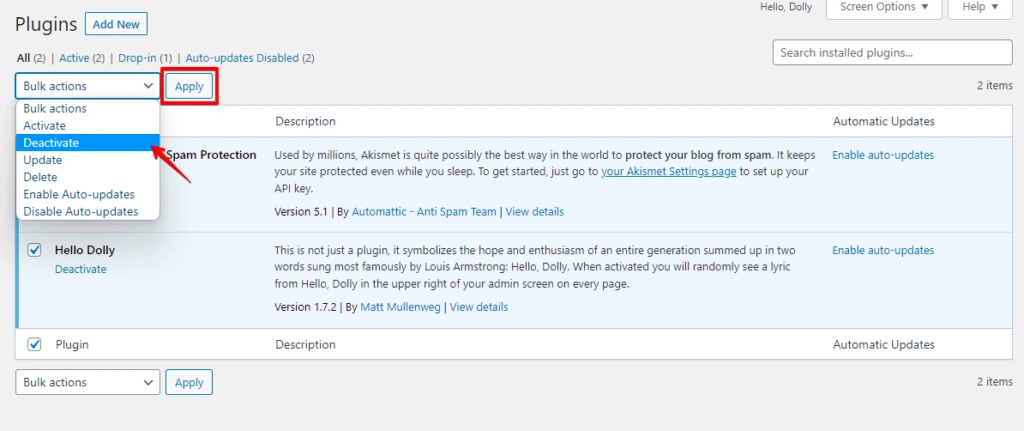
- The selected plugins will now be deactivated, and their functionalities will be temporarily disabled.
Disabling plugins can help identify if they are causing conflicts or the HTTP error. You can reactivate the plugins individually to determine which one might be causing the issue.
Method 6: Switching to the Default Theme
If you encounter issues with your current WordPress theme or wish to test the functionality of your website with a different theme, you can switch to the default theme.
Switch to the default theme in WordPress and follow these steps:
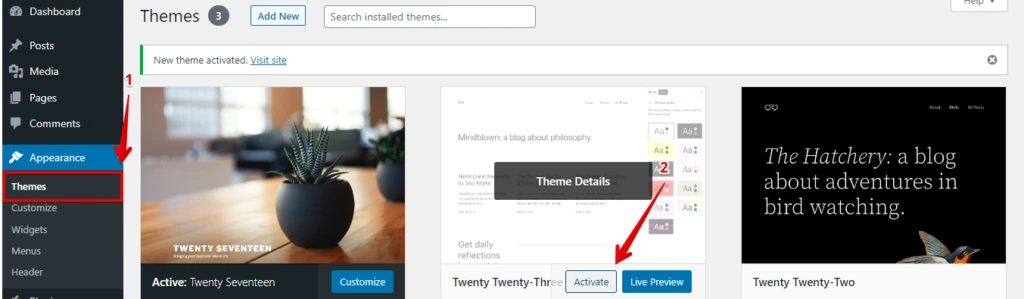
- Access your WordPress admin dashboard by logging in to your site.
- Go to "Appearance" from the sidebar menu and click on it.
- You will see a list, and there are options for "Themes" Click on it.
- Then click "Activate" Twenty Twenty-Three default WordPress themes.
Method 7: Edit your .htacess File
WordPress relies on two PHP modules, Imagick and GD Library, for image processing. If your server allocates enough resources to Imagick, you may encounter HTTP errors when uploading images to your WordPress site. This issue is more prevalent in shared hosting environments where resources are divided among multiple websites on the same server.
To resolve this problem, you can add a specific line of code to your .htaccess file, instructing Imagick to employ a single thread instead of multiple threads for image processing.
Here are the steps to implement this solution:
- Access your WordPress files through FTP or a file manager provided by your hosting provider.
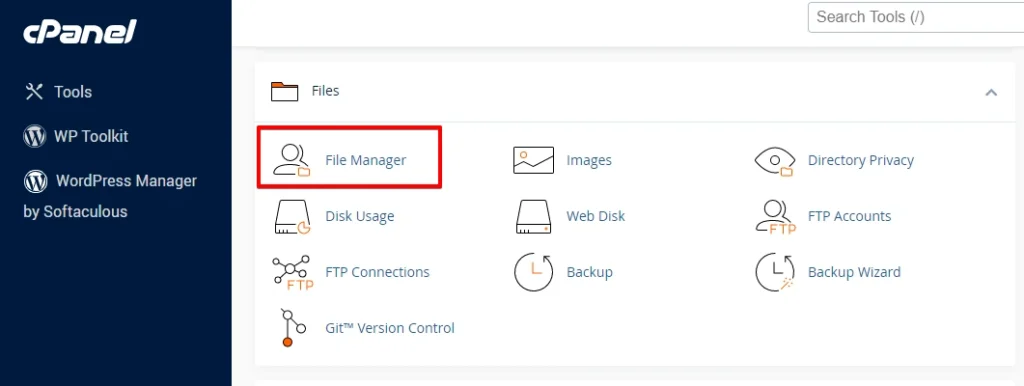
- Locate the root directory of your WordPress installation (usually named "public_html" or "www").

- Look for the .htaccess file and open the .htaccess file in the editor.
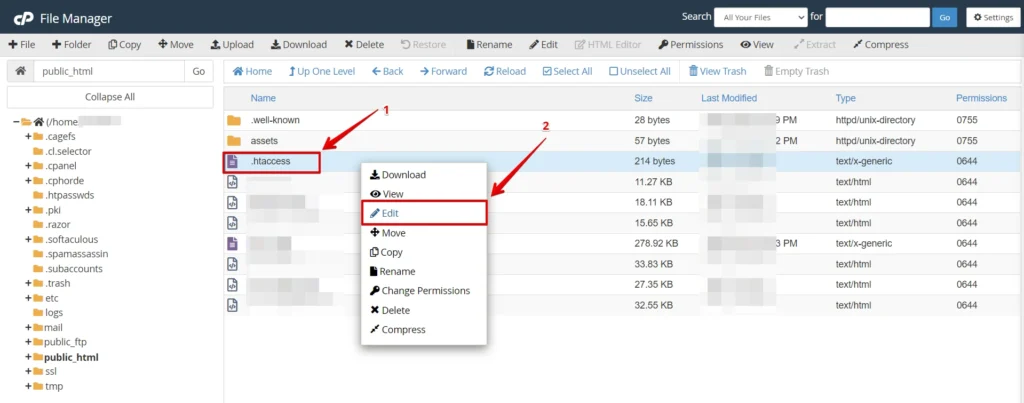
- Add the following line of code to it, and don’t forget to save the changes.
SetEnv MAGICK_THREAD_LIMIT 1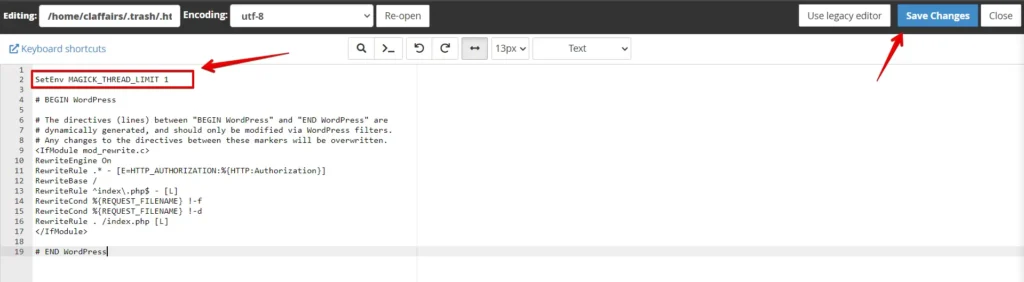
After saving your modifications, return to your admin dashboard and attempt to upload the media file.
Conclusion
Encountering HTTP errors when uploading images in WordPress can be frustrating, but you can usually identify and resolve the issue with the right troubleshooting steps.
By following the solutions mentioned above, you should be able to fix the HTTP error and continue managing your website seamlessly.
Remember to keep your WordPress core, themes, and plugins updated to minimize the chances of encountering such errors in the future.