The PHP fatal error "Allowed memory size of X bytes exhausted" means WordPress hit PHP’s per-process memory ceiling. Fix it by raising the limit: add define('WP_MEMORY_LIMIT', '256M'); to wp-config.php on shared hosting, or set memory_limit = 256M in php.ini on a VPS or dedicated server. The specific byte number in the error does not change the fix.
Which fix should you try first?
| Hosting type | Quickest fix | Where to add it |
|---|---|---|
| Shared hosting (cPanel) | define('WP_MEMORY_LIMIT', '256M'); |
wp-config.php |
| VPS / dedicated | memory_limit = 256M |
php.ini |
| Managed WordPress (Kinsta, WP Engine) | Contact host — no php.ini access |
Support ticket |
| Local (Local, DevKinsta) | Edit php.ini in the site’s config folder |
App settings |
If you get a high memory consumption and memory exhaust error while created a backup with WP STAGING, please read this article.
Contents
This WP Memory Limit error can prevent you from accessing your website and completing essential tasks. This article explains how to increase the WordPress memory limit and fix the memory-exhausted error, whatever byte value it reports.
What causes the "Allowed Memory Size of X Bytes Exhausted" error?
The WordPress memory limit error "Allowed memory size of 268435456 bytes exhausted" occurs when your WordPress site consumes more memory than PHP allows. PHP, the language that powers WordPress, gives each process a fixed memory budget. When your site exceeds it, PHP stops the process and throws the error.
Several factors drive high memory consumption:
- Large image files: Large, unoptimized images take up significant memory.
- Plugin or theme conflicts: Some plugins and themes conflict with each other or with WordPress, causing memory leaks and high usage.
- Caching issues: Improperly configured caching plugins can spike memory usage.
- Traffic spikes: A sudden surge in traffic can push memory usage past the limit.
The byte value just tells you the current limit
The number in the error is your current limit in bytes. It changes from site to site, but the fix is identical — you raise the limit. Common values:
| Bytes in the error | Current limit | Recommended new limit |
|---|---|---|
| 67108864 | 64 MB | 256M |
| 134217728 | 128 MB | 256M |
| 268435456 | 256 MB | 512M |
| 536870912 | 512 MB | 512M or higher (investigate the cause) |
How to fix the "Allowed Memory Size of X Bytes Exhausted" error
Work through these steps. For most sites, raising the limit in wp-config.php is enough.
Increase the PHP memory limit in wp-config.php
Increasing the PHP memory limit is the easiest fix. Add the following code to your wp-config.php file:
define('WP_MEMORY_LIMIT', '256M');This sets the memory limit to 256 megabytes. Adjust the number to your site’s needs, raising it until the memory-exhausted errors stop.
Make sure you add the WP_MEMORY_LIMIT constant before this line:
/* That's all, stop editing! Happy blogging. */
 /** Absolute path to the WordPress directory. */
 if ( !defined('ABSPATH') )
 define('ABSPATH', dirname(__FILE__) . '/');
 /** Sets up WordPress vars and included files. */
require_once(ABSPATH . 'wp-settings.php');Optimize your images
To reduce memory usage, optimize images for the web. Image optimization plugins like Smush or EWWW Image Optimizer compress images without visible quality loss.
Deactivate plugins and themes
If you suspect a plugin or theme is causing high memory usage, deactivate them one at a time to identify the culprit.
Upgrade your hosting plan
If your site sees frequent traffic spikes, your plan may not provide enough memory headroom. Upgrading gives PHP more room to work.
If none of this resolves the error, follow the steps below to set the limit at the server level.
How to check and raise the limit at the server level
First, check how much memory PHP currently assigns. Go to WP Staging > Tools > System Info:
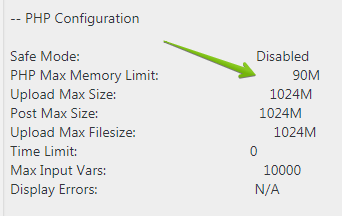
This should read at least 128M — ideally 256M or more.
A more precise alternative is to create an empty file and add this code:
<?php echo phpinfo();- Save the file as
info.phpand upload it to your website’s root via FTP or a file-manager plugin. - Open
https://yoursite.com/info.phpand find thememory_limitline.

This line shows the exact memory limit, in megabytes, your site uses. For medium WordPress sites it should read at least 128M, preferably 256M.
If the limit is lower, raise it by editing php.ini. Open php.ini, find the memory_limit line, and change the value to:
memory_limit = 256MAsk your hosting provider where to find php.ini if you are not sure of its location.
If you have no access to php.ini, try editing your .htaccess file and adding this code:
php_value memory_limit 256MReopen info.php or the WP Staging system info log and check whether the memory limit increased. Once phpinfo() shows the correct limit, reload your website — the "Allowed memory size exhausted" error should be gone. If you cannot raise the limit yourself, ask your hosting provider to do it.
Why is my site still hitting the limit after increasing it?
In WP STAGING support tickets, this is the most common follow-up. If the error persists after you raised the limit, one of these is usually why:
- You edited the wrong
php.ini. Servers can load more than onephp.ini. Confirm which file is active by checking the "Loaded Configuration File" line inphpinfo()output, and edit that one. - A plugin or theme resets the limit at runtime via
ini_set('memory_limit', …). Its value overrides yours after WordPress loads. Deactivate plugins to find the one lowering the limit. - You set the value in a location your host ignores. A site-level
.htaccesssetting fails silently on servers that only honor a server-levelphp.ini. When we tested this on a shared cPanel host, the.htaccessapproach took no effect and produced no error — usephpinfo()to confirm which method actually applied. wp-config.phpcan’t exceed the server’s hard cap.WP_MEMORY_LIMITraises WordPress’s limit only up to the ceiling PHP enforces. If the server caps PHP at 128M, a 256M value inwp-config.phpwon’t help — raise the server limit or ask your host.
Conclusion
The "Allowed memory size of X bytes exhausted" error is frustrating but common and fixable. Raise your PHP memory limit in wp-config.php, php.ini, or .htaccess depending on your hosting, optimize your images, deactivate conflicting plugins and themes, and confirm with phpinfo() that the new limit actually took effect.