When trying to access a website, you might occasionally encounter an error that blocks you from viewing the page. One such error is the “409 Conflict,” which appears when the server detects a mismatch between your request and the current state of the resource.
Though running into this error can be frustrating, it is often easy to resolve. As a user, you can start by correcting any typos in the URL, clearing your browser’s cache, or disabling problematic browser extensions. On the other hand, if you manage the website, the solution may lie in uninstalling plugins, reviewing software, or adjusting server settings.
This guide explains the 409 Conflict Error and why it happens. Then, we’ll take you through the steps to identify and resolve the issue on both the client and server sides.
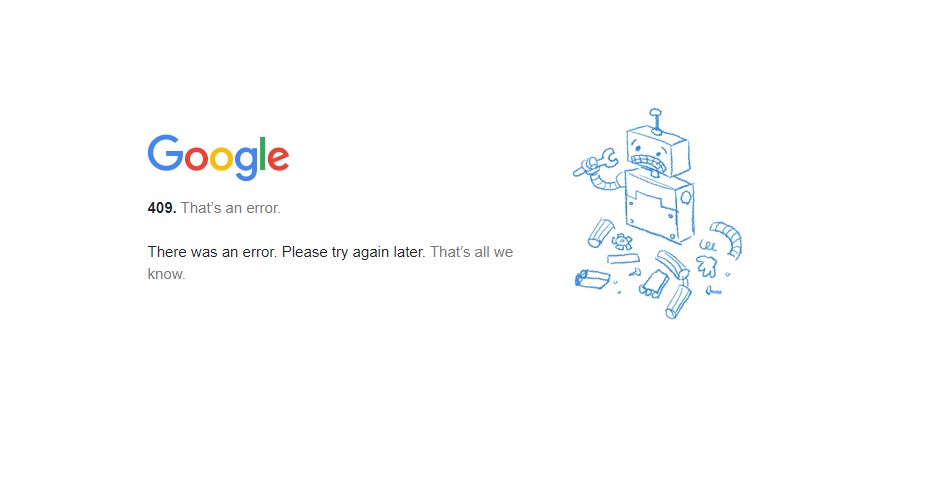
HTTP status codes are divided into five categories:
- 100s: Informational – ongoing requests.
- 200s: Success – requests completed successfully.
- 300s: Redirection – directing to another resource.
- 400s: Client errors – issues from the client’s side.
- 500s: Server errors – problems on the server.
A “409 Conflict” falls under the 400s, indicating the request conflicts with the current resource state. Although it may seem complex, the 409 error is often easy to fix, allowing you to retry the request once the conflict is resolved.
Contents
What Triggers a “409 Conflict” Error?
As the name implies, a “409 Conflict” error arises when a conflict occurs in the HTTP request. It often happens when the requested resource is unexpected or if processing the request would result in a conflict.
The 409 error is commonly associated with PUT requests to update or create resources. These requests modify the target resource but can fail when the sent data conflicts with the server’s current state.
For instance, if discrepancies or errors exist in the fields within the PUT request, such as mistyped data, the server may detect these conflicts and reject the request. Another typical example is trying to upload an older version of a file that conflicts with a newer version already present, leading to a version control issue that triggers the 409 error.
7 Easy Ways to Fix the 409 Conflict Error
- Check for URL Errors
- Clear Browser Cache
- Reset Your Permalinks
- Deactivate Conflicting Plugins
- Manual WordPress Downgrade using FTP
- Review Your Server Configuration
- Enable Debug Mode
Note: Before making any changes, it’s a good idea to back up your website. If something goes wrong, you can quickly restore it to its previous state. WP Staging provides an easy way to set up automatic backups. For more help, check out the backup and restore guide.
1. Check for URL Errors
First, double-check the URL for any simple mistakes. Sometimes, the error results from incorrect spelling, extra slashes, or misplaced characters. If the URL is correct but the content is still missing, it’s time to dig deeper.
2. Clear Browser Cache
Clearing your browser cache can effectively resolve the WordPress 409 conflict error. The cache stores temporary files to speed up loading, but outdated or corrupted data can cause errors. Here’s how clearing it helps:
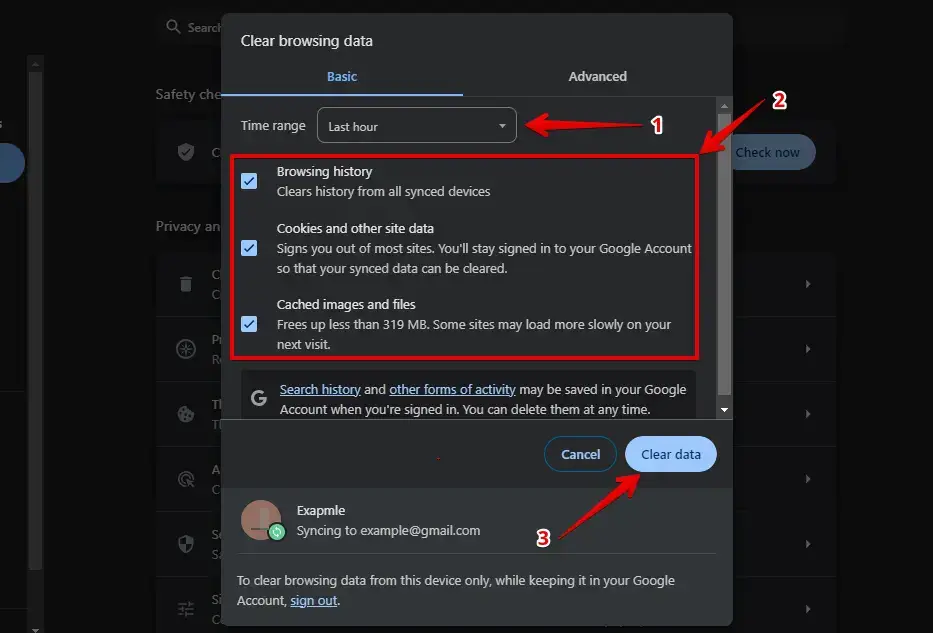
Google Chrome: Press Ctrl + Shift + Delete, select the desired time range, and click “Clear Data.”
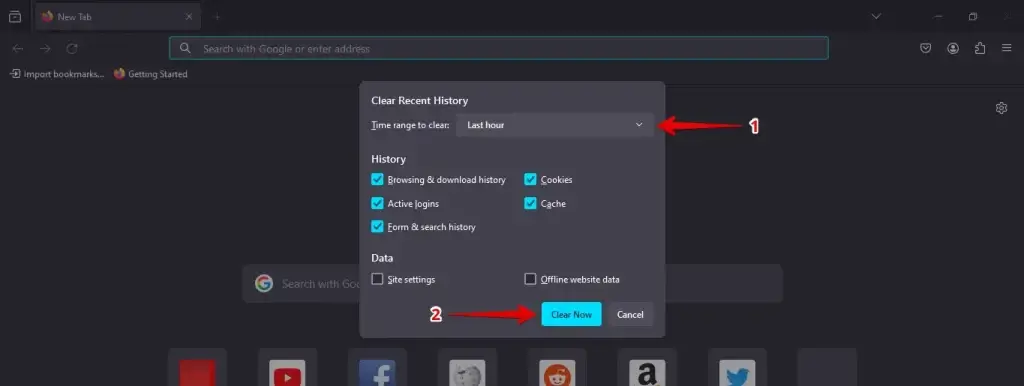
Mozilla Firefox: Press Ctrl + Shift + Delete, choose the appropriate time range, and click “Clear Now.”
After clearing your cache, reload your site to check if the 409 conflict error is fixed. If not, consider other solutions. Regularly clearing your cache helps ensure you’re viewing the latest version of your site.
3. Reset Your Permalinks
Resetting your permalinks is a quick resolution for the WordPress 409 conflict error. If your URLs aren’t set up correctly or get corrupted, they can cause this issue. Here’s how to do it:
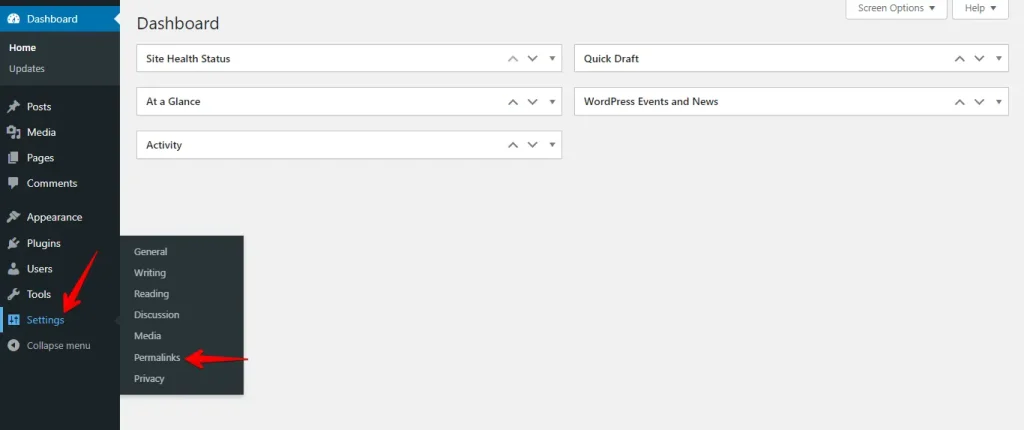
Log into your WordPress dashboard, go to Settings, and click Permalinks.
On the Permalinks page, scroll down and click Save Changes without adjusting settings.
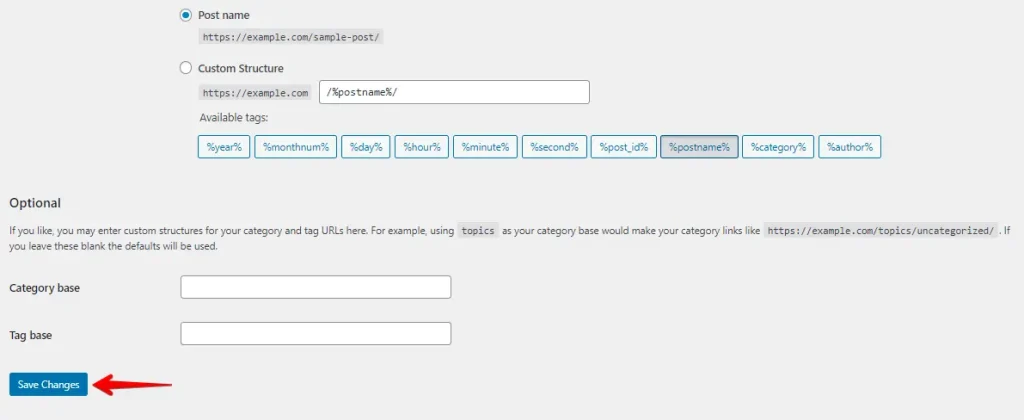
By clicking “Save Changes,” WordPress refreshes and regenerates your .htaccess file, which controls how URLs are handled on your site. This often resolves issues where the permalinks have become corrupted, leading to 404 errors.
4. Deactivate Conflicting Plugins
When encountering backup issues or conflicts with specific plugins on your WordPress website, it may be necessary to disable them temporarily.
By deactivating plugins, you can separate and troubleshoot the problem without affecting the overall functionality of your website.
Here’s how to do it:
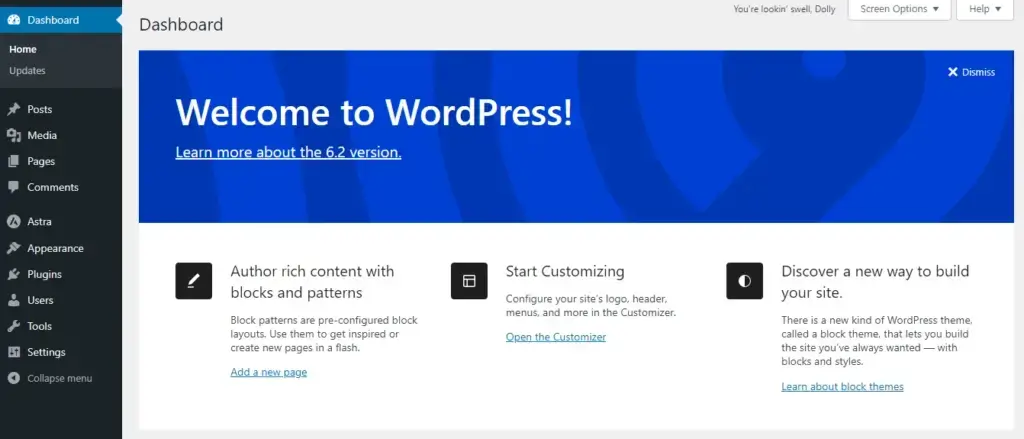
- Access your WordPress admin dashboard by logging in to your site.
- Go to “Plugins” from the sidebar menu and click on it.
- You will see a list of installed plugins.
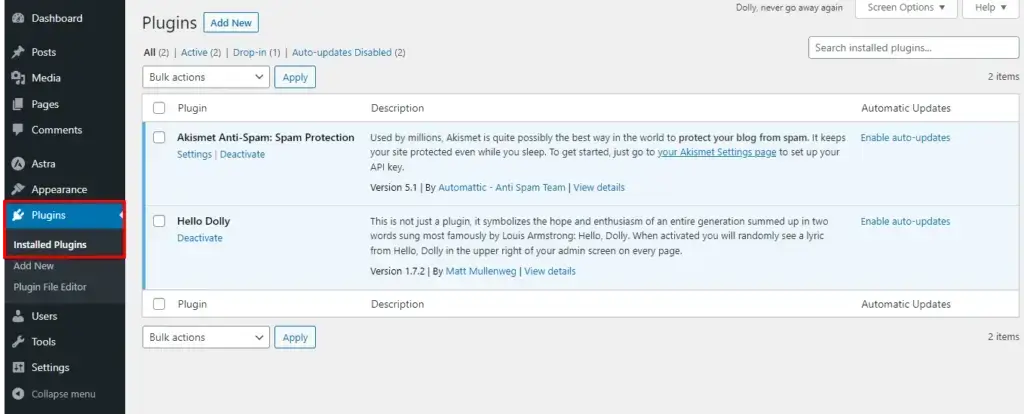
- Select the plugins you want to disable by clicking the checkboxes next to their names. You can choose multiple plugins at once.
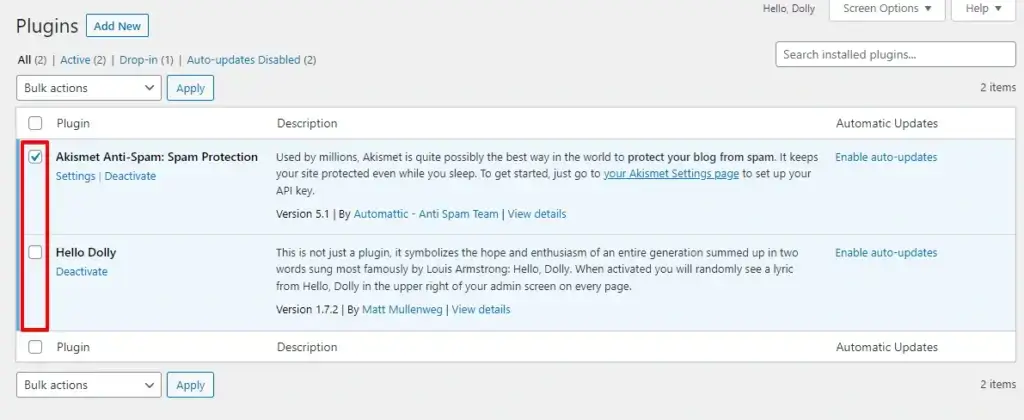
- Once you have selected the plugins, look for the “Bulk Actions” dropdown menu at the top of the list and select “Deactivate.”
- Click the “Apply” button next to the dropdown menu.
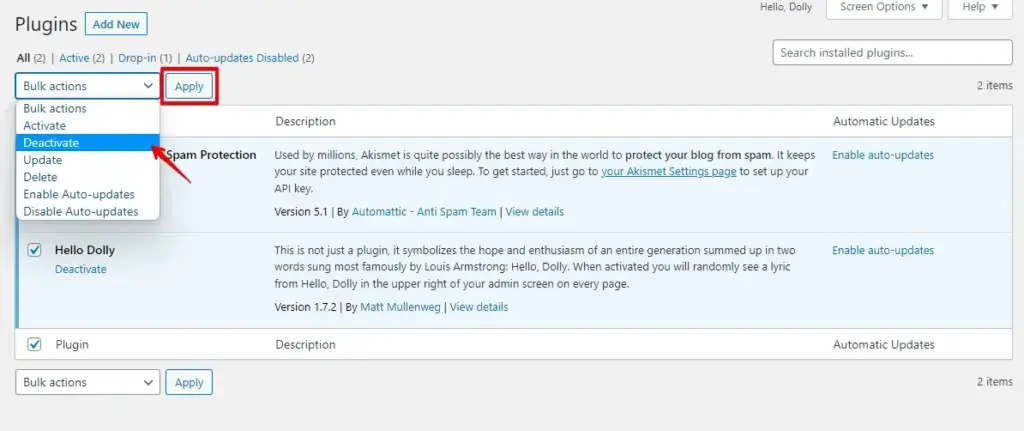
After deactivating plugins, refresh your website to see if updates instantly appear. Then, reactivate plugins one by one, refreshing your site each time to pinpoint the problematic one.
Repeat this process until you find the culprit, and consider updating, replacing, or contacting the plugin developer for help.
5. Manual WordPress Downgrade using FTP
The process of manually reverting a WordPress version closely resembles a fresh installation. The steps for utilizing FTP and cPanel share significant similarities, allowing us to consolidate the instructions into a single section for your convenience.
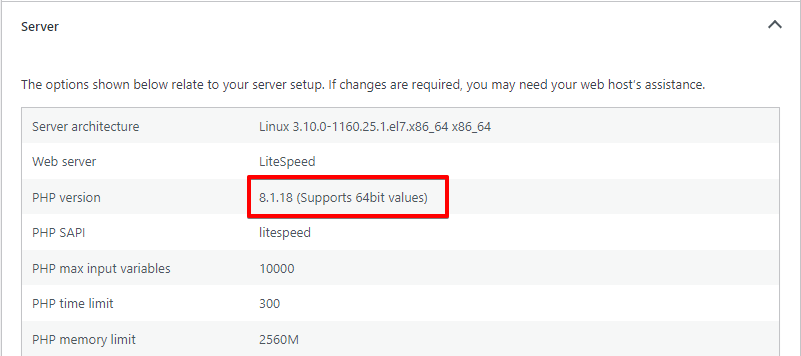
- Begin by downloading the specific version of WordPress that you intend to downgrade to from the official WordPress website. In this tutorial, we will install a server with PHP 8.2, making WordPress version 6.2 our target for the downgrade process.

- After downloading the file, proceed to extract its contents on your computer. Within the extracted files, you will find a folder labeled “WordPress.”

- Utilize an FTP client such as FileZilla to establish a connection with your website’s server. Upon successful connection, you will be presented with two panes: the left pane represents the file explorer for your local computer, while the right pane represents the file explorer for your site’s server.
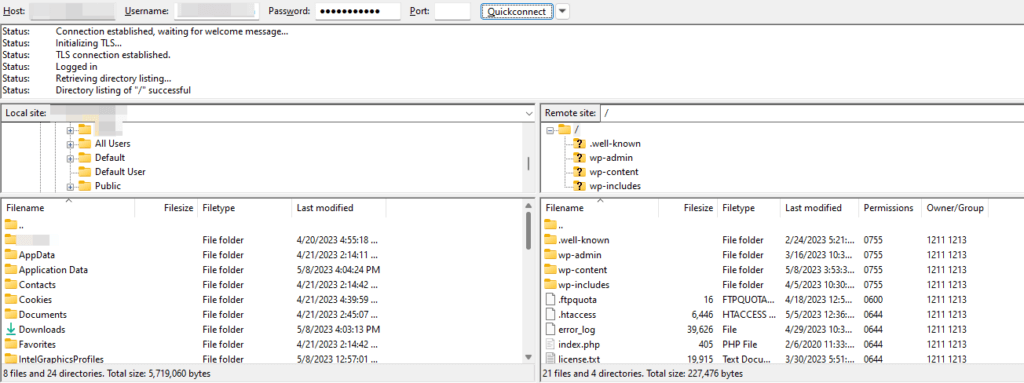
- Proceed to locate the directory containing the extracted WordPress installation within the FTP client. From the left pane representing your local files, select the “wordpress” directory and drag it to the right pane representing your site’s server. This action will initiate the copying process, which may take a few minutes to complete due to the relatively slower transfer speed of the FTP protocol. Exercise patience during this step.
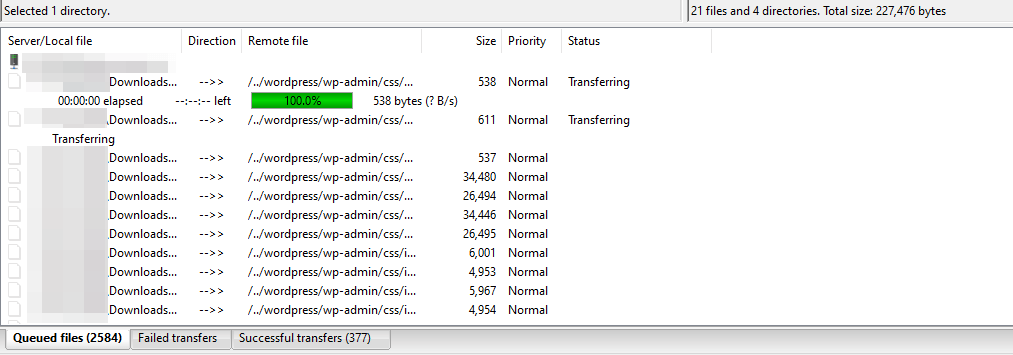
- After successfully transferring the directory, navigate to your server’s root directory, where WordPress is installed. Typically, this directory is named “public” or “public_html.” However, your specific setup may vary. For instance, the root directory in our example is “migratetester.dreamhosters.com.”
- In the root directory, locate and delete the “wp-admin” and “wp-includes” directories.
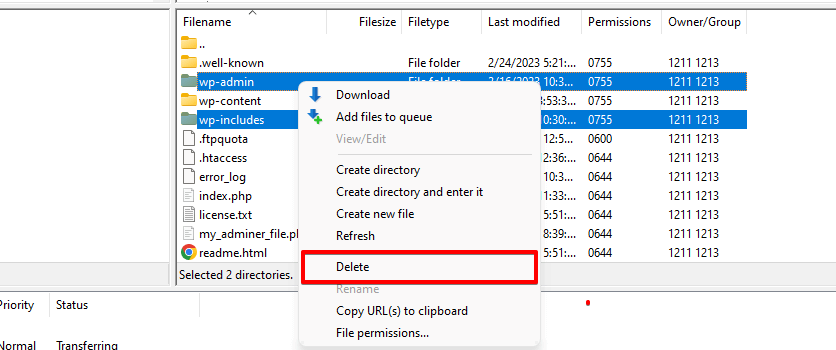
- Return to the “wordpress” folder and relocate the “wp-admin” and “wp-includes” directories to the root directory.
- Consolidate the remaining loose files within the “wordpress” directory and transfer them to the root directory. Do not modify or move the “wp-content” folder and the “wp-config” file, as they should remain unaffected.
- Proceed to access the
wp-includesdirectory and locate theversion.phpfile. Take note of the number indicated for the$wp_dbvariable. Subsequently, access your site’s database and locate thedb_versionvalue within thewp_optionstable. If these values differ, update the database value to match the one specified in theversion.phpfile. Save the changes and exit the database interface.
6. Review Your Server Configuration
The 409 conflict error occurs when the server blocks access to a resource (URI) due to restricted HTTP methods. To resolve this, review your server configuration for any misconfigured request handling rules or redirects that might be causing the issue.
Identify the correct configuration file based on your server type. For Apache-based servers, it’s usually the .htaccess file, while NGINX servers use the nginx.conf file for managing directives.
7. Enable Debug Mode
Enable WordPress debugging mode to get more detailed error messages. Open your site’s “wp-config.php” file and find the line that says define( 'WP_DEBUG', false );. Change false to true, save the file, and reload your site. This may reveal specific errors or warnings that can help you pinpoint the issue.
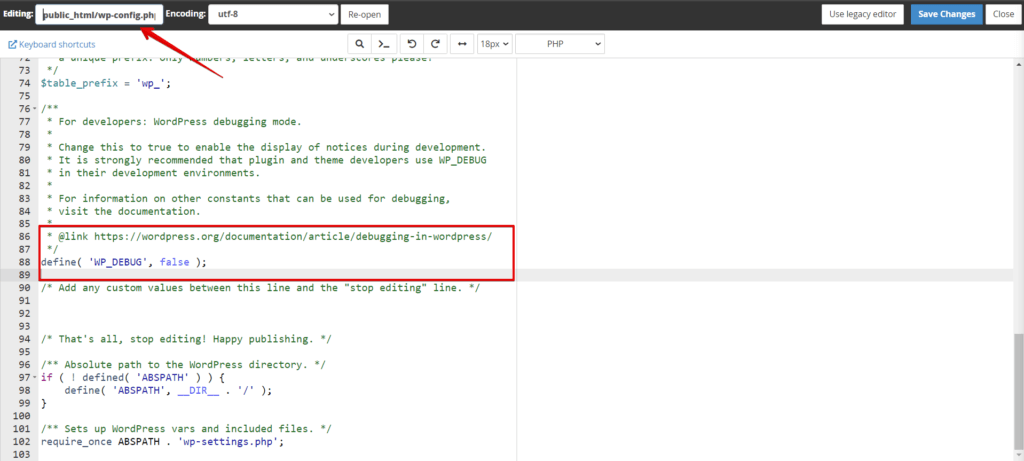
Read more about how to activate the WordPress Debug Mode and debug.log.
Conclusion
The 409 Conflict Error is a sign of a mismatch between a client request and the server’s current state of a resource. It often arises due to concurrency issues, resource duplication, or version control conflicts.
By understanding the root causes and implementing best practices such as version control, concurrency handling, and unique constraints, developers can effectively resolve and prevent 409 Conflict Errors.
Related Articles
- How to Fix 429 Too Many Requests Error in WordPress?
- How to Fix the HTTP Error During Image Upload on WordPress
- How to fix the “Sorry, You Are Not Allowed to Access This Page” Error in WordPress?
- How to Fix WordPress Login Page Refreshing & Redirecting Issues?
- Reduce HTTP Requests for a WordPress Site

