The 405 Method Not Allowed error occurs when a web server recognizes a client’s HTTP request method (like GET, POST, PUT, or DELETE) but does not permit that specific method for the requested resource. This typically arises during web development, API interaction, or when server configurations are improperly set.
While the error might seem daunting, resolving it is often straightforward. Let’s walk through the quickest ways to diagnose and fix this issue.
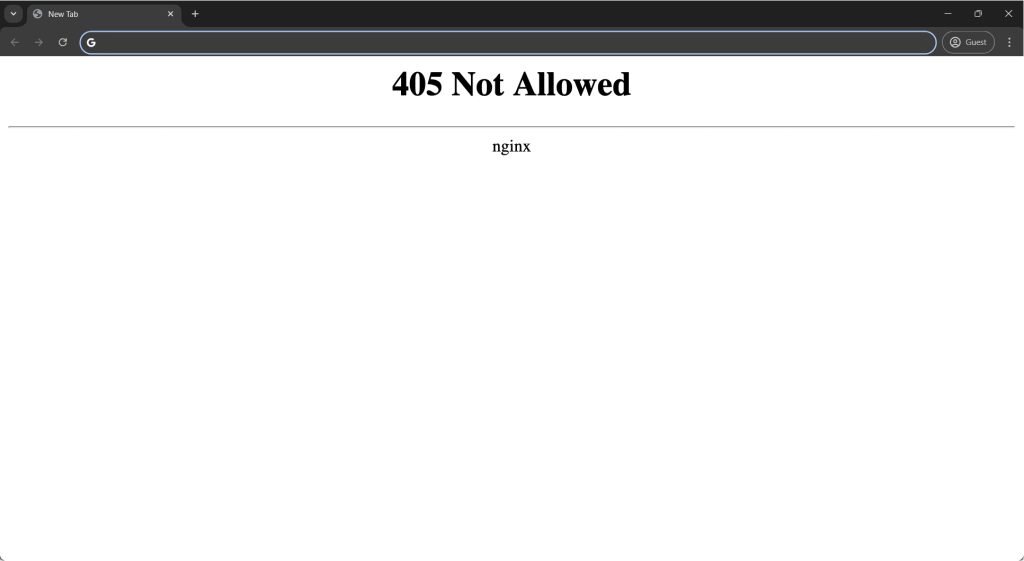
Common Causes of the 405 Error
- Wrong HTTP Method: The client sends an unsupported request type (e.g., using POST instead of GET).
- Misconfigured Server Settings: Issues in the server configuration may inadvertently block certain HTTP methods.
- Incorrect URL or API Endpoint: Mistyping the URL or endpoint can result in an error.
- Incompatible CMS Plugins or Themes: If you use platforms like WordPress, misconfigured or faulty plugins can trigger this error.
Fixing the 405 Method Not Allowed Error
Note: Before making any changes, it’s wise to back up your website. This ensures you can swiftly revert to the previous state if anything goes awry. WP Staging offers a simple solution for setting up automatic backups. For additional assistance, refer to the backup and restore guide.
1. Reload the Page
Reloading the page can sometimes resolve the 405 Error in WordPress, mainly if temporary server glitches or outdated cache data cause it.
By performing a simple reload or a hard refresh (using Ctrl + Shift + R on Windows or Command + Shift + R on macOS), you can ensure that your browser fetches the latest data from the server.
This method is quick, easy, and often effective, making it a significant first step in troubleshooting before moving on to more complex solutions.
2. Check for URL Errors
First, double-check the URL for any simple mistakes. Sometimes, the error results from incorrect spelling, extra slashes, or misplaced characters. If the URL is correct but the content is still missing, it’s time to dig deeper.
3. Revert Any Recent Changes
If you see the 405 error after updating your website, the changes are likely the cause. To fix it, revert any recent updates you applied to your site, such as plugins, themes, extensions, or modules.
The approach will vary depending on the platform. For instance, if you’re using WordPress, you can try rolling back to a previous version of the CMS with a plugin like WP Rollback.
Always ensure you test your site thoroughly after each update to prevent unexpected issues like the 405 HTTP status code from recurring.
4. Inspect Recent Database Modifications
A potential cause of the “405 Method Not Allowed” error is unexpected changes to your database.
Review the latest modifications to your database to check if this is the issue. You can trace the error to a plugin, theme, or other extension that altered the database by examining recent updates.
Remember that specific plugins or extensions may alter your database, so do not undo those changes even after deactivating or removing them.
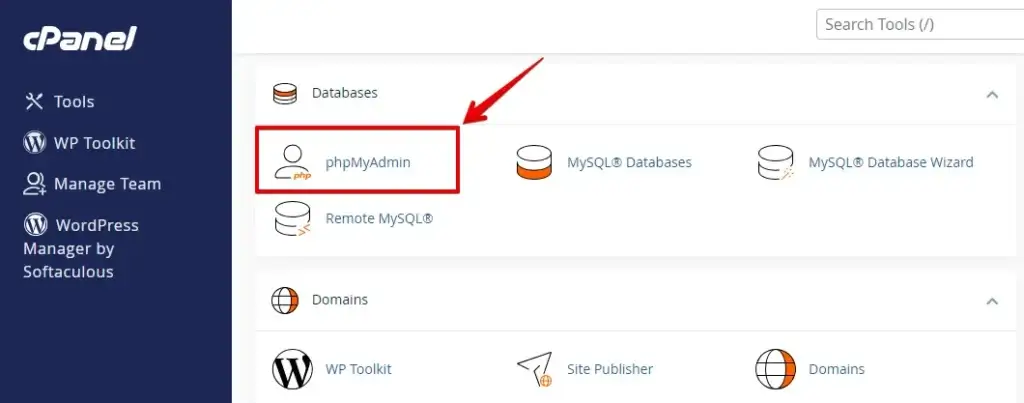
The steps for checking your database depend on your hosting provider. For example, cPanel users can access their database through phpMyAdmin to investigate recent changes.
PhpMyAdmin is a free tool included in your web hosting package that allows you to manage your MariaDB databases. It allows you to import, export, optimize, or delete tables.
- Log in to your web hosting cPanel and navigate to phpMyAdmin.
- In phpMyAdmin, locate and select the database associated with your WordPress site from the left-hand sidebar.
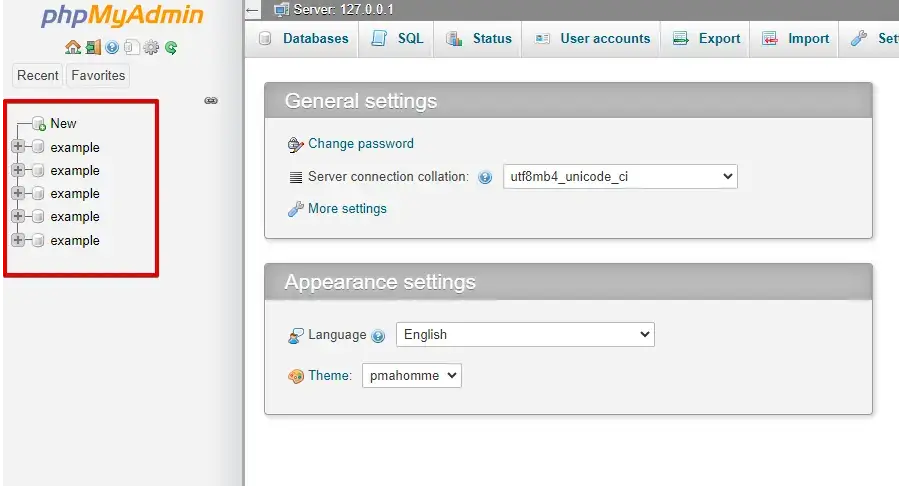
Look for leftover database tables from uninstalled plugins and remove them. Check the wp_posts, wp_options, wp_plugins, wp_users, and wp_usermeta tables for recent changes that might have triggered the 405 error. If you find any, revert those changes to resolve the issue.
5. Deactivate Plugins
Deactivating plugins is a helpful way to troubleshoot the 405 Method Not allowed Error in WordPress. This error might be caused by a plugin that isn’t working right or is clashing with other parts of your site.
- Log in to your site to access the WordPress admin dashboard.
- Go to “Plugins” in the sidebar, select the checkboxes next to the plugins you want to disable and choose multiple at once.
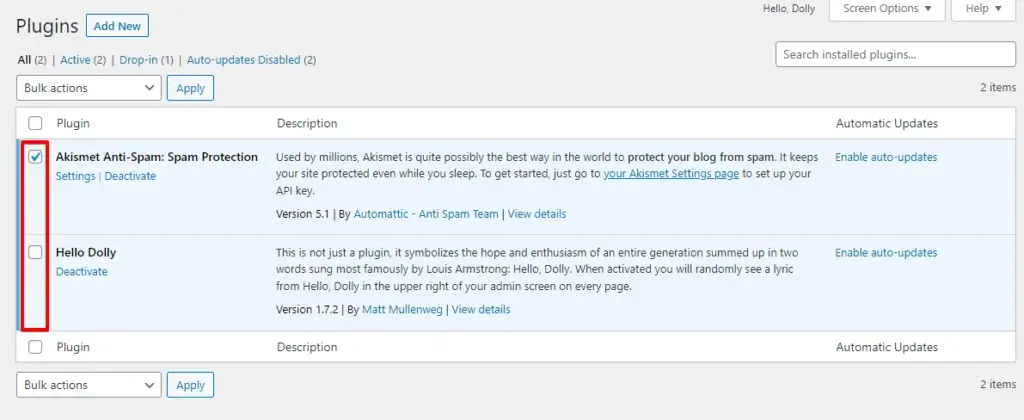
After selecting the plugins, go to the “Bulk Actions” dropdown at the top, choose “Deactivate,” and click the “Apply” button.
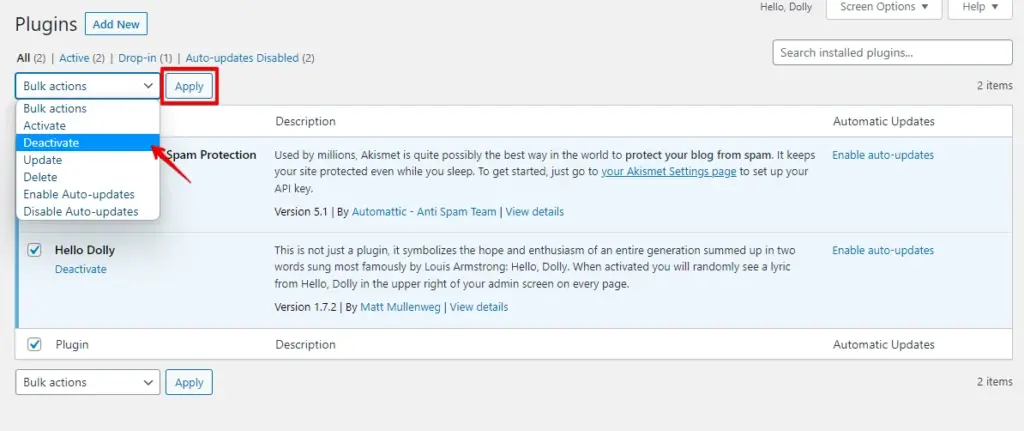
After deactivating all plugins, return to your site to check if the 405 error has been resolved. If the error is gone, reactivate each plugin one by one to determine which one is causing the issue. Keep going until you identify the plugin that triggers the 405 Method Not allowed error.
6. Switch to a Default Theme
Switching to a default WordPress theme can help troubleshoot the 405 Method Not allowed Not Implemented Error. This error could stem from conflicts or issues in your current theme that disrupt server communications or site functionality.
Log in to your WordPress dashboard, go to “Appearance” in the sidebar, click “Themes,” and activate the Default Theme.

After switching to a default theme, check your site to see if the 405 error is resolved. If the error disappears, your original theme will likely be the cause.
7. Review Your Server Configuration
The HTTP 405 error occurs when the server blocks access to a resource (URI) due to restricted HTTP methods. To resolve this, review your server configuration for any misconfigured request handling rules or redirects that might be causing the issue.
Identify the correct configuration file based on your server type. For Apache-based servers, it’s usually the .htaccess file, while NGINX servers use the nginx.conf file for managing directives.
8. Check and Reset the .htaccess File
The .htaccess WordPress files can sometimes become corrupted or misconfigured, leading to errors like the 405 Method Not allowed error. Here’s how to check and reset it:
Log in to your hosting account and open the File Manager.
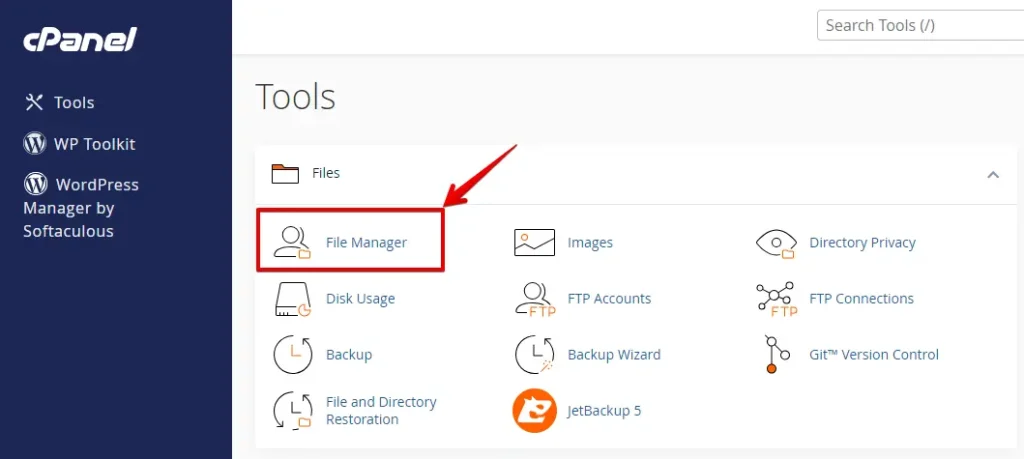
Find the root directory of your WordPress installation, often labeled as public_html or www, and open it.
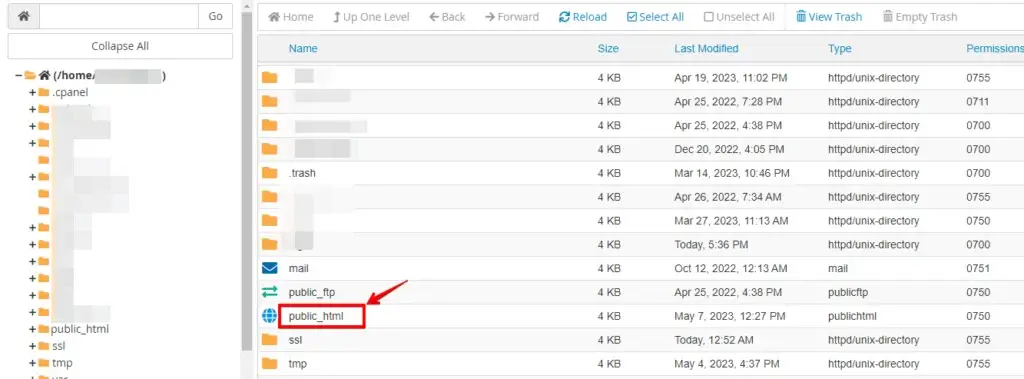
Locate the .htaccess file in the root directory.
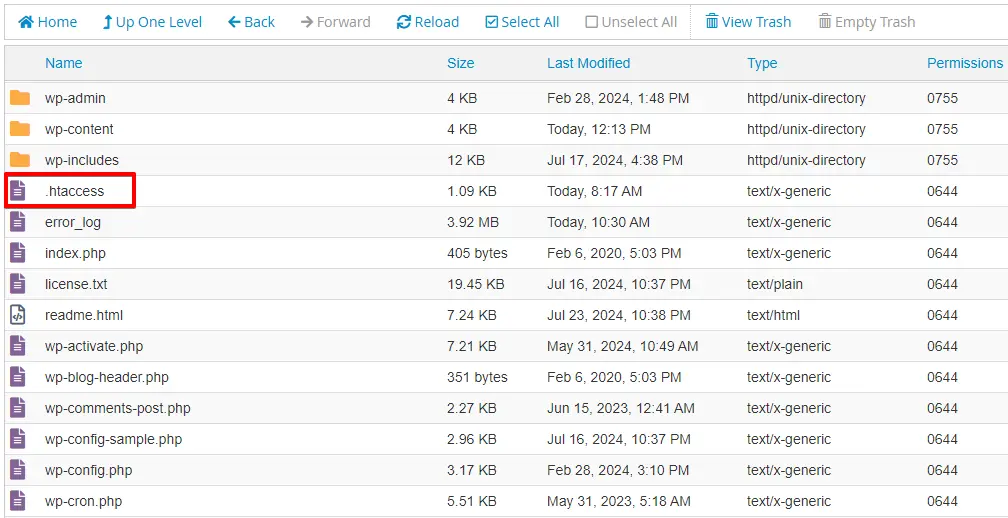
Right-click on the .htaccess file and select “Download” to create a backup on your computer.
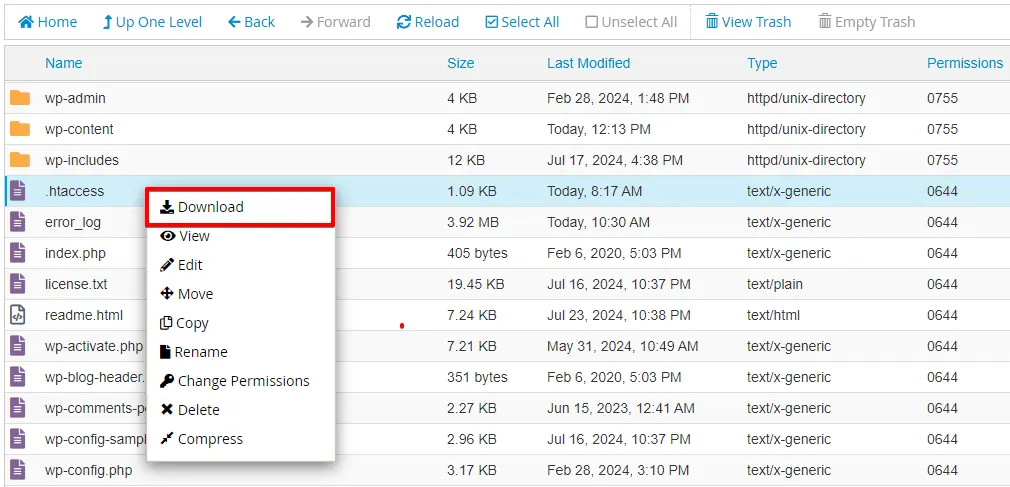
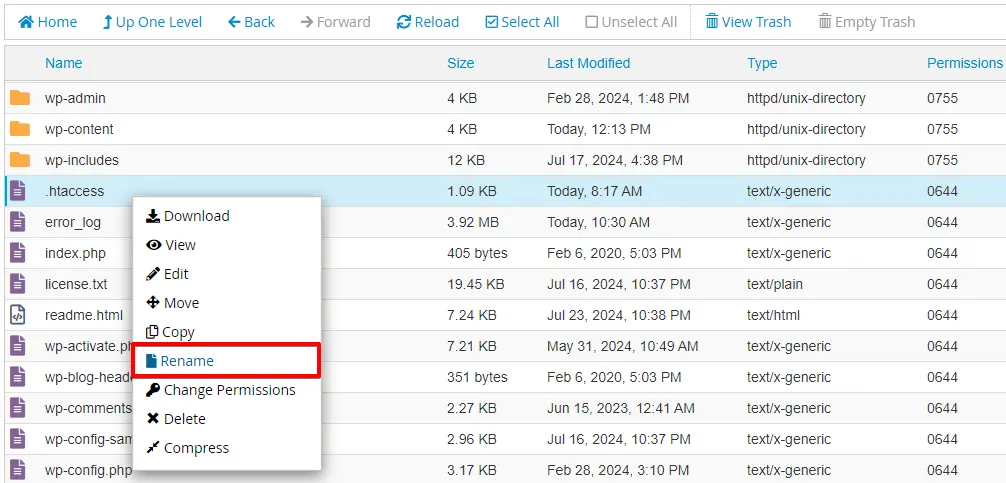
After downloading the backup, right-click the .htaccess file again, choose “Rename,” and rename the file. This will temporarily disable it.
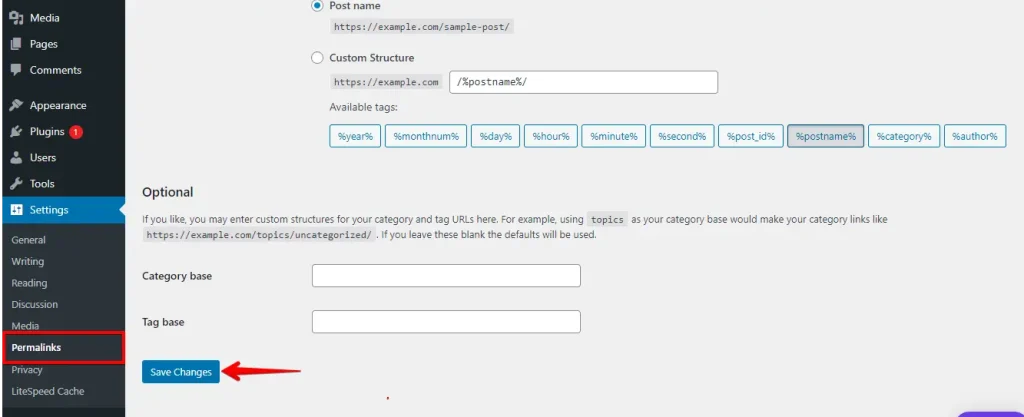
After renaming the file, regenerate a new .htaccess file by going to Settings > Permalinks in your WordPress dashboard and clicking “Save Changes.”
After creating the new .htaccess file, check your website to see if the 405 error is resolved. If not, revert to the old .htaccess file and investigate other potential causes.
9. Check Your Server Logs
Reviewing your server logs can help identify the source of the 405 HTTP error. Typically, there are two main types of logs: access and error.
Access logs record the server’s request and response, including HTTP status codes, URLs accessed, and client IP addresses. By scanning these logs, you can spot blocked requests with the message “failed to load resource: the server responded with a status of 405 (method not allowed).”
Error logs provide detailed entries of failed operations, such as server or application errors. By inspecting the error logs, you can trace the 405 error back to its cause and troubleshoot accordingly.
10. Enable Debug Mode
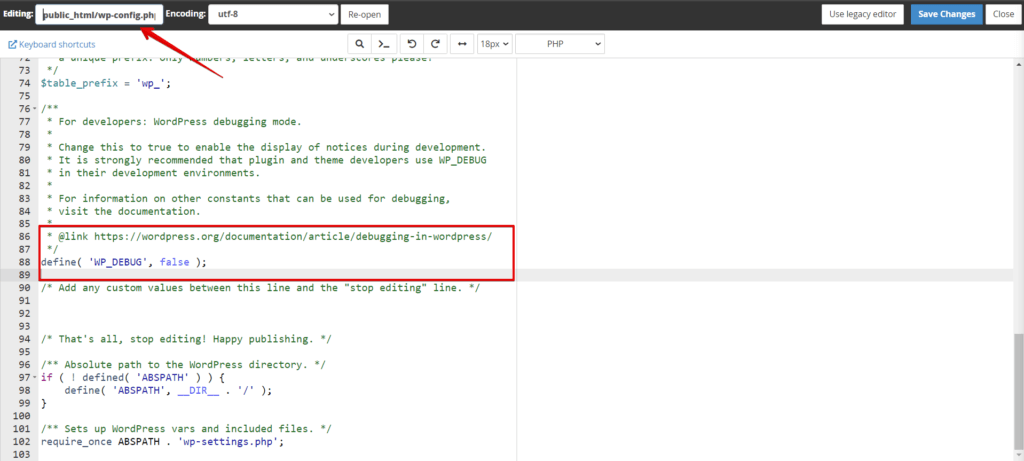
Enable WordPress debugging mode to get more detailed error messages. Open your site’s “wp-config.php” file and find the line that says define( 'WP_DEBUG', false );. Change false to true, save the file, and reload your site. This may reveal specific errors or warnings that can help you pinpoint the issue.
Read more about how to activate the WordPress Debug Mode and debug.log.
Conclusion
405 Method Not Allowed error is standard, even on optimized websites. Quick troubleshooting is key to maintaining smooth operation and user engagement. To fix the issue, you can start by checking the URL, rolling back recent updates, and disabling any new plugins or themes.
Additionally, inspecting database changes, reviewing server configurations, and examining server logs can help identify the root cause. With these steps, you’ll likely resolve the error and restore your site’s functionality.
Related Articles
- How to Fix 429 Too Many Requests Error in WordPress?
- How to Fix the HTTP Error During Image Upload on WordPress
- How to fix the “Sorry, You Are Not Allowed to Access This Page” Error in WordPress?
- How to Fix WordPress Login Page Refreshing & Redirecting Issues?
- Reduce HTTP Requests for a WordPress Site

