
Are you looking to change the wp-content folder name in WordPress? Renaming the wp-content folder can provide a layer of security to your website and make it harder for potential hackers to exploit any vulnerabilities.
This comprehensive guide will walk you through the step-by-step process of changing the wp-content folder name in WordPress.
By following our instructions, you can enhance the security of your website and outrank other articles on this topic.
Why do We Need to Change the ‘wp-content’ Folder Name?
The content folder in WordPress contains all the themes, plugins, and uploaded media files for your website. By default, the name of this folder is "wp-content," which is widely known among hackers and malicious bots.
Changing the folder name can serve as a security measure to protect your website from unauthorized access attempts and potential vulnerabilities.
Contents
- Why do We Need to Change the ‘wp-content’ Folder Name?
- Step-by-Step Guide to Changing the wp-content Folder Name
- Step 1: Backup Your Website
- Step 2: Update the WordPress Configuration File wp-config.php
- Step 3: Move the wp-content Folder
- Step 4: Update the wp-content Path in the wp-config.php File
- Method 1: Update the wp-content path in wp-config.php
- Method 2: Update the wp-content path in functions.php
- Step 5: Update Your Theme and Plugin Files
- Conclusion
- Related Articles
Step-by-Step Guide to Changing the wp-content Folder Name
Step 1: Backup Your Website
Creating a backup is crucial before making any changes to your website. WP Staging is a highly recommended plugin for creating backups in WordPress.
With WP Staging, you can easily and safely create a copy of your website in a staging environment. This allows you to make and test changes without affecting your live site.
It offers a user-friendly interface and advanced features for seamless backup management. Ensure the safety of your website with WP Staging. TRY FOR FREE
Step 2: Update the WordPress Configuration File wp-config.php
To change the wp-content folder name, modify your WordPress configuration file (wp-config.php). Access your website’s files through an FTP client or the file manager provided by your hosting provider. Locate the wp-config.php file in the root directory of your WordPress installation and open it in a text editor.
Locate the 'wp-config.php'in the root folder of your WordPress installation. Insert the following code snippet above the line that says ‘require_once(ABSPATH . ‘wp-settings.php’);’. Remember to replace ‘Folder_Name‘ with the actual name of the folder you want to use.
define('WP_CONTENT_FOLDERNAME', 'Folder_Name');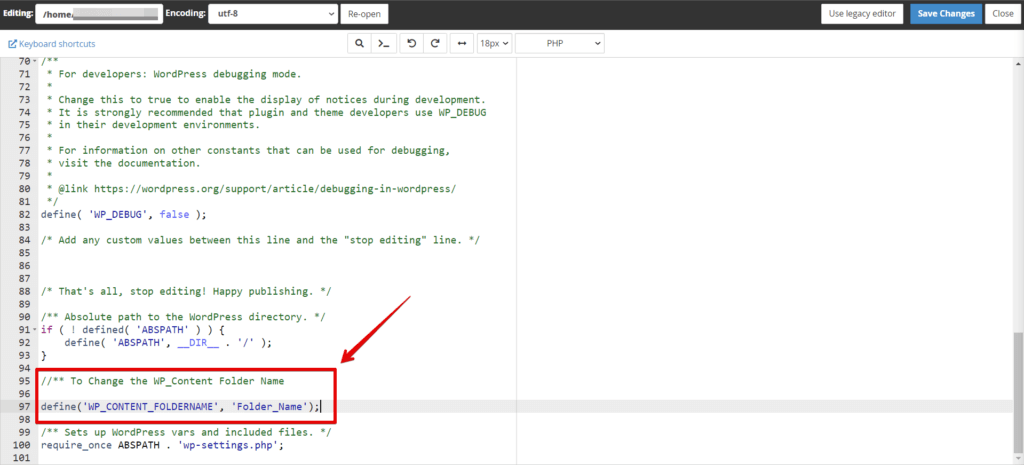
Change the 'wp-content' to your desired folder name. For example, you can use 'assets' or 'media' instead. Save the changes and close the file.
Step 3: Move the wp-content Folder
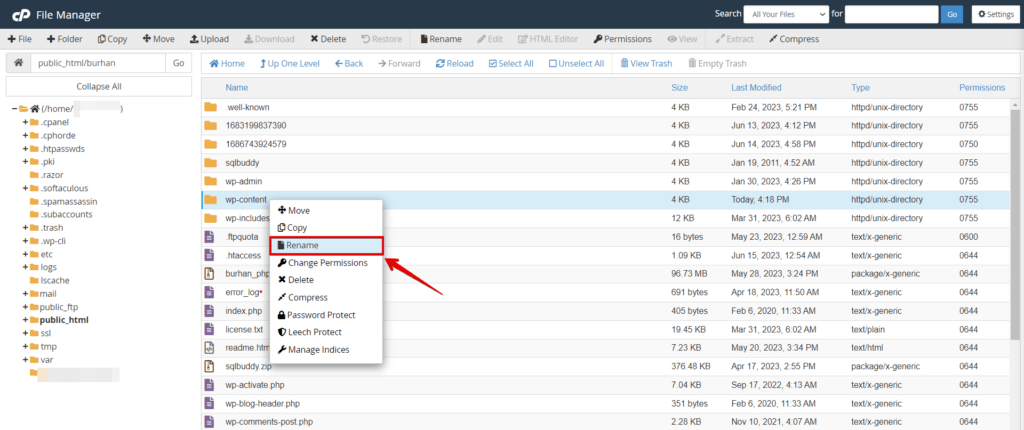
Next, you must move the wp-content folder to match the new name you specified in the configuration file. Use your FTP client or file manager to navigate to the root directory of your WordPress installation.
Locate the wp-content folder, right-click on it, and choose the "Rename" option. Enter your new folder name and confirm the changes.
Step 4: Update the wp-content Path in the wp-config.php File
Changing the wp-content folder name also requires updating the path of the wp-content folder. Use your FTP client or file manager to navigate to the root directory of your WordPress installation. Locate the wp-config.php file in the root directory of your WordPress installation and open it in a text editor.
Method 1: Update the wp-content path in wp-config.php
To update the wp-content path, you can edit the wp-config.php file in your WordPress installation. Here’s how:
Locate the "wp-config.php" in the root folder of your WordPress installation. Open the file in a text editor. Look for the following line of code ""require_once(ABSPATH . ‘wp-settings.php’);"
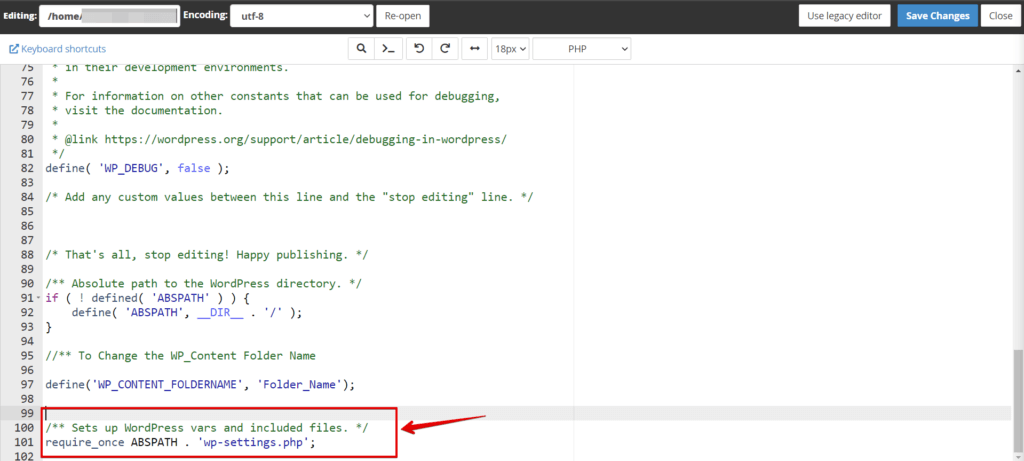
Add the following code snippet above the mentioned line:
// Define the new directory path and URL
define('WP_CONTENT_FOLDERNAME', 'your_folder_name');
define('WP_CONTENT_DIR', ABSPATH . WP_CONTENT_FOLDERNAME);
define('WP_CONTENT_URL', 'http://example.com/' . WP_CONTENT_FOLDERNAME);
Replace 'your_folder_name' with the actual name of the folder you have chosen. Save the changes to the "wp-config.php" file.
Adding this code snippet defines the new directory path and URL for the WordPress wp-content folder. Make sure to replace ‘your_folder_name’ with the name of the folder you want to use.
Remember to save the changes and proceed with the necessary steps to ensure the functionality of your WordPress website.
Method 2: Update the wp-content path in functions.php
To update the wp-content path, use a custom function in the theme’s "functions.php" file. Here’s how:
Locate your WordPress theme’s functions.php file.
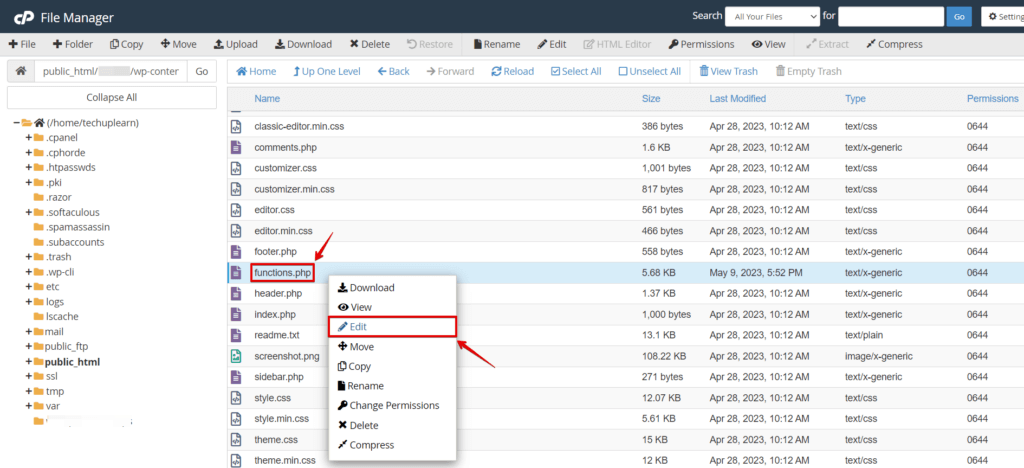
Insert the following code snippet at the end of the file:
// Define the new directory path and URL
function custom_define_wp_content_path() {
    define('WP_CONTENT_FOLDERNAME', 'your_folder_name');
    define('WP_CONTENT_DIR', ABSPATH . WP_CONTENT_FOLDERNAME);
    define('WP_CONTENT_URL', 'http://example.com/' . WP_CONTENT_FOLDERNAME);
}
add_action('after_setup_theme', 'custom_define_wp_content_path');
Replace ‘your_folder_name’ with the name of the folder you chose. Save the changes to the functions.php file.

Step 5: Update Your Theme and Plugin Files
After changing the WordPress content folder name, you must update your theme and plugin files to ensure they can locate the new folder. Access your theme and plugin files through an FTP client or the file manager. Look for any references to the old folder name and replace them with the new name.
Conclusion
Updating the wp-content path in WordPress is crucial when you want to change the folder name and ensure that your website functions properly. Follow the methods outlined above, such as editing the wp-config.php file and defining the new name of the wp-content folder. Remember to make the necessary adjustments and save the changes in the appropriate files.
Taking these steps will help maintain the integrity of your website’s content and ensure its smooth operation.