Scheduled posts are a valuable feature in WordPress, allowing you to plan and publish content at a specified time. However, sometimes this functionality can fail, resulting in the “Missed Schedule” error.
This error occurs when WordPress fails to publish a post at the scheduled time, usually due to problems with the WordPress cron system, which handles expected tasks. If these tasks don’t run as planned, your post won’t get published.
This can be frustrating, primarily if you rely on scheduled posts for timely content delivery. In this blog, we’ll explore common causes of this error and provide step-by-step solutions to fix it.
Contents
Common Causes
- WP-Cron Issues: WordPress relies on WP-Cron to schedule posts. If WP-Cron malfunctions, it may not publish posts as planned.
- Plugin Conflicts: Some plugins can mess with the scheduling system, causing posts to miss their scheduled publish times.
- Hosting Issues: Certain hosting environments may restrict how WordPress can execute scheduled tasks.
- Incorrect Server Time: If your server’s clock isn’t set correctly, it can lead to timing issues for scheduled posts.
- Poor Resource Allocation: Limited server resources or a high load on your hosting server can prevent WP-Cron from executing tasks on time.
5 Methods to Resolve the Missed Schedule Post Error
- Check Your WordPress Timezone Settings
- Clear Your WordPress Cache
- Increase WordPress Memory Limit
- Use a Missed Schedule WordPress Plugin
- Disable wp-cron and Set Up a New Cron Job
1. Check Your WordPress Timezone Settings
Sometimes, the missed schedule error occurs if your WordPress site’s timezone is set incorrectly, causing posts to publish at the wrong time. Here’s how to adjust your WordPress timezone settings:
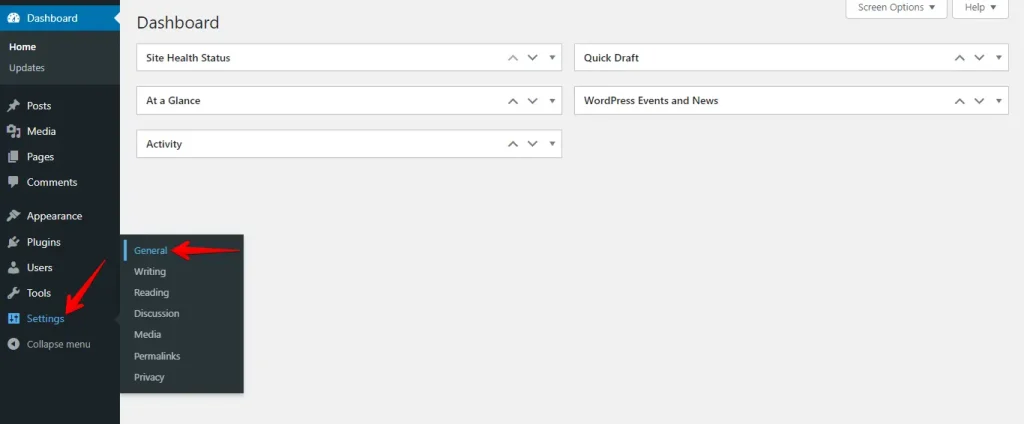
- Log into your Dashboard, navigate to Settings > General, and click on it.
- Find the Timezone option, select your correct timezone from the dropdown menu, and click Save Changes at the bottom of the page.
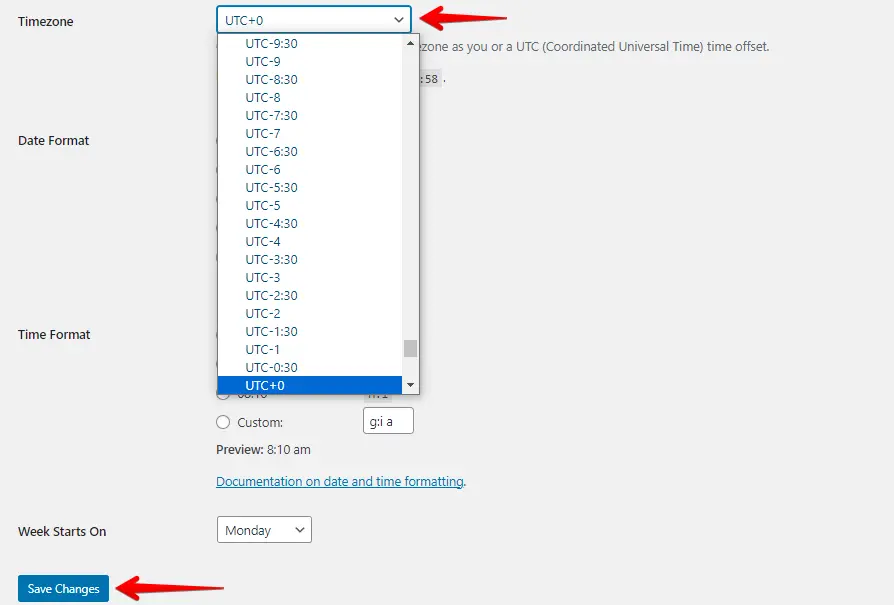
After saving, verify that the displayed date and time in General Settings are correct for your timezone.
This helps prevent the Missed Schedule error and ensures your posts are published on time.
2. Clear Your WordPress Cache
If you use WordPress caching plugins to store static site versions for better performance, cached versions can interfere with scheduled tasks like publishing posts. Here’s how to clear your WordPress cache to resolve the Missed Schedule error:
- Log into your WordPress Dashboard, navigate to your caching plugin (e.g., WP Super Cache, W3 Total Cache) and click on it.
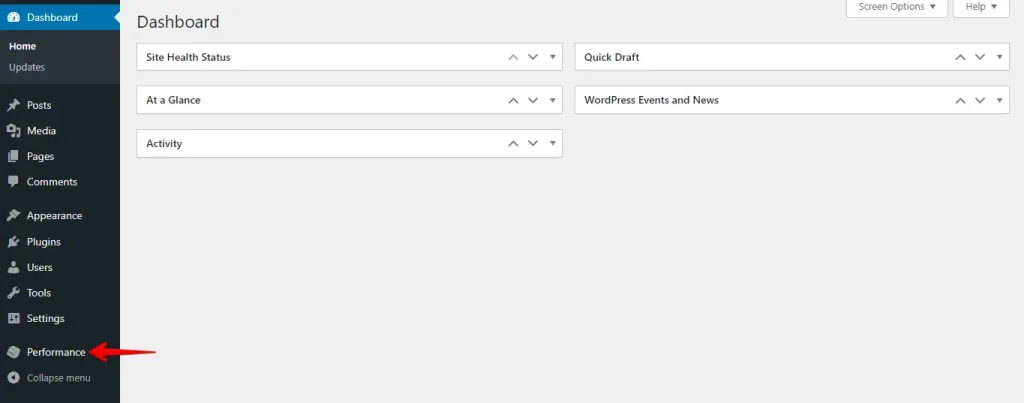
- Look for an option to clear or purge the cache, typically found in the plugin settings or dashboard, and click on it.
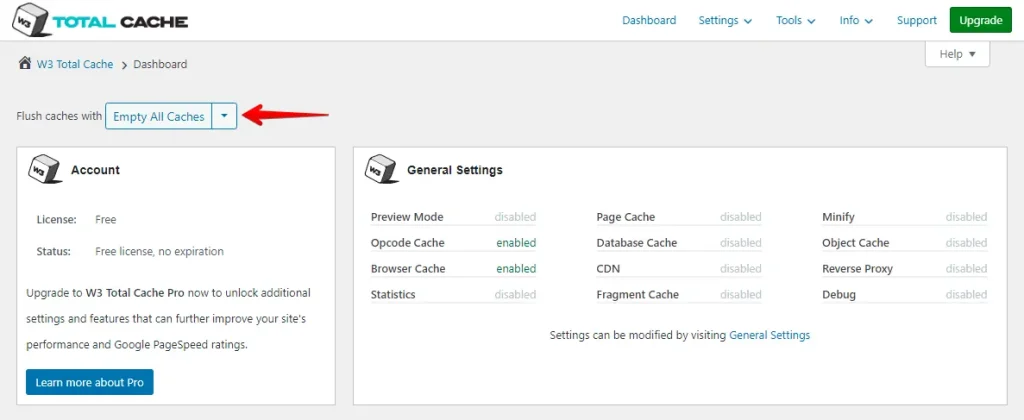
After clearing the cache, visit your site to ensure it was purged. Try scheduling a post again to see if the Missed Schedule error occurs.
Clearing your WordPress cache ensures your site serves the latest content and helps prevent issues with scheduled posts.
3. Increase WordPress Memory Limit
Increasing the WordPress memory limit can help resolve the “Missed Schedule Post” error by ensuring your website has enough memory to execute scheduled tasks efficiently. Here’s how to increase the WordPress memory limit:
- Use an FTP client like FileZilla or your web host’s file manager to access your WordPress root directory.
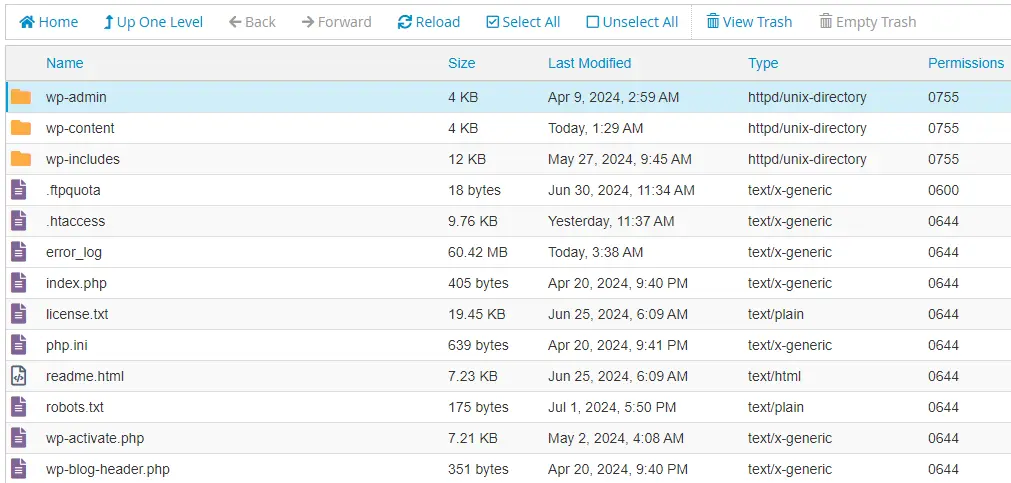
- Locate the
wp-config.phpfile, right-click, and choose the ‘Edit’ option.
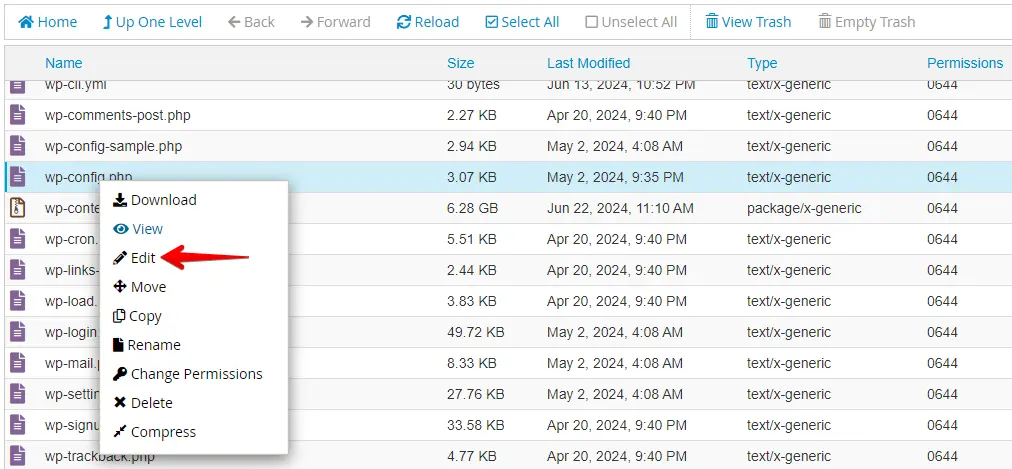
Add the following line of code before the line that says
/* That's all, stop editing! Happy blogging. */,
Then click the ‘Save Changes’ button.
define('WP_MEMORY_LIMIT', '256M');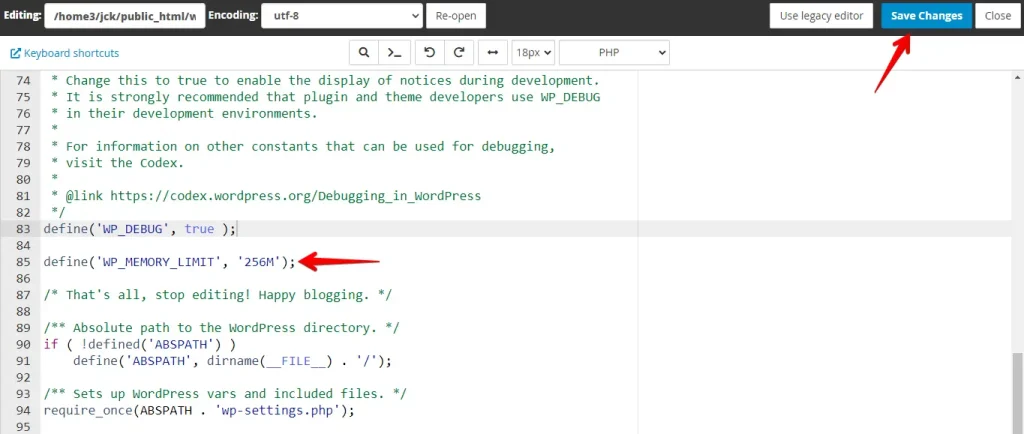
Increasing the WordPress memory limit is easy and can help fix the “Missed Schedule Post” error by giving your site enough memory to run scheduled tasks smoothly.
4. Use a Missed Schedule WordPress Plugin
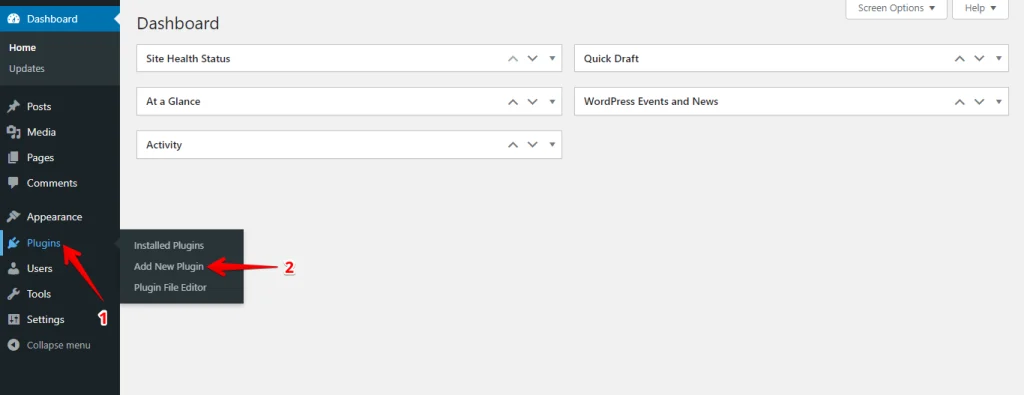
- Log in to your WordPress admin dashboard and navigate to Plugins > Add New.
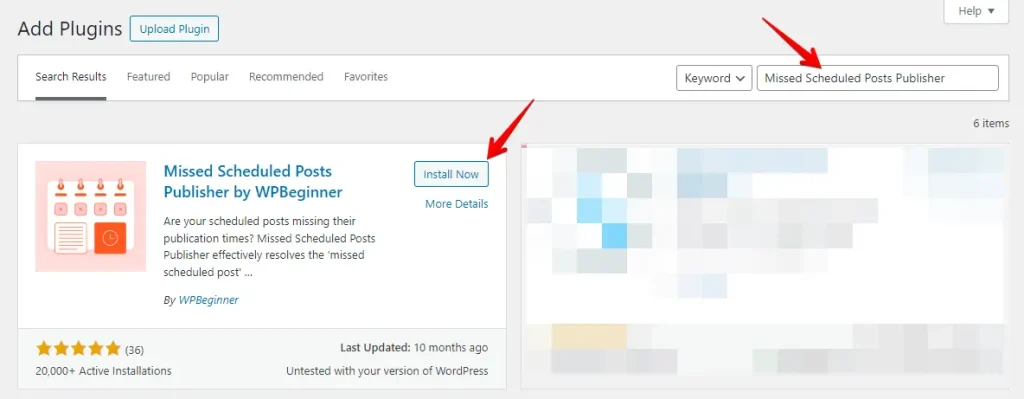
- In the search bar, type “Missed Schedule” and look for a plugin like Missed Scheduled Posts Publisher or Scheduled Post Trigger.
- After installation, click Activate.
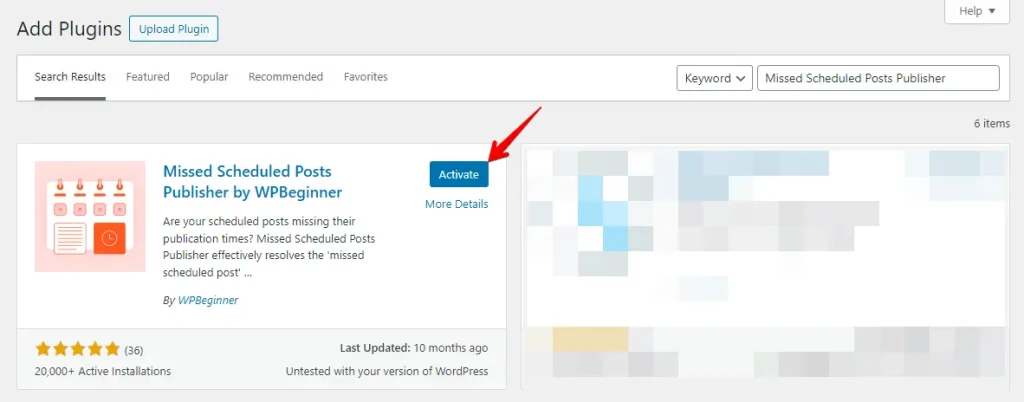
Once activated, most Missed Schedule plugins work automatically without any additional configuration. They will regularly check for any missed scheduled posts and publish them.
5. Disable wp-cron and Set Up a New Cron Job
Disabling wp-cron and setting up a server-side cron job can help resolve the “Missed Schedule Post” error by ensuring that scheduled tasks are executed more reliably. Here’s how to do it:
- Use an FTP client like FileZilla or your web host’s file manager to access the root directory of your WordPress site.

- Find the
wp-config.phpfile, right-click on it, and select the ‘Edit’ option.

- Add this line of code before
/* That's all, stop editing! Happy blogging. */and save thewp-config.phpfile.
define('DISABLE_WP_CRON', true);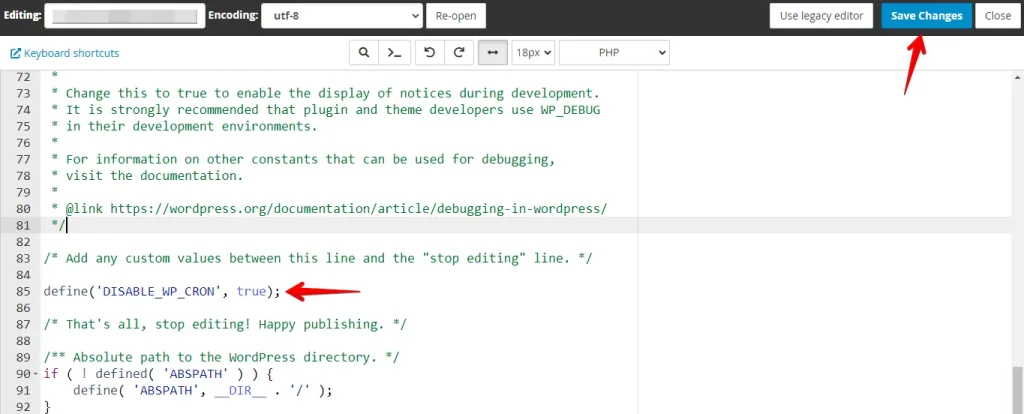
- Log in to your web hosting control panel (cPanel, Plesk, etc.) and find the Cron Jobs section, typically under the Advanced or System category.

Set the time interval for the cron job, with a good starting point being every 15 minutes. In cPanel, you might use the following settings: Minute: */15, Hour: *, Day: *, Month: *, Weekday: *.
In the command field, add the following command, replace http://yourwebsite.com it with your actual website URL, and click Add New Cron Job to save your settings.
wget -q -O - http://yourwebsite.com/wp-cron.php?doing_wp_cron > /dev/null 2>&1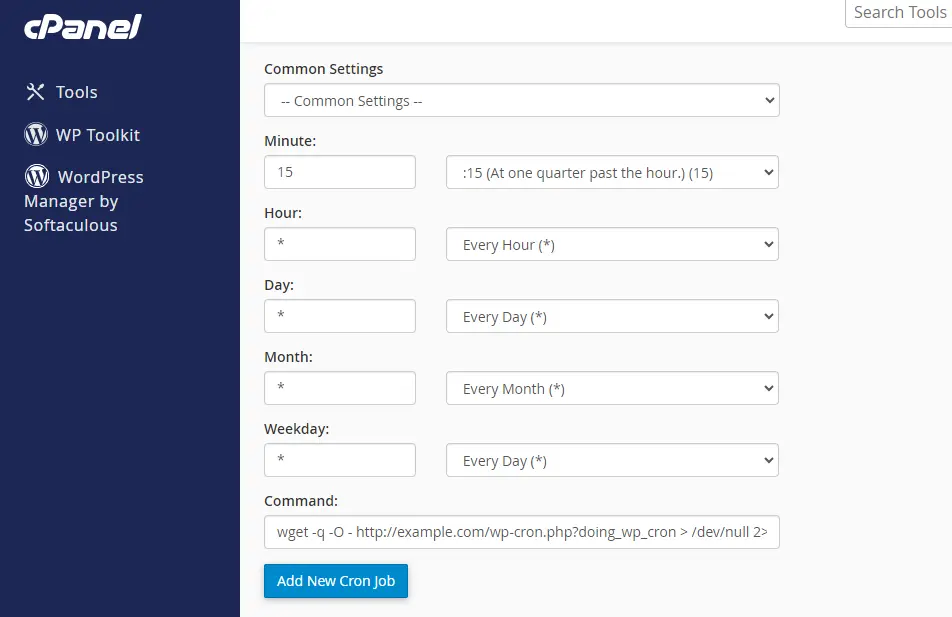
Disabling off wp-cron and setting up a server-side cron job can make scheduled tasks in WordPress much more reliable. This helps fix the “Missed Schedule Post” error and ensures your content is published on time.
For more references, please find a detailed guide on how to add and modify WordPress cron jobs.
Conclusion
By taking these proactive steps, you can maintain a seamless publishing schedule, enhance your website’s reliability, and continue to engage your audience with timely, valuable content. Remember, troubleshooting is a part of managing a website, and with the right tools and knowledge, you can keep your WordPress site running smoothly.
Keep experimenting with different solutions to see what works best for your specific setup and hosting environment.

