WordPress is a popular content management system used by millions of websites worldwide. While it’s essential to keep your WordPress site up-to-date with the latest version, there may be situations where you need to revert to a previous version.
In this article, we’ll explore the steps in reverting to a previous version of WordPress and highlight some critical considerations before proceeding with the downgrade process.
Contents
Valid Reasons to Roll Back WordPress to an Earlier Version
- Compatibility issues with plugins or themes
- The need to restore a previous backup
- Server compatibility issues
- Incompatibility with particular features or functionalities
- A preference for an earlier version’s layout or design
- Outdated versions of PHP or MySQL
- Your web host’s PHP setup may not be compatible with the latest WordPress version.
Remember, downgrading should only be a temporary fix. Once you’ve resolved the underlying issue causing the WordPress version rollback, promptly update your site. Keeping your website up-to-date ensures optimal performance, security, and access to the latest enhancements. Neglecting to update may expose your site to vulnerabilities and compatibility problems. So, while downgrading offers temporary relief, prioritizing timely updates is crucial.
Essential Steps Before Rolling Back WordPress
- Creating a Full Site Backup Before Rolling Back WordPress
- Creating a Staging Site for WordPress Downgrade
RELATED: LEARN HOW TO CREATE AUTOMATED BACKUPS WITH WP STAGING
Disabling Plugins and Themes
Managing extensions, particularly plugins, can complicate the situation. To simplify the troubleshooting process, it is recommended that you deactivate all plugins and themes on your site and keep only one default WordPress theme active.
You can achieve this by accessing your wp-admin dashboard or, if necessary, utilizing FTP to rename the respective folders within the plugins and themes directories.
Ensure PHP Compatibility Before Commencing
Downgrading PHP may sometimes be necessary, but this decision ultimately lies with your web host as it is part of their setup. Your control over this process will be limited. Certain web hosts provide options to set the PHP version through your hosting dashboard or cPanel, while others may require you to contact their support team for assistance.
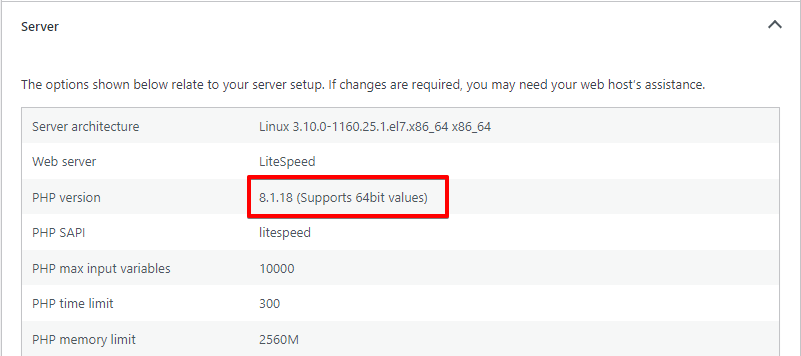
To determine your site’s currently enabled PHP version, navigate to your wp-admin dashboard’s "Tools" section and access the "Site Health" feature.
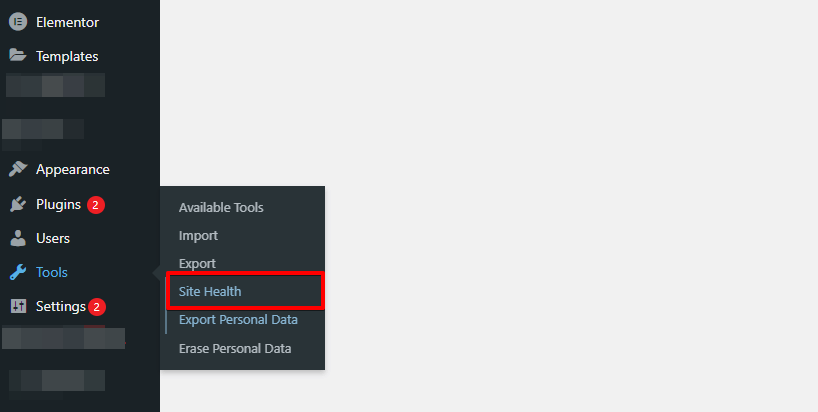
Once you are in the "Site Health" section, select the "Info" tab and scroll down to the "Server" section. Expand this section by clicking on it; the PHP version is indicated. Note this value for reference.

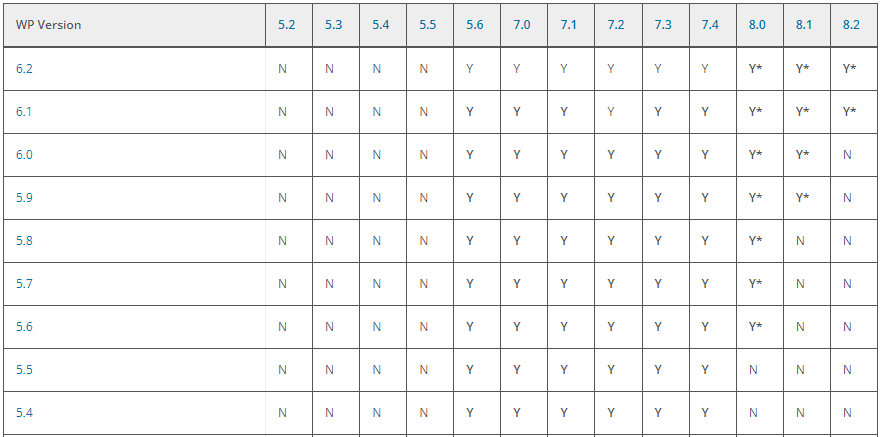
Afterward, refer to the support version chart to confirm the compatibility of your desired WordPress version with the PHP version installed on your site.
Manual WordPress Downgrade using FTP
The process of manually reverting a WordPress version closely resembles a fresh installation. The steps for utilizing FTP and cPanel share significant similarities, allowing us to consolidate the instructions into a single section for your convenience.
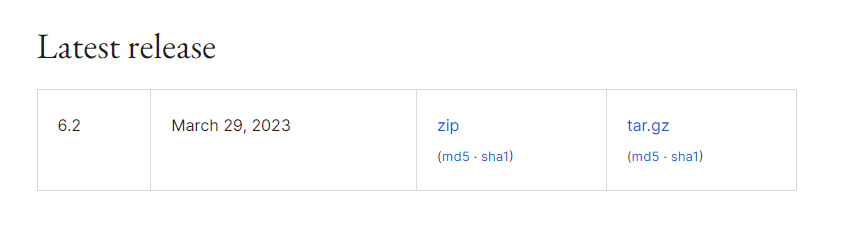
- Begin by downloading the specific version of WordPress that you intend to downgrade to from the official WordPress website. In this tutorial, we will install a server with PHP 8.2, making WordPress version 6.2 our target for the downgrade process.
- After downloading the file, proceed to extract its contents on your computer. Within the extracted files, you will find a folder labeled "Wordpress."

- Utilize an FTP client such as FileZilla to establish a connection with your website’s server. Upon successful connection, you will be presented with two panes: the left pane represents the file explorer for your local computer, while the right pane represents the file explorer for your site’s server.
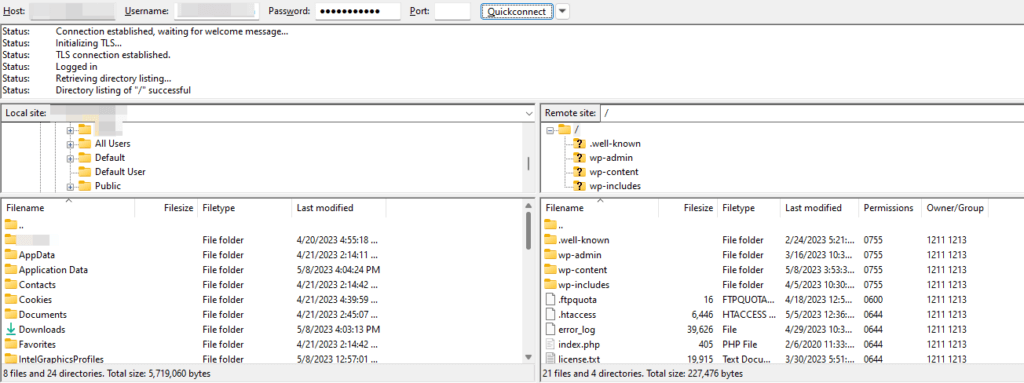
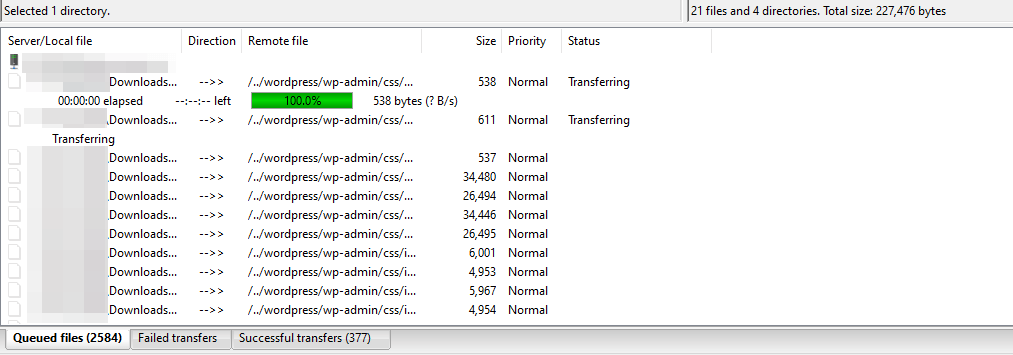
- Proceed to locate the directory containing the extracted WordPress installation within the FTP client. From the left pane representing your local files, select the "wordpress" directory and drag it to the right pane representing your site’s server. This action will initiate the copying process, which may take a few minutes to complete due to the relatively slower transfer speed of the FTP protocol. Exercise patience during this step.
- After successfully transferring the directory, navigate to your server’s root directory, where WordPress is installed. Typically, this directory is named "public" or "public_html." However, your specific setup may vary. For instance, the root directory in our example is "migratetester.dreamhosters.com."
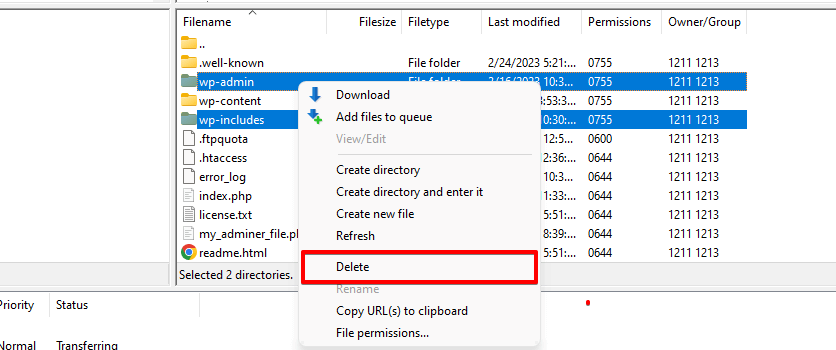
- In the root directory, locate and delete the "wp-admin" and "wp-includes" directories.
- Return to the "wordpress" folder and relocate the "wp-admin" and "wp-includes" directories to the root directory.
- Consolidate the remaining loose files within the "wordpress" directory and transfer them to the root directory. Do not modify or move the "wp-content" folder and the "wp-config" file, as they should remain unaffected.
- Proceed to access the
wp-includesdirectory and locate theversion.phpfile. Take note of the number indicated for the$wp_dbvariable. Subsequently, access your site’s database and locate thedb_versionvalue within thewp_optionstable. If these values differ, update the database value to match the one specified in theversion.phpfile. Save the changes and exit the database interface.
Conclusion
While reverting to a previous version of WordPress may seem daunting at first, it is a manageable task with the proper knowledge and precautions. Following the steps outlined in this blog post, you can successfully roll back your WordPress installation and restore your website to a stable state.
Remember always to have a backup, address the root cause of the issue, and strive to stay up to date with the latest version of WordPress to ensure a secure and optimized website. TRY WP STAGING!
Lastly, if you’re not confident performing a WordPress rollback yourself, consider seeking assistance from a professional or reaching out to the WordPress community for guidance. They can provide expert advice and help you navigate the process safely.