When website owners forget to renew their SSL certificates, it can lead to severe issues such as data breaches, legal non-compliance, and decreased website traffic.
Many owners mistakenly believe that SSL certificates are a one-time setup, a common misunderstanding due to their lack of technical expertise. They often rely on freelance developers for SSL installation. Once installed, they lose track of the certificate’s expiration date because they don’t communicate with the developer regularly.
To avoid this issue, it is crucial to learn how to check your SSL certificate’s status and renew it before it expires.
Contents
Why Renewing SSL Certificate is Essential?
SSL certificates typically expire after one to two years, depending on the type and issuing authority. For example, Let’s Encrypt offers certificates that last only 90 days. When an SSL certificate expires, it can’t simply be extended; it must be replaced with a new one, often called a “renewal” certificate.
Here are two main reasons why renewing your SSL certificate is essential:
- Updated Security: A new certificate ensures that your website’s encryption meets the latest security standards.
- Enhanced Protection: Regularly changing your SSL certificate makes it harder for hackers to exploit.
Additionally, an expired SSL certificate can harm your website’s credibility.
- Loss of Visitor Trust – New visitors are likely to avoid your site due to security warnings, and even loyal users may question its safety, suspecting it might be hacked.
- Decreased Traffic – The warning message can deter visitors, leading to a drop in traffic.
- Unsecured Data – Without a valid SSL certificate, data between your site and users is not encrypted, making it vulnerable to hackers. This compromises the security of your website and your users’ information.
Similarly, failed SSL leads to many technical errors in your WordPress:
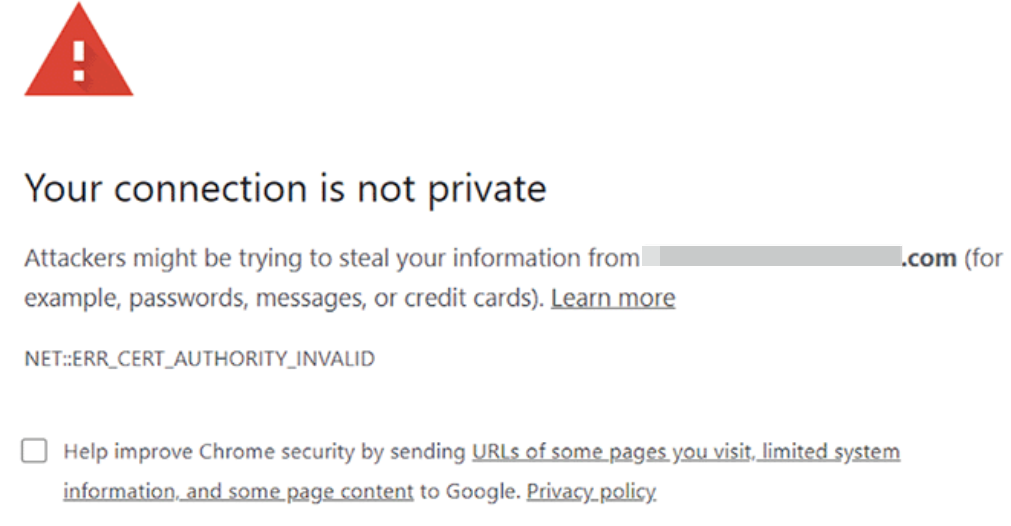
- NET::ERR_CERT_INVALID
- Your Connection is Not Private
- Mixed Content Issues
- This Site Ahead Contains Harmful Programs
- HSTS Missing From HTTPS Server
Visitors may see a warning message when accessing your site, which can drive them away. To keep your site secure and maintain trust with your visitors, renew your SSL certificate promptly.
How to Renew Your SSL Certificate – Automatically
Most WordPress hosting providers include a free SSL certificate with domain hosting. These certificates are often automatically renewed, and you will receive email notifications when renewal time approaches.
However, you can also renew your SSL certificate manually through your hosting provider’s control panel. Here’s a general guide:
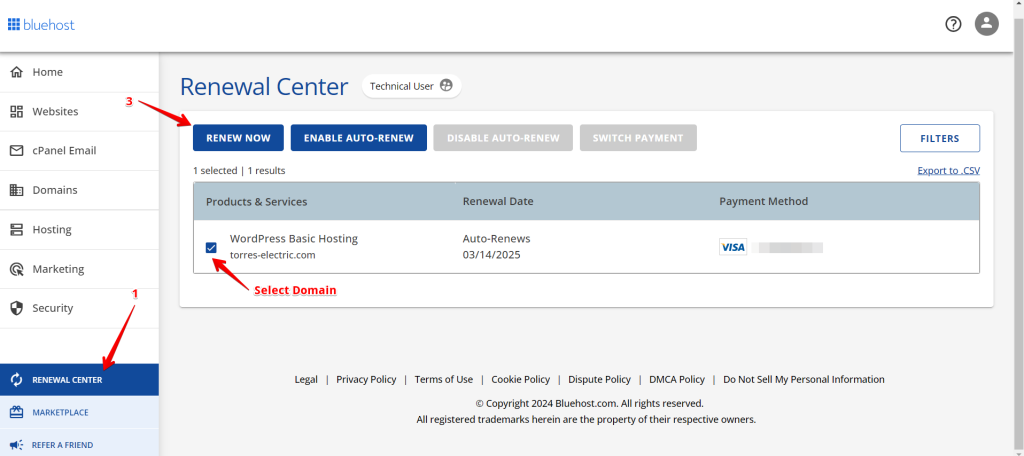
- Access the Renewal Section: Log in to your hosting account and navigate to the renewal section. For example, in Bluehost, you can find this in the ‘Renewal Center’ on the left menu.
- Renew the Certificate: Click the ‘Renew Now’ button and proceed with the checkout process. You can renew the certificate for multiple years.
- Set Up Auto-Renewal: If available, consider setting up auto-renewal to avoid manual renewals in the future.
The exact process may vary slightly depending on your hosting provider, but these steps provide a general overview of renewing your SSL certificate.
Initiating a Certificate Signing Request
A Certificate Signing Request (CSR) is an encrypted text block used to apply for a new SSL certificate. It contains vital details about your site, such as your domain name, organization name, and geographic information. The CSR looks like a coded message that your Certificate Authority (CA) uses to verify your information and issue your SSL certificate.
Your CSR will appear like this:
-----BEGIN CERTIFICATE REQUEST-----
MIIByjCCATMCAQAwgCCCCzAJBgNVBAYTAlVTMRMwEQYDVQQIEwpDYWxpZm9ybmlh
MRYwFAYDVQQHEw1Nb3VudGFpbiBWaWV3MRMwEQYDVQQKEwpHb29nbGUgSW5jMR8w
HQYDVQQLExZJbmZvcm1hdGlvbiBUZWNobm9sb2d5MRcwFQYDVQQDEw53d3cuZ29v
Z2xlLmNvbTCBnzANBgkqhkiG9w0BAQEFAAOBjQAwgYkCgYEApZtYJCHJ4VpVXHfV
IlstQTlO4qC03hjX+ZukhrYd1Q4+qbAeTwXmCUKYHThVRd5aXSqlPzyIBwieMZr
WFlRQddZ1IzXAlVRDWwAo60KecqeAXnnUK+5fXoTI/UgWshre8tJ+x/TMHaQKR/J
cIWPhqaQhsJuzZbvAdGA80BLxdMCAwEAAaAAMA0GCSqGSI98DQEBBQUAA4GBAIhl
4PvFq+e7ipARgI5ZM+GZx6mpCz44DTo0JkwfRDf+BtrsaC0q68eTf2XhYOsq4fkH
Q0uA0aVog3f5iJxCa3Hp5gxbJQ6zV6kJ0TEsuaaOhEko9sdpCoPOnRBm2i/XRD2D
6iNh8f8z0ShGsFqjDgFHyF3o+lUyj+UC6H1QW7bn
<br>
-----END CERTIFICATE REQUEST-----
How to Renew Your SSL Certificate – Manually
Follow these professional yet straightforward steps to renew and replace your SSL certificates when they expire manually. Remember, the specific instructions can vary depending on your SSL certificate provider, so always refer to their documentation or contact support for precise guidance.
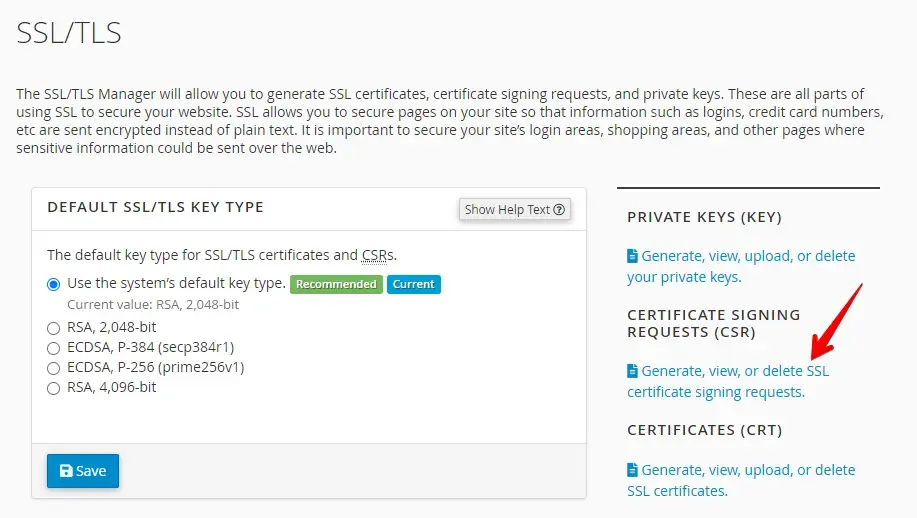
- Log in to your cPanel account using your username and password.

- From here, look for the ‘SSL/TLS’ option and click on it.
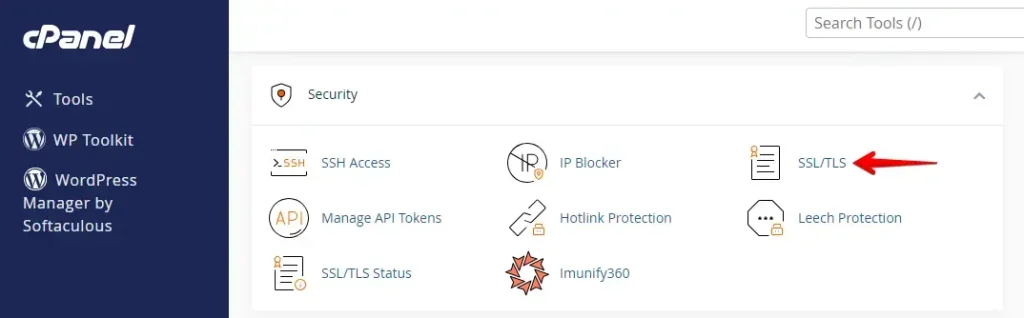
- In the next step, find and click on the link for ‘Certificate Signing Requests (CSR)’. A CSR, or Certificate Signing Request, is a secure file created by your server. It contains key information about your domain and is necessary for applying for an SSL/TLS certificate.
After generating the CSR, please submit it to a Certificate Authority (CA). The CA will verify the details and issue your SSL certificate upon approval.
In this step, you must fill in some essential information in these fields: ‘Domain(s)’, ‘City,’ ‘State,’ ‘Country,’ and ‘Company‘.
Include an email address for domain ownership verification. Optionally, you can set a passphrase to verify your identity as the website owner. After completing these fields, click ‘Generate’.
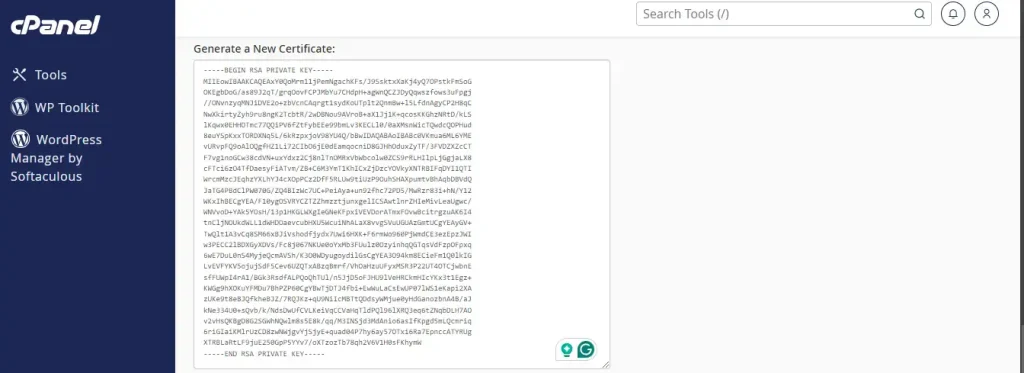
You will receive a success message indicating that the Certificate Signing Request (CSR) has been created. The CSR is an encrypted text block containing the necessary information for the Certificate Authority (CA) to issue your new SSL certificate.
Copy and save this code, as you’ll need it to renew your certificate.
You will also see a decoded version of the CSR, which includes details like your domain name, organization name, and location. Keep this information for your records.
Buying and Activating Your SSL Certificate
After generating your CSR, you can purchase a new SSL certificate from your Certificate Authority (CA) or another provider. Follow the instructions provided, including submitting the CSR you created earlier.
Verify Domain Ownership through Domain Control Validation
Activating your SSL certificate requires another step called Domain Control Validation (DCV). This process ensures that you own the domain for which you request SSL protection.
Your Certificate Authority (CA) will provide several options for this validation, commonly offering email verification. They will email the address associated with your domain; follow the instructions to complete the DCV.
If you have organization-validated or extended validation certificates, you’ll need to submit extra documentation to verify your identity and ownership of the domain.
Install Your New SSL Certificate
To install your new SSL certificate, follow these steps:
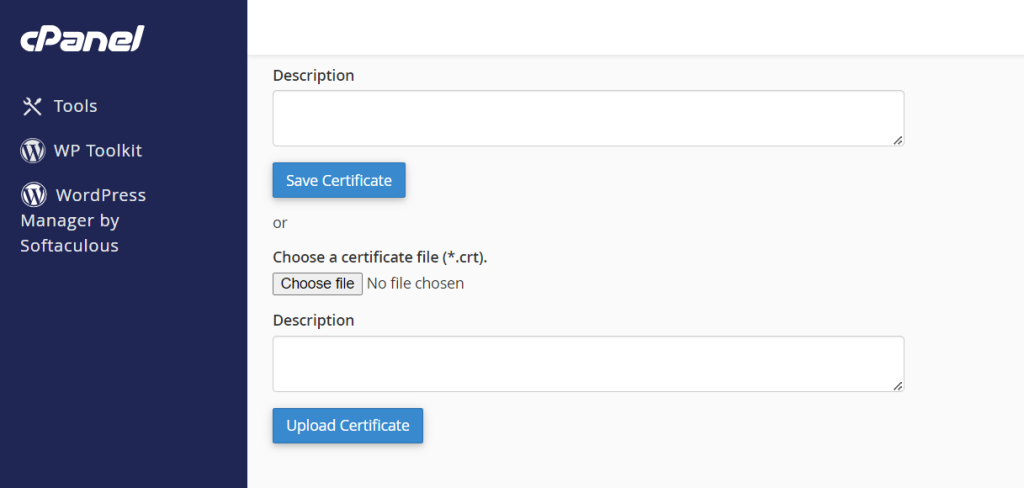
- Navigate to Certificates (CRT): In your control panel, find and click on the “Certificates (CRT)” section.
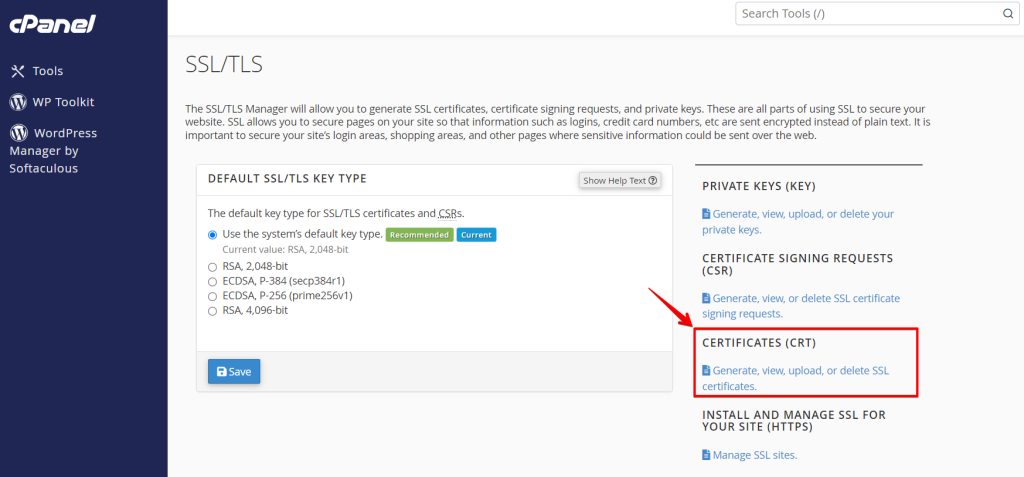
- Manage SSL Certificates: Select “Generate, view, upload, or delete SSL certificates”.
- Upload or Paste Certificate: You can paste the certificate code you received from the Certificate Authority (CA) into the provided text box or upload the CRT file directly.
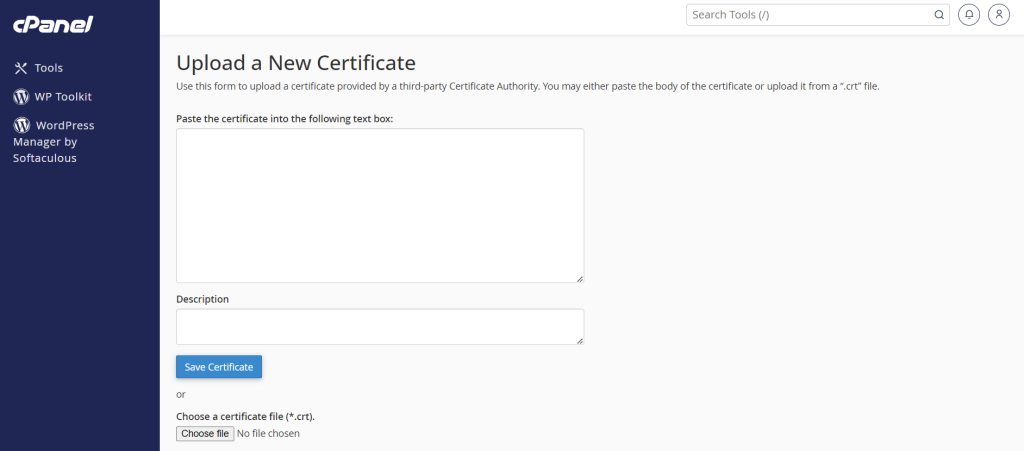
- Optional Description: You can add a description for your SSL certificate to help you identify it later.
- Complete the Installation: After uploading, click the “Upload Certificate” button to finalize the process.
After installation, your new SSL certificate should be active on your site. To check if it is working properly, visit multiple pages on your site and see if they have HTTPS in the URL.
Conclusion
Renewing your SSL certificate is a crucial task that ensures your website’s continued security and trustworthiness.
You can protect your site and visitors by setting reminders, choosing between automatic or manual renewal, and following the correct steps to install and activate your new certificate.
Taking these steps safeguards your data and helps maintain your site’s reputation.