Note: This article was originally published on April 19, 2024. In the meantime, it might be that the features of WP Staging or UpdraftPlus changed, so we can not guarantee the accuracy of the described features.
WP Staging and UpdraftPlus are renowned WordPress plugins for website backup, migration, and staging.
While UpdraftPlus is more focused on backup and migration. WP Staging is a full-fledged plugin that offers an all-in-one solution.
This article is all about WP Staging vs UpdraftPlus. We compared both plugins with several key factors contributing to running your site operations smoothly.
Contents
WP Staging vs. UpdraftPlus: Who’s the Best in 7 Key Areas
We analyzed both plugins for seven pivotal factors.
- Key Features
- Ease of Use
- Exploring Backup and Restore Options
- Comparative Analysis
- One-Click Cloning
- Cost Comparison
- Pros & Cons
In a Nutshell
Let’s start from scratch and see what each plugin offers. We’ll check out the main goodies “WP Staging” and “UpdraftPlus” bring to the party.
| Feature | WP Staging | UpdraftPlus |
| One-Click Backup | Yes | Yes |
| Backup Options | Yes | Yes |
| Backup Schedules | Yes | Yes (Premium) |
| Backup to Cloud Storages | Yes (PRO) | Yes |
| One-Click Cloning | Yes | Yes (Premium) |
| Create Multiple Clones | Yes (PRO) | Yes (Premium) |
| Files & Folders & Selection | Yes | Yes |
| Multisite support | Yes | Yes(Premium) |
| User interface | Easy | Technical |
| Renewal cost | Low | High |
1. Key Features
This chapter looks at what both plugins offer for free and what you get if you pay for them.
WP Staging
WP Staging stands out from other WordPress backup and cloning tools because it’s excellent at creating staging sites for any website, big or small. With over 90,000 active users and a 4.9-star rating on WordPress.org, it’s clear that people love it.
While some plugins focus mainly on making backups easy, WP Staging puts a lot of effort into providing excellent staging features. The best part? It’s user-friendly, so you can manage your WordPress site without dealing with confusing code.
Free
- Quick Backup: Make unlimited backups with a click.
- Scheduled Backups: Set one daily backup at a fixed time.
- One-Click Cloning: Easily create unlimited staging sites.
- Restore Backup: Restore to the original domain and host.
- Backup Retention: Keep one backup at a time.
Pro
- Push Staging Site: Easily move staging site changes to the live site.
- Restore Anywhere: Restore backups to different domains and hosts.
- Backup Storage: Store backups on Amazon S3, Google Drive, and more.
- Unlimited Scheduled Backups: Backup database and site hourly, daily, or weekly.
- User Access Control: Give specific users access to staging sites.
- Email Backup Reports: Get notified of any backup errors via email.
- Simple Migration: Move WordPress to new servers or domains.
UpdraftPlus
UpdraftPlus is a popular WordPress plugin with over 3 million users. It helps you backup, restore, and move your website quickly. Even if you’re new, its simple interface lets you manage your site without any tricky coding.
Free
- Manual and scheduled backups
- Migrate to a new URL or host
- Easy restore from the WordPress dashboard
- Backup of your website’s files and database
- Remote storage options (e.g., Google Drive)
Premium
- Backup only what’s changed with incremental backups.
- Automatically backup before making updates.
- Protect your backups with passwords.
- Choose from remote storage options like Amazon S3, FTP/SFTP, and Microsoft Azure.
- Securely backup WordPress core and other files.
- Support multisite networks seamlessly.
- Keep your data safe with encryption.
- Restore backups from various other backup plugins with ease.
2. Ease of Use
WP Staging
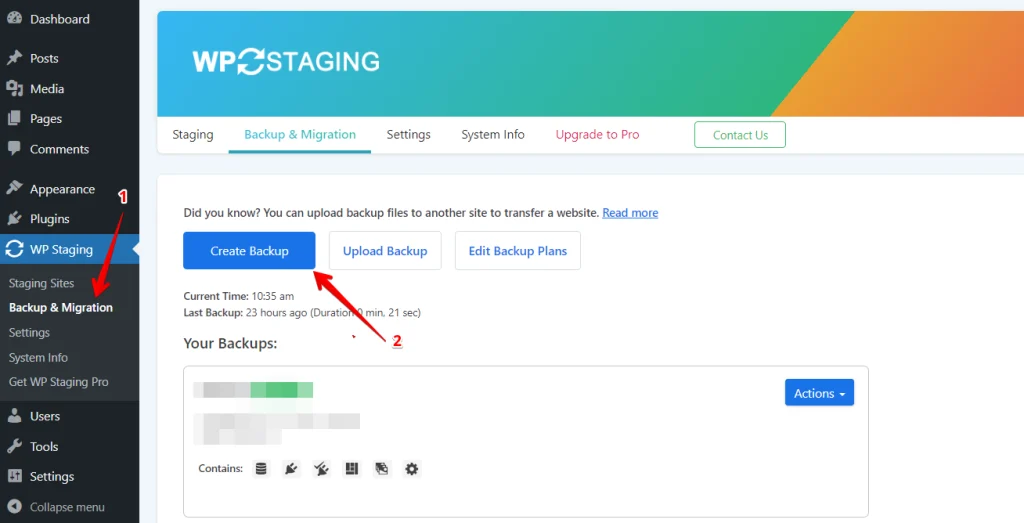
Just go to Wp Staging » Backup & Migration » Create Backup, name your backup, and choose where to store it:
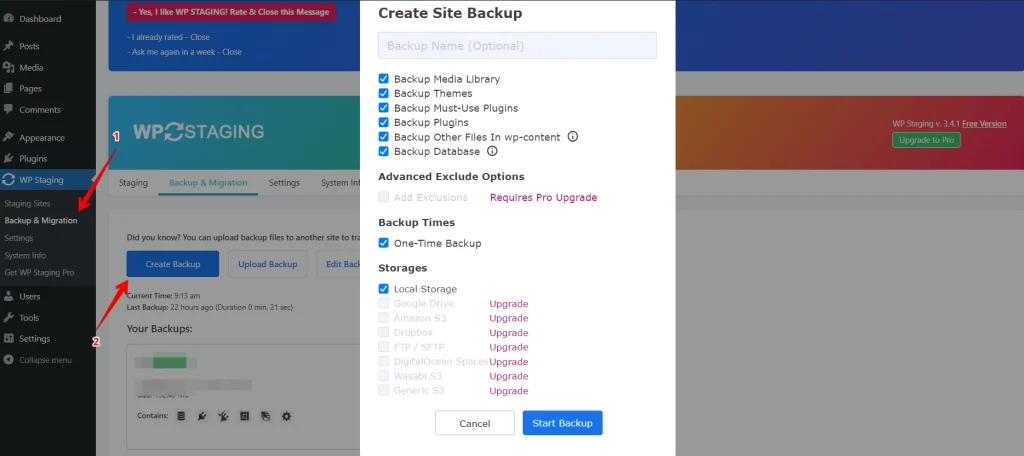
If you don’t want to keep your backup on your server, WP Staging lets you save it to different online storage places, like:
- Google Drive
- Amazon S3
- Dropbox
- FTP / SFTP
- DigitalOcean Spaces
- Wasabi S3
- Generic S3
With WP STAGING, you can save time and effort by setting up automatic backups. Remember to back up after each change – your website always stays safe. Give WP STAGING a try today!
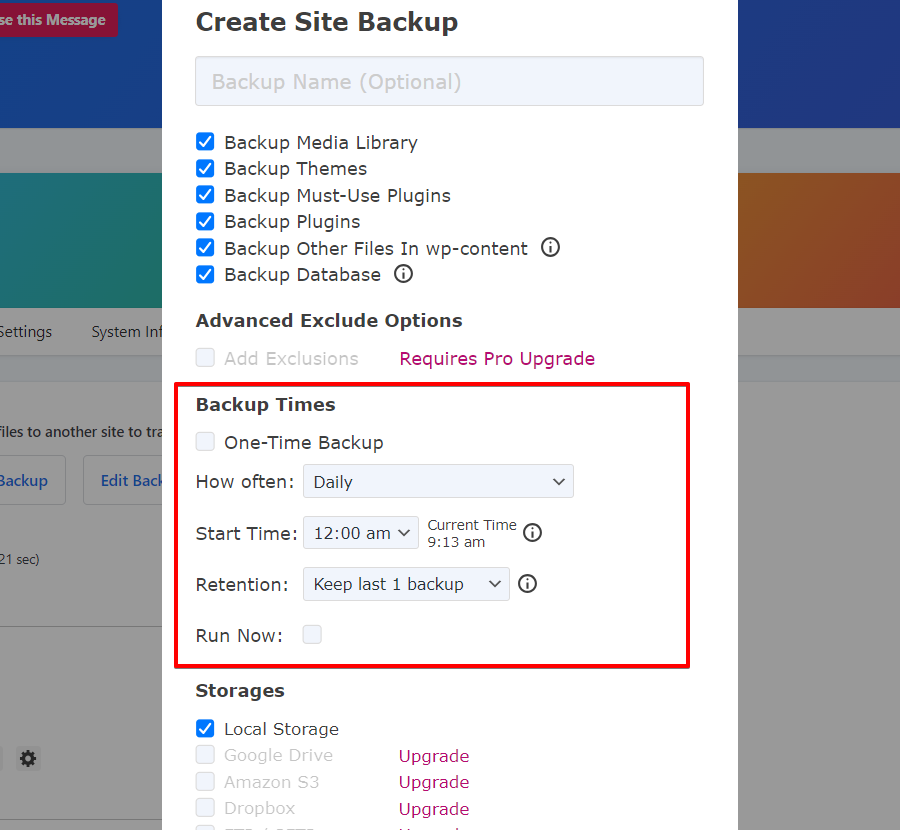
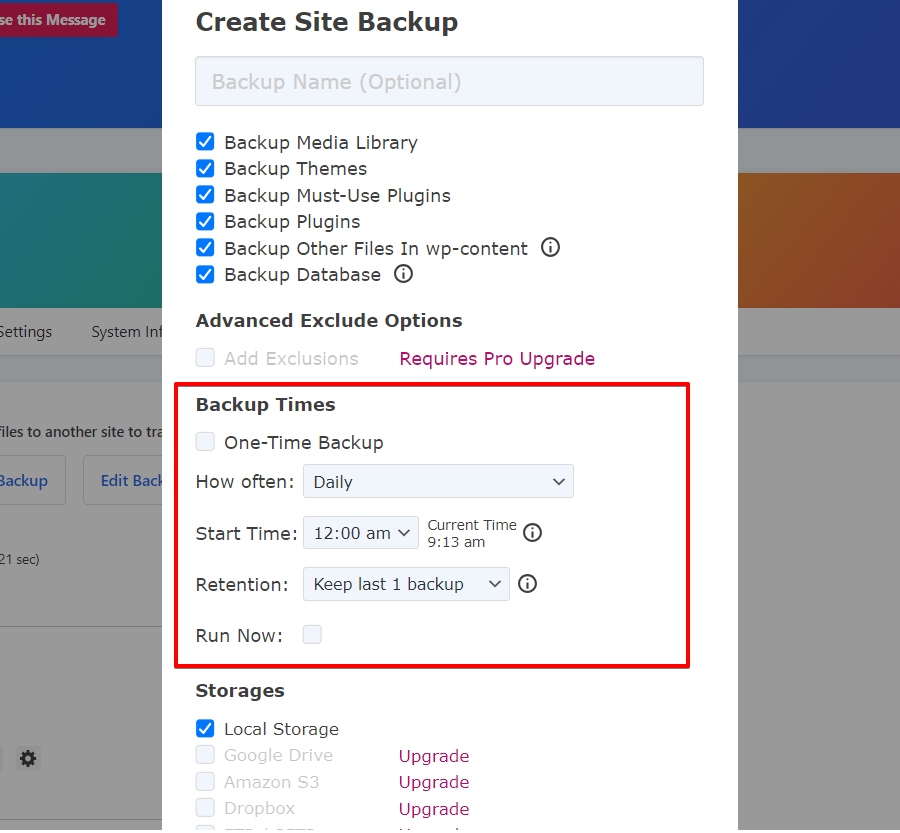
Just click “Create Backup,” uncheck “One-Time-Only,” then pick how often you want backups, when they should start, and how many to keep. It’s as simple as that!
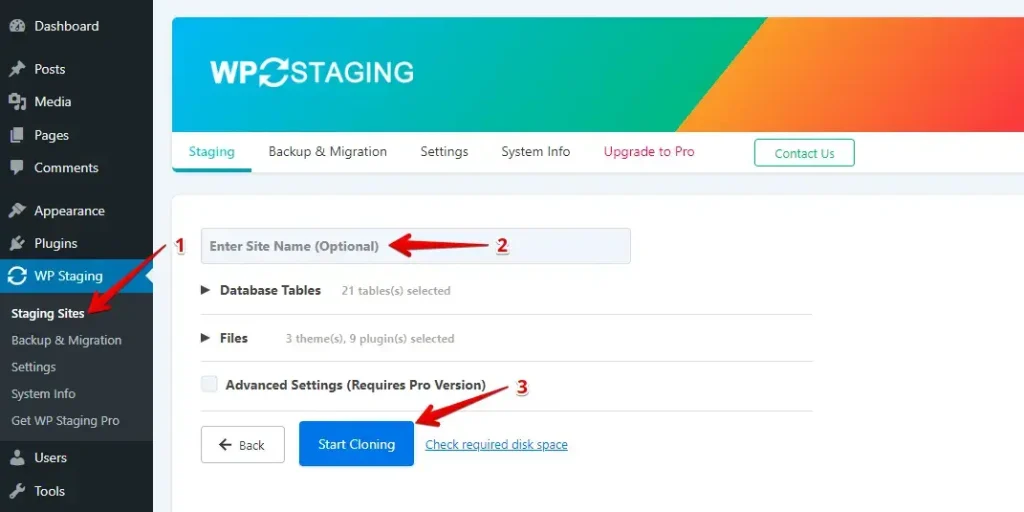
With WP Staging, making a copy of your live WordPress site for testing is as simple as clicking a button. This way, you can try out changes or new stuff without any risk of messing up your leading site. Handy, right?
UpdraftPlus
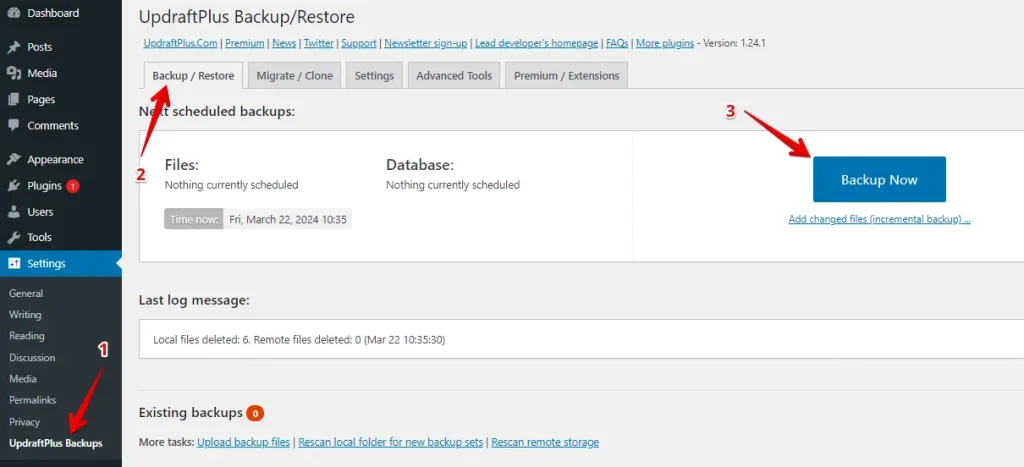
Once you’ve installed the plugin, head to the “Backup/Restore” section under “UpdraftPlus Backups” in your settings menu.
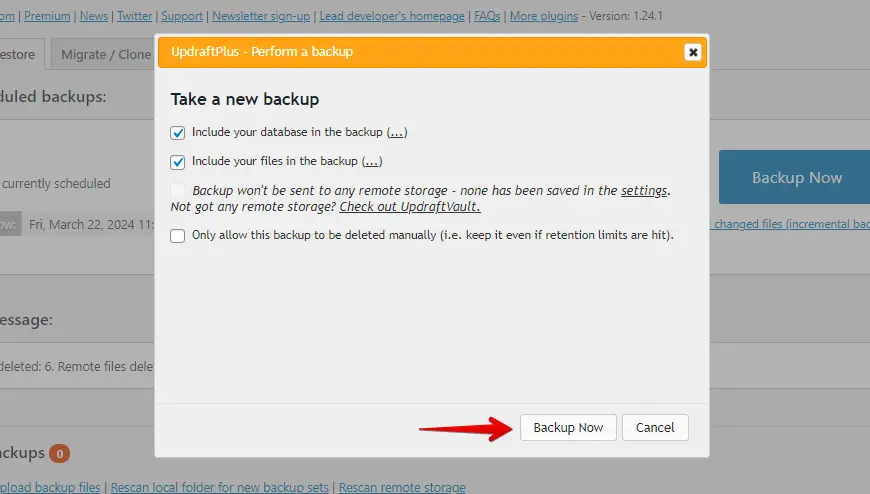
Next, you’ll see a few options to tailor your backup. If you prefer, you can exclude either the database or your WordPress files.
Once you’ve made a backup, you’ll find it listed under “Existing backups.”

You can choose how to download your backup. You can save copies of your database, plugins, themes, or uploads.
3. Backup and Restore Options
WP Staging
WP Staging makes it super simple to create backups of your WordPress site with just one click. It’s a fast fix for issues like site glitches or losing data.
Here’s how to easily backup your site:
- Go to the left menu and click ‘WP Staging.’
- Then, pick ‘Backup & Migration’ and hit ‘Create Backup.’
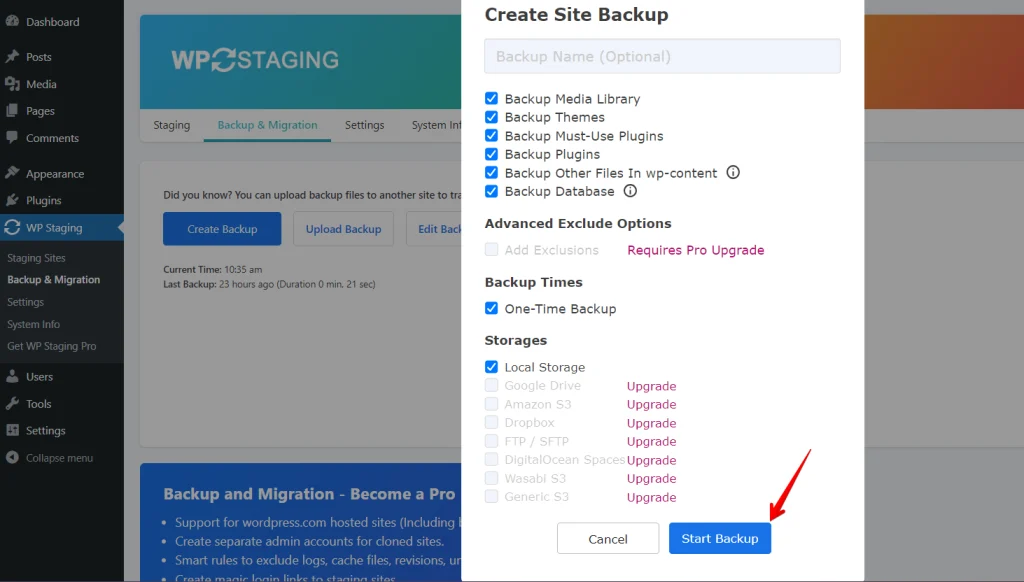
A window will pop up with options. Just uncheck everything except if you’re only backing up your themes or plugins. With WP Staging, you can easily save your backups on Amazon S3, Google Drive, Dropbox and others.
Note: Storing backups in cloud storage requires the Pro version of WP Staging.
Select where to save, link it to your account, and hit “Start Backup” to get started.
Restore
Next, let’s talk about restoring. There’s a button with different choices, such as downloading, restoring, and more. If you want to keep the backup on your computer, just click download. When it’s time to use the backup, hit restore.
Note: To restore a backup, you’ll need the WP Staging Pro version.
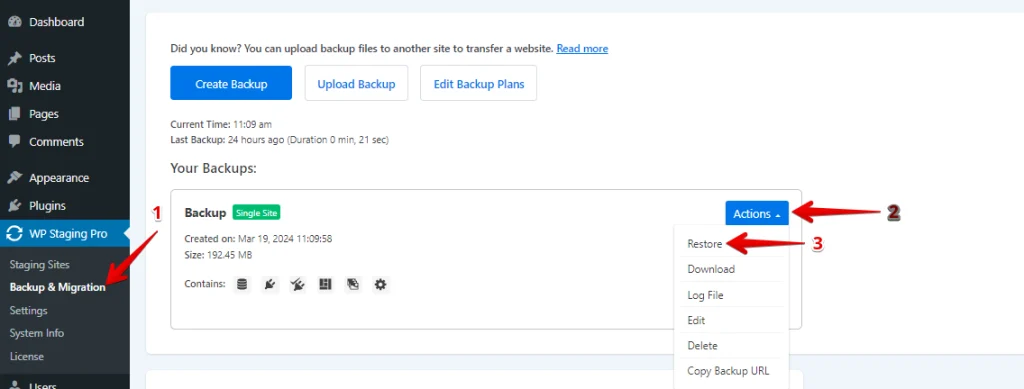
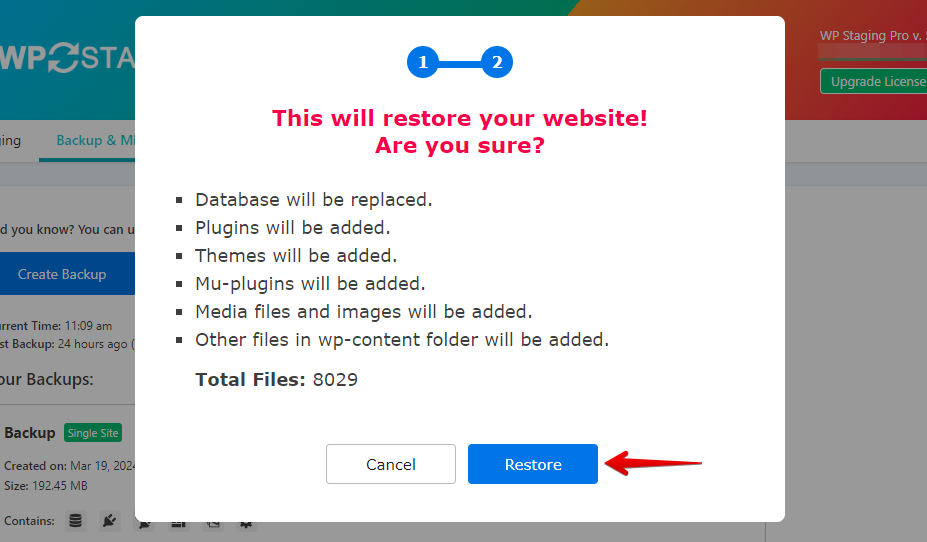
Click the “Restore” button, and a popup will appear. Inside are two options: “Cancel” and “Next.” Press “Next” to proceed.
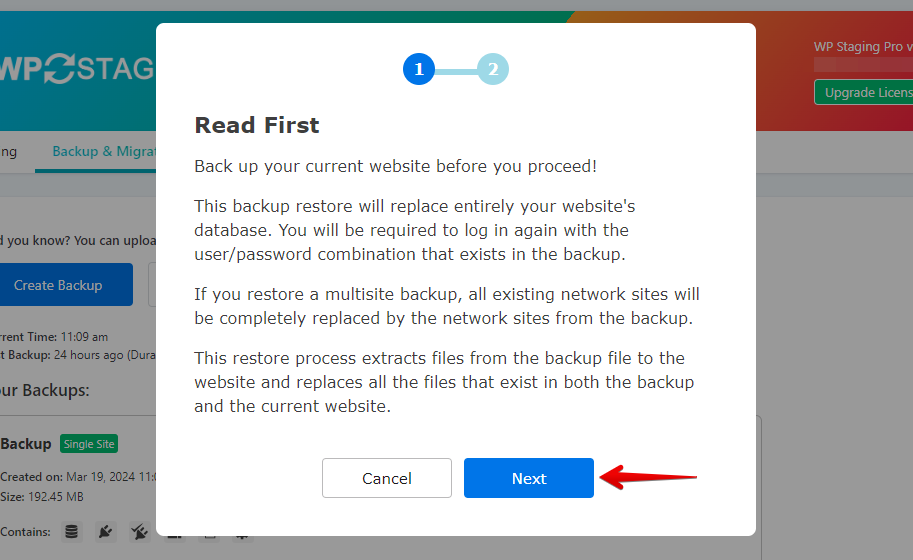
Once you click “Next,” another window will appear. From there, click “Restore” to begin the restoration process.
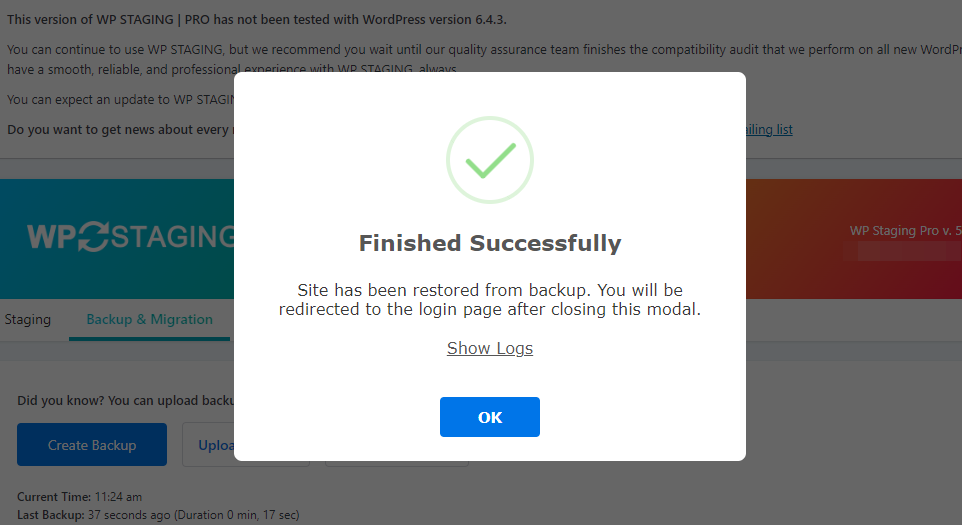
In the following popup, you’ll get a message that says the restoration has been completed.
Find a more detailed guide in this article.
Scheduling Automatic Backups
With WP STAGING, you can make life easier by automating your backups. No more manual backups every time you make a change. Now you can relax, knowing your site is always backed up.
Click “Create Backup,” skip the “One-Time-Only” option, and then pick how often you want backups, when to start, and how many to keep. It’s that easy.
UpdraftPlus
Click on ‘Settings’ in the left menu. Then, click ‘UpdraftPlus Backups’ and press the ‘Backup Now’ button.
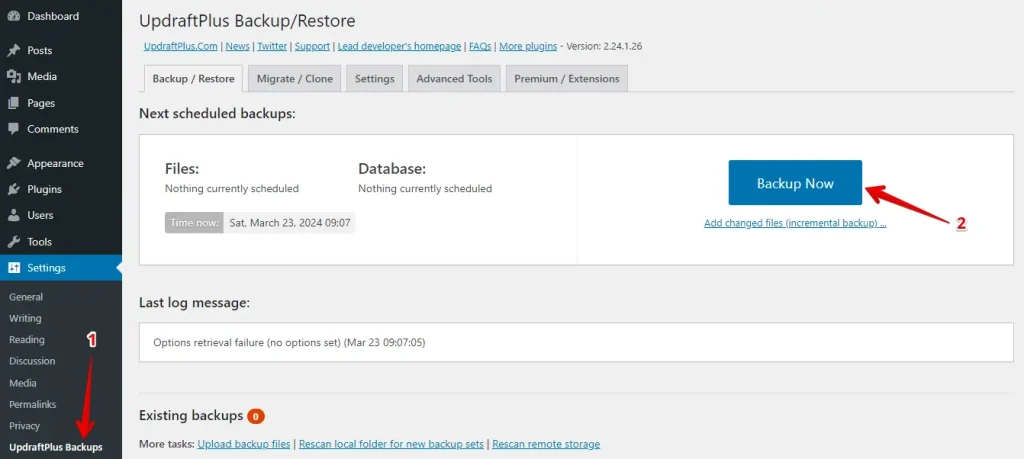
If you want to exclude a database or file from your backup, uncheck the checkbox; otherwise, click the “Backup Now” button.

Restore
UpdraftPlus can restore your backup directly from the WordPress admin dashboard. Just click on ‘Restore’ next to your latest backup.

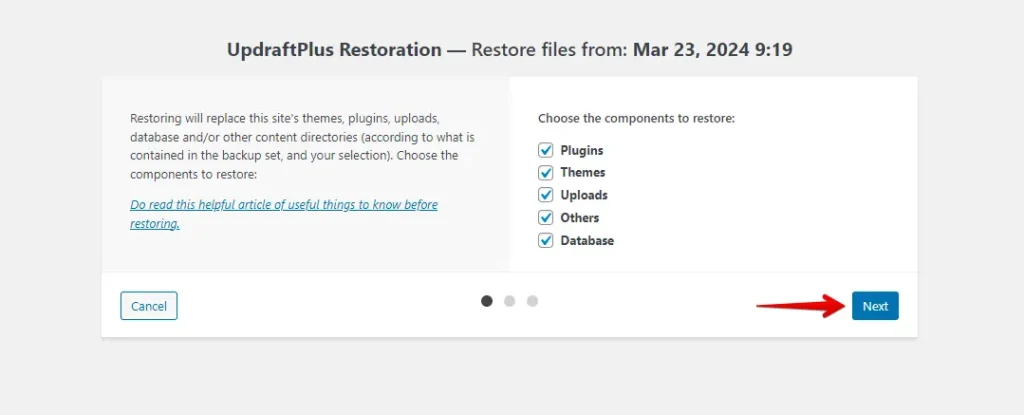
Next, choose what data you want to bring back. UpdraftPlus lets you uncheck any plugins, themes, uploads, or database details you don’t want to restore, then click the Next button.
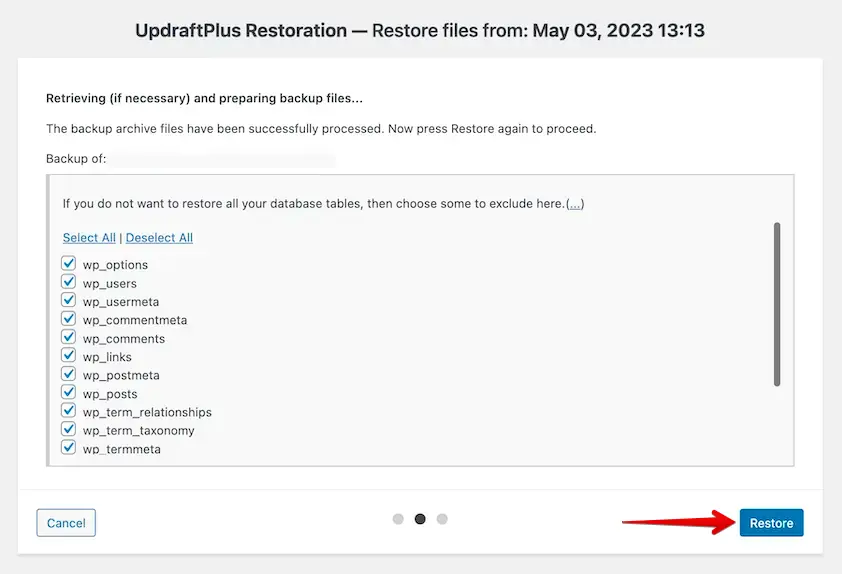
You can select which database tables to exclude from the restoration. After doing so, click on ‘Restore’ once more.
Now, UpdraftPlus will begin restoring your backup and will let you know when it’s completed.
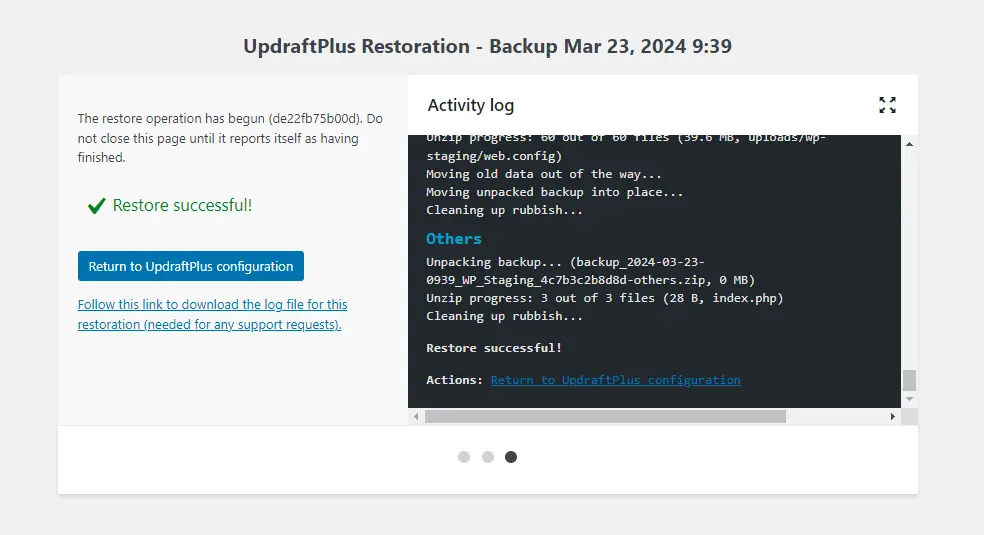
Click ‘Return to UpdraftPlus configuration’ to return to your restored WordPress dashboard.
4. One-Click Cloning
WP Staging
WP Staging makes cloning your WordPress site easy with just one click. This means you can test new stuff without messing up your leading site. Here’s how to get it done fast:
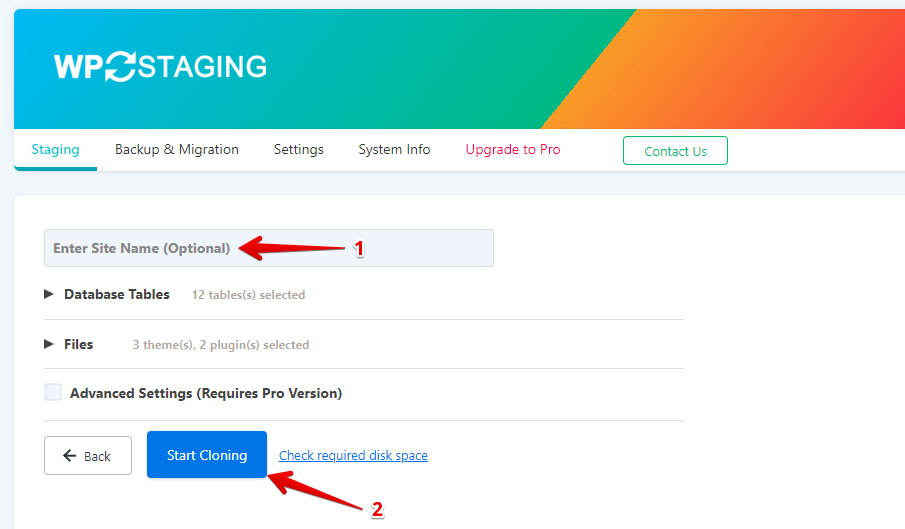
In WP Staging, find “Staging Sites,” click on it, and then press the “Create Staging Site” button.
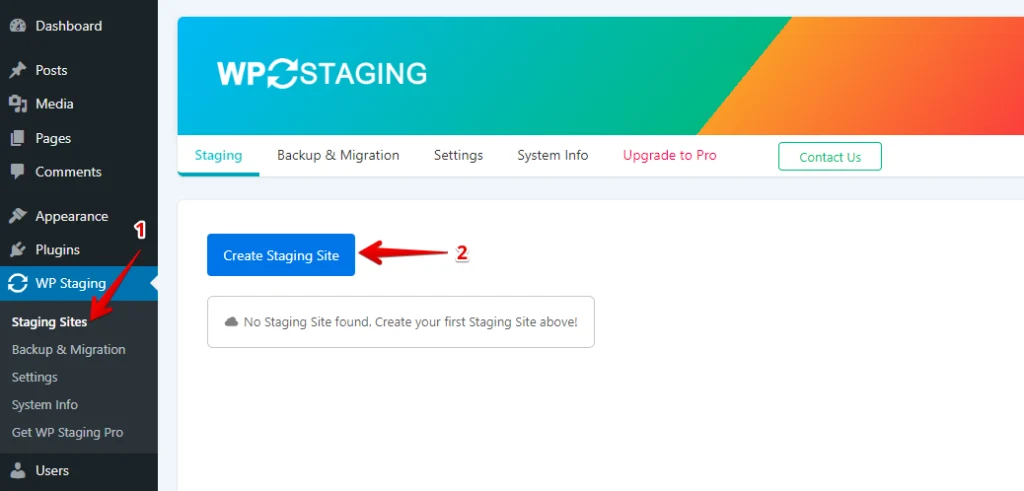
Next, enter the name of your staging site and skip any tables or files you don’t want. Check out Advanced Settings for extra tweaks, then click “Start Cloning” to finish.
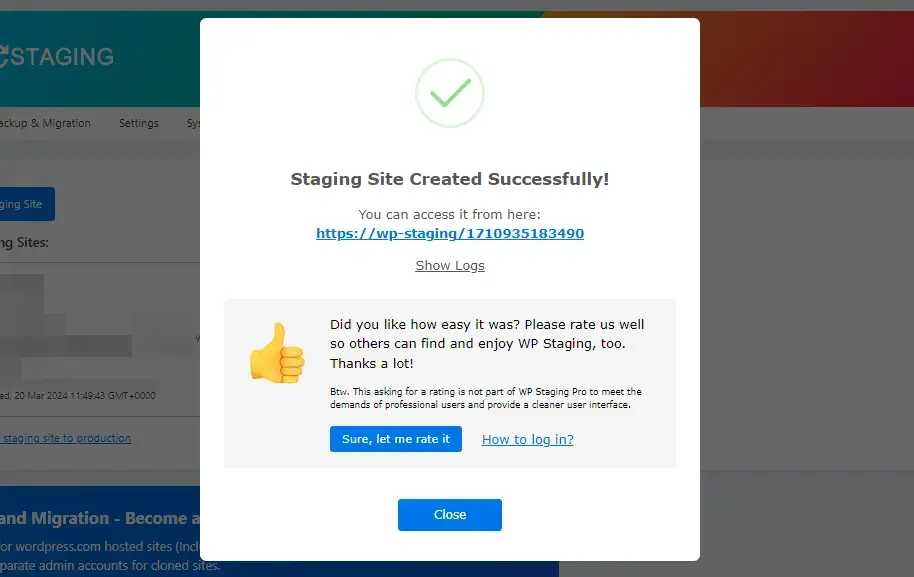
Finally, a popup will appear, letting you know your staging site is ready to use.
Push Changes
Once you’ve tested changes on your staging site, transferring them to your live site is crucial. Here’s a straightforward guide on how to do this with WP Staging:
Note: To push changes from Staging Site to Production Site, you’ll need the WP Staging Pro version.
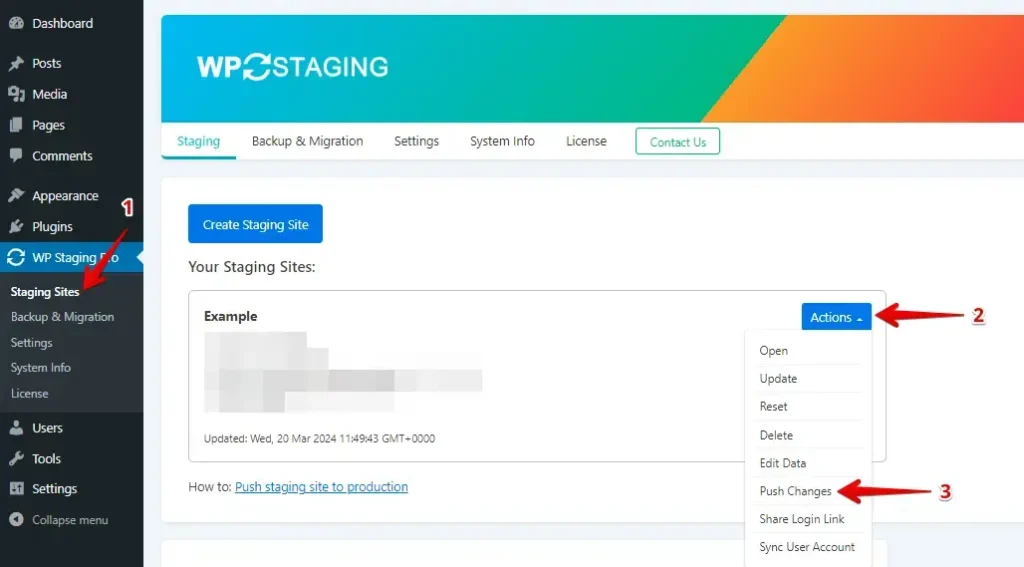
Navigate to the “Push Changes” option within the staging site area and activate it. This initiates the process of transferring your updates to the main site.
After that, if there are any files or database tables you don’t want to add, deselect them and press the “Confirm Push” button.
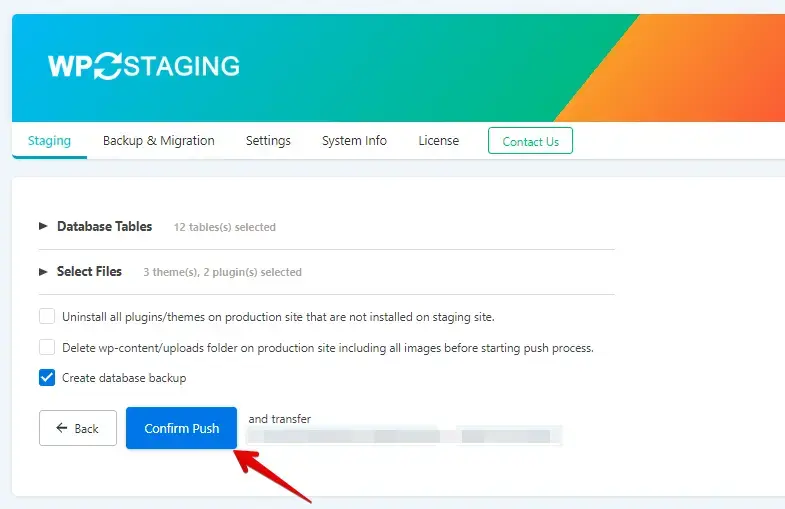
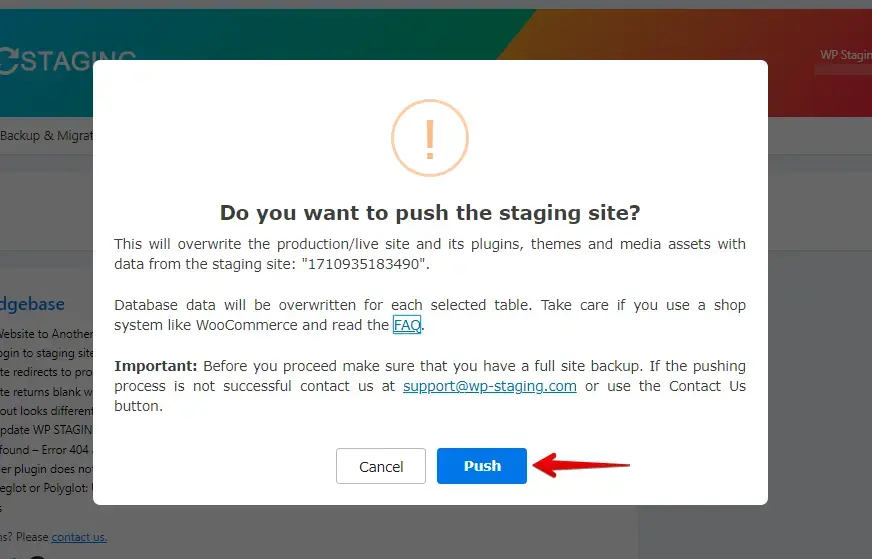
A popup will appear; click the “Push” button within that pop-up.
UpdraftPlus
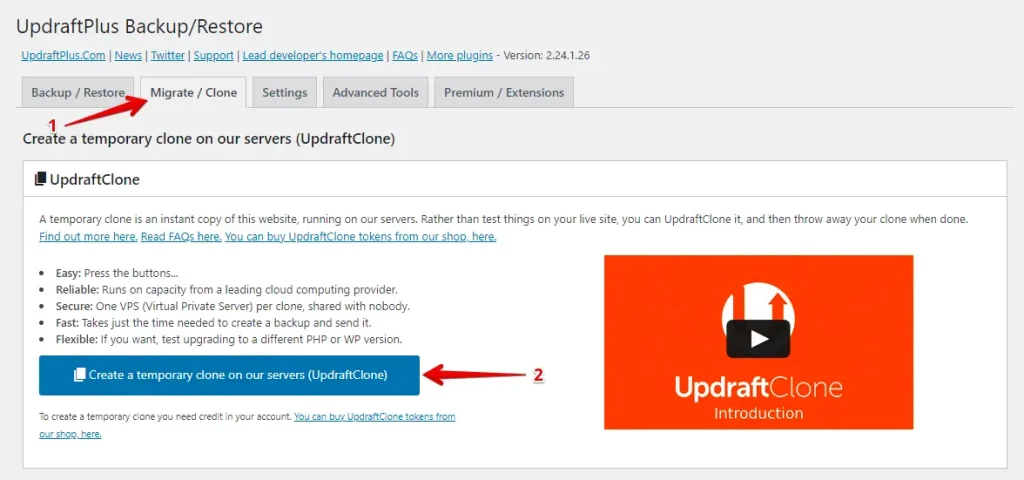
To begin cloning, go to the Migrate/Clone tab in your UpdraftPlus plugin on your original site and click the “Create a temporary clone on our servers” button.
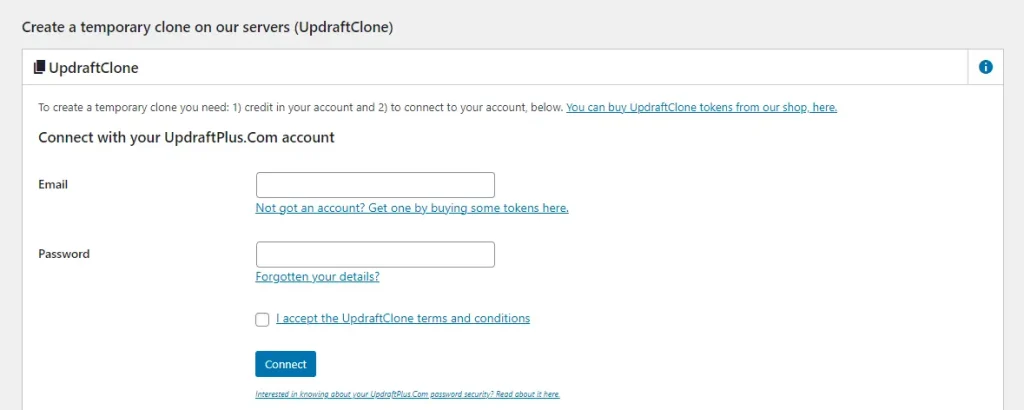
When asked, log in to your UpdraftPlus account. Before you begin, make sure you have UpdraftClone tokens ready in your account.
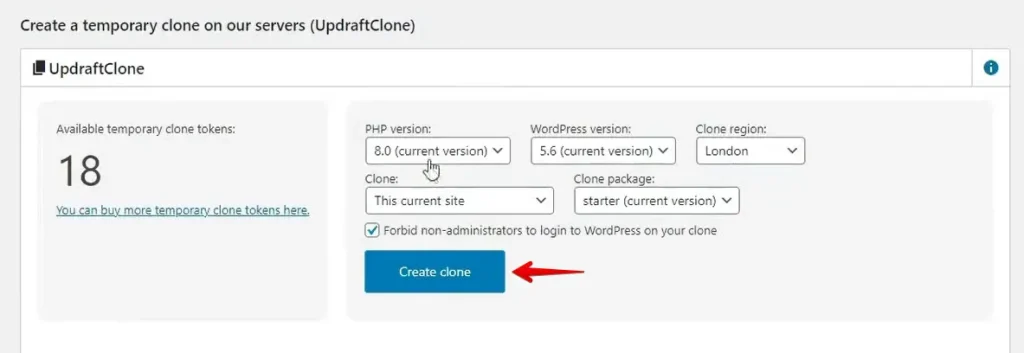
After logging in, you can choose the PHP and WordPress versions, select the clone region, and specify the details of the cloned site you want to make. Once you finish these selections, click the “Create Clone” button.
5. Cost Comparison
WP Staging
WP Staging offers a free plugin with basic features like one-click cloning, backup, and simple scheduled backups for WordPress sites.
The personal license lets you enjoy unlimited backups and restores, freely move your site around, and create as many test sites as you need. Additionally, you can schedule your backups, select specific restore points, and even utilize cloud storage.
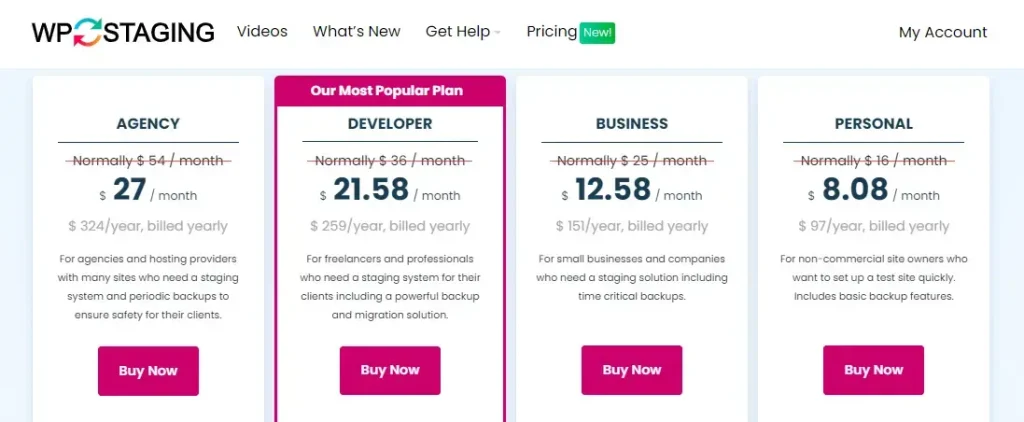
If you have any technical problems with the plugin, don’t stress! A 14-day money-back guarantee covers you. Just be sure to delete the plugin from your site before asking for a refund.
UpdraftPlus
Similar to WP Staging, UpdraftPlus offers a free plugin. This includes backup and restore options and the ability to set automated backup schedules.
However, UpdraftPlus Premium will set you back at least $70 a year. With the basic plan, you get only one token for cloning your site. If you’ll clone your site a lot, you’ll need to grab extra tokens.

7. Pros and Cons
WP Staging – Pros
- Effortless Staging: WP Staging makes it easy to test updates safely.
- Easy to Use: Its straightforward interface is excellent for all skill levels.
- Backup Choices: Offers backups via Google Drive, Amazon S3, SFTP, and Dropbox.
- Supports Multisite: Plans like AGENCY and DEVELOPER are multisite friendly.
- Scheduled Backups: Set up auto backups for peace of mind.
- Affordable Plans: Different plans to fit any budget, often more budget-friendly than competitors.
- SEO Friendly: Prevents search engines from wasting crawl budgets on unfinished changes, boosting rankings.
WP Staging – Cons
- Limited Advanced Features: Unlimited scheduled backups and user sync plans require pro plan.
- User Cap: Most plans support only one user; the AGENCY plan allows two, a constraint for big teams.
UpdraftPlus – Pros
- Easy-to-use interface
- Has a free version
- Comes with migration, cloning, and backup options
- Lets you set automatic backup schedules
- Supports multiple sites
- Offers incremental backups
- Automatically backs up before any updates
UpdraftPlus – Cons
- Backups divided by database, themes, plugins, and uploads
- Missing developer-specific features
- Pricier compared to similar products
- Limited number of UpdraftClone tokens
- Restoration is only possible through the WordPress dashboard
Closing Thoughts
To wrap things up, if you’re looking for a stress-free method to experiment with website changes, WP Staging is your best pick. It’s incredibly user-friendly, ensuring you won’t have to skip complicated steps. It stands out for its ease of use, allowing you to test updates without risking your live site.
So, if simplicity and safety in testing changes are your top priorities, WP Staging is the clear choice. When deciding, consider what’s most important for your website needs!

